|
|
| Line 127: |
Line 127: |
| | | | |
| | ''OK, so your Ardiono blinks, that was ''Hello World!'''' | | ''OK, so your Ardiono blinks, that was ''Hello World!'''' |
| − |
| |
| − | =Servo motor=
| |
| − | Now we will hookup a '''servo motor''' and instruct it to behave a certain way.
| |
| − |
| |
| − | [[File:Micro-servo.jpg]]
| |
| − | <br>
| |
| − | This is a servo, a very small one
| |
| − | ==Hookup==
| |
| − | The servo has 3 wires, we need to connect them all to the arduino.
| |
| − | ===''red'' is for 5V===
| |
| − | you will find it easy to plug one end of a jumper wire inside the connectors of the servo motor, and the other end to the corresponding pin of the Arduino
| |
| − | make sure you use corresponding colors for the jumpers, in bigget setups messy wire can cause you more time to debug
| |
| − | ===''black'' is for GND===
| |
| − | to GND of the Arduino
| |
| − | ===and ''orange'' is for signal===
| |
| − | signal is going into the pin of the Arduino we will use to control the servo motor
| |
| − | We will look for a pin that has a wave next to the number ( look at the Arduino board). Those pins are able to output Pulse Width Modulation (PWM) is a fancy term for describing a type of digital signal. Pulse width modulation is used in a variety of applications including sophisticated control circuitry. Also in our case control the servo motor. The control wire is used to send this pulse.
| |
| − | For more info how servos work look here [[https://www.servocity.com/how-does-a-servo-work]]
| |
| − |
| |
| − |
| |
| − |
| |
| − | [[File:Oneservo hello.png | 900 px]]
| |
| − | <br>
| |
| − | We will use another example to see if our servos work
| |
| − |
| |
| − | ==Sweep==
| |
| − |
| |
| − | Now with knowing where the examples are located, find a servo example sketch called sweep. <br>
| |
| − |
| |
| − | <br>
| |
| − | you should have a code that looks like this
| |
| − | <syntaxhighlight lang=c style="border:3px dashed blue">
| |
| − | /* Sweep
| |
| − | by BARRAGAN <http://barraganstudio.com>
| |
| − | This example code is in the public domain.
| |
| − |
| |
| − | modified 8 Nov 2013
| |
| − | by Scott Fitzgerald
| |
| − | http://www.arduino.cc/en/Tutorial/Sweep
| |
| − | */
| |
| − |
| |
| − | #include <Servo.h>
| |
| − |
| |
| − | Servo myservo; // create servo object to control a servo
| |
| − | // twelve servo objects can be created on most boards
| |
| − |
| |
| − | int pos = 0; // variable to store the servo position
| |
| − |
| |
| − | void setup() {
| |
| − | myservo.attach(9); // attaches the servo on pin 9 to the servo object
| |
| − | }
| |
| − |
| |
| − | void loop() {
| |
| − | for (pos = 0; pos <= 180; pos += 1) { // goes from 0 degrees to 180 degrees
| |
| − | // in steps of 1 degree
| |
| − | myservo.write(pos); // tell servo to go to position in variable 'pos'
| |
| − | delay(15); // waits 15ms for the servo to reach the position
| |
| − | }
| |
| − | for (pos = 180; pos >= 0; pos -= 1) { // goes from 180 degrees to 0 degrees
| |
| − | myservo.write(pos); // tell servo to go to position in variable 'pos'
| |
| − | delay(15); // waits 15ms for the servo to reach the position
| |
| − | }
| |
| − | }
| |
| − |
| |
| − |
| |
| − | </syntaxhighlight>
| |
| − |
| |
| − | Let's upload the sketch to the board <br>
| |
| − | Observe the motor---->sweeping?
| |
| − |
| |
| − | ===A new thing......Breadboarding===
| |
| − | OK, first, what's with the name....bread board? Bread, like in food?
| |
| − | Well yes, kind of.
| |
| − | <br>
| |
| − | [[File:Breadboard.jpg ]]
| |
| − |
| |
| − | This terminology goes way back in the days.
| |
| − | Generally, you would mount electronic components to a piece of wood (the actual "breadboard"), and do all the wiring with point-point wire and the components just hanging between the various devices.
| |
| − | <br><br>
| |
| − | [[File:Breadboardreal.jpg]]
| |
| − | <br><br>
| |
| − | The story goes that an engineer had an idea for a vacuum tube device late one night. Looking around the house, the only base for his prototype that he found was indeed his wife's breadboard, from the breadbox.
| |
| − | <br><br>
| |
| − | [http://www.youtube.com/watch?feature=player_embedded&v=HrG98HJ3Z6w A video by the Make magazine people ]
| |
| − | <br>
| |
| − | <br>
| |
| − |
| |
| − | Ok, but why do we need to breadboard?
| |
| − | <br>
| |
| − | Well, they are useful for making temporary circuits and prototyping, and they require absolutely no soldering.
| |
| − | <br>
| |
| − | Prototyping is the process of testing out an idea by creating a preliminary model from which other forms are developed or copied, and it is one of the most common uses for breadboards.
| |
| − | <br>
| |
| − | The best way to explain how a breadboard works is to take it apart and see what’s inside.
| |
| − | [[File:Breadboard02.jpg]]
| |
| − | <br><br>
| |
| − | connections lines are connected like this
| |
| − | <br>
| |
| − | [[File:Breadboard03.jpg]]
| |
| − |
| |
| − | <br>
| |
| − |
| |
| − | ==Knob==
| |
| − |
| |
| − | Great,
| |
| − | let us include another agent into the servo situation.
| |
| − | A potentiometer to exercise some external control.
| |
| − | We will be using the potentiometer as a variable [[https://learn.sparkfun.com/tutorials/voltage-dividers voltage divider]]
| |
| − | <br>
| |
| − | [[File:Servo pot.png | 900 px]] <br>
| |
| − |
| |
| − | <syntaxhighlight lang=c style="border:3px dashed blue">
| |
| − | /*
| |
| − | Controlling a servo position using a potentiometer (variable resistor)
| |
| − | by Michal Rinott <http://people.interaction-ivrea.it/m.rinott>
| |
| − |
| |
| − | modified on 8 Nov 2013
| |
| − | by Scott Fitzgerald
| |
| − | http://www.arduino.cc/en/Tutorial/Knob
| |
| − | */
| |
| − |
| |
| − | #include <Servo.h>
| |
| − |
| |
| − | Servo myservo; // create servo object to control a servo
| |
| − |
| |
| − | int potpin = 0; // analog pin used to connect the potentiometer
| |
| − | int val; // variable to read the value from the analog pin
| |
| − |
| |
| − | void setup() {
| |
| − | myservo.attach(9); // attaches the servo on pin 9 to the servo object
| |
| − | }
| |
| − |
| |
| − | void loop() {
| |
| − | val = analogRead(potpin); // reads the value of the potentiometer (value between 0 and 1023)
| |
| − | val = map(val, 0, 1023, 0, 180); // scale it to use it with the servo (value between 0 and 180)
| |
| − | myservo.write(val); // sets the servo position according to the scaled value
| |
| − | delay(15); // waits for the servo to get there
| |
| − | }
| |
| − | </syntaxhighlight>
| |
Hello everyone hello hello hello
Ardu..?
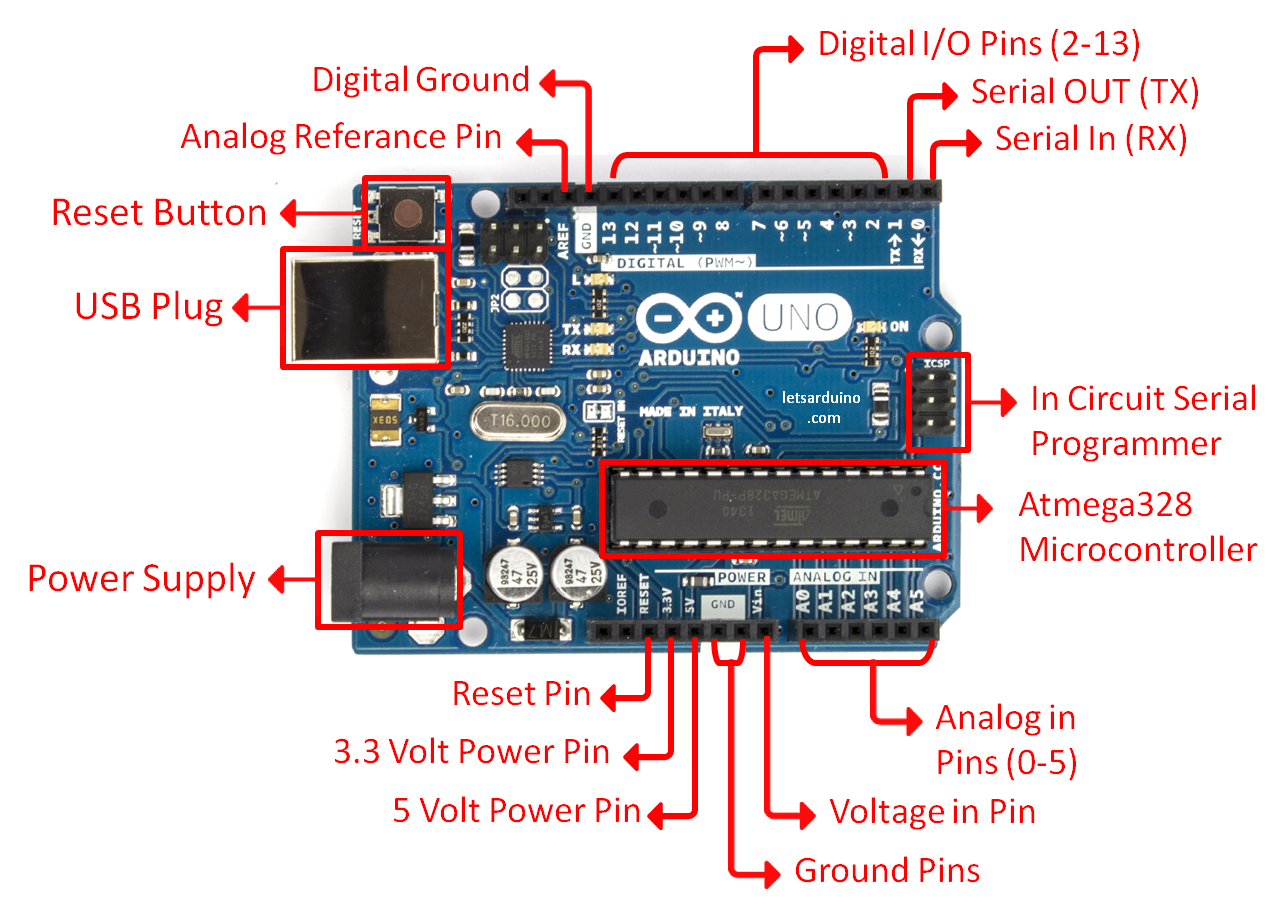
now what is an Arduino ...well...find a detailed introduction here [[1]]
Arduino is an open source physical computing platform based on a simple input/output (I/O) board and a development environment that implements the Processing language. Arduino can be used to develop standalone interactive objects
or can be connected to software on your computer.
What Is Physical Computing?
Physical Computing uses electronics to prototype new materials for designers and artists.
Arduino is composed of two major parts: the Arduino board, which is the piece of hardware you work on when you build your objects; and the Arduino IDE, the piece of software you run on your computer. You use the IDE to create
a sketch (a little computer program) that you upload to the Arduino board. The sketch tells the board what to do.
In the meantime, HERE you can find ANYTHING about Arduino, including download the software
NOW,
But...why?
I bring you......how Arduino is involved in lots of works
sound sculptures
sensing pollution
Performance / Microphone manipulation
light swarm
Machines that almost fall over
Mom, I hit a man
forbidden fruit machine
as light goes by
instant messanging?
string fountain
what the phonics
a piece of privacy
can be very simple
even more simple
bottle song test
bottle song
simple and with a sense of humor 1
simple and with a sense of humor 2
same but different
FIRST
we start by figuring put if our Arduino is all good or it is somehow damaged ...it is a basic test to check and run a simple script at the same time.
Go to File ---> Examples ---> Basics --->Blink
so we have something like this
/*
  Blink
  Turns on an LED on for one second, then off for one second, repeatedly.

  Most Arduinos have an on-board LED you can control. On the Uno and
  Leonardo, it is attached to digital pin 13. If you're unsure what
  pin the on-board LED is connected to on your Arduino model, check
  the documentation at http://www.arduino.cc

  This example code is in the public domain.

  modified 8 May 2014
  by Scott Fitzgerald
 */


// the setup function runs once when you press reset or power the board
void setup() {
  // initialize digital pin 13 as an output.
  pinMode(13, OUTPUT);
}

// the loop function runs over and over again forever
void loop() {
  digitalWrite(13, HIGH);   // turn the LED on (HIGH is the voltage level)
  delay(1000);              // wait for a second
  digitalWrite(13, LOW);    // turn the LED off by making the voltage LOW
  delay(1000);              // wait for a second
}
GOOOD! lets dissect this
- commenting / one line and multiple lines
- setup
- loop
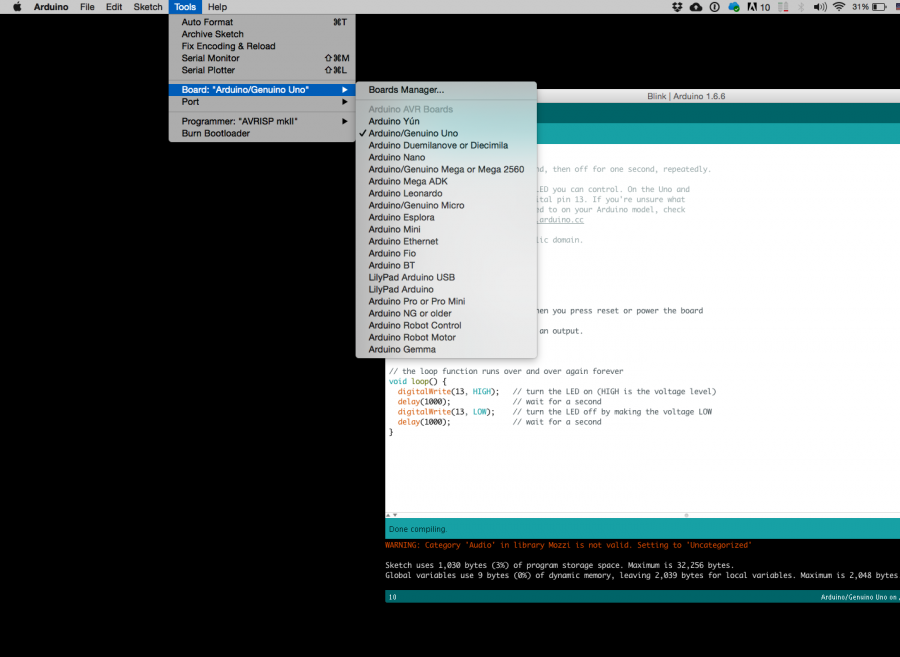
Choose board
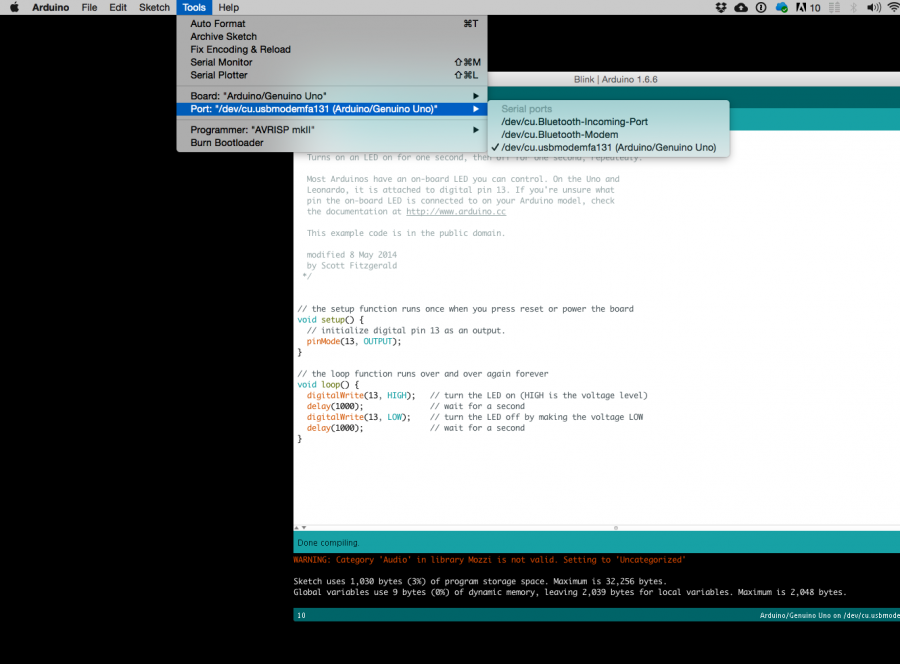
Choose port
Lets compile this
--- Press/ Click upper most left button, looks like a Tick. Observe the messages appearing in the bottom of the Arduino software window ( there must be a sentence Done Compiling
Lets upload this
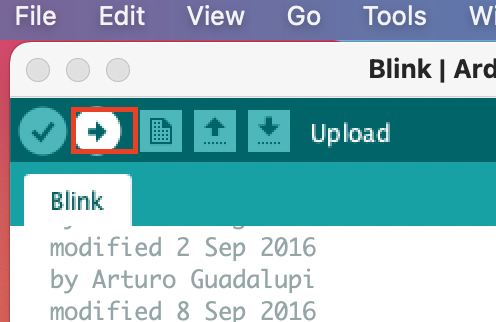
And we should have a Blinking aka Flashing on board LED

OK, so your Ardiono blinks, that was Hello World!'


