Difference between revisions of "Processing Introduction"
| Line 151: | Line 151: | ||
1. the first one is to use the microcontroller as an HID (Human Interface Device), like a mouse or keyboard. | 1. the first one is to use the microcontroller as an HID (Human Interface Device), like a mouse or keyboard. | ||
| + | [[arduino-hid]] | ||
| − | |||
| − | |||
| − | |||
| − | |||
| − | |||
| − | |||
| − | |||
| − | |||
| − | |||
| − | |||
| − | |||
| − | |||
| − | |||
| − | |||
| − | |||
| − | |||
| − | |||
| − | |||
| − | |||
| − | |||
| − | |||
| − | |||
| − | |||
| − | |||
| − | |||
| − | |||
| − | |||
| − | |||
| − | |||
| − | |||
| − | |||
| − | |||
| − | |||
| − | |||
| − | |||
| − | |||
| − | |||
| − | |||
| − | |||
| − | |||
| − | |||
| − | |||
| − | |||
| − | |||
| − | |||
| − | |||
| − | |||
| − | |||
| − | |||
| − | |||
| − | |||
| − | |||
| − | |||
| − | |||
| − | |||
| − | |||
| − | |||
| − | |||
| − | |||
| − | |||
2. '''however, sometimes, you want to send data directly from a microcontroller to processing.''' | 2. '''however, sometimes, you want to send data directly from a microcontroller to processing.''' | ||
Revision as of 11:53, 21 April 2021
Processing
Processing is a free graphical library and integrated development environment built for the electronic arts, new media art,
and visual design communities with the purpose of teaching non-programmers the fundamentals of computer programming in a visual context.
Currently, Processing uses the Java language, p5.js (JavaScript), and Processing.py (Python).
https://processing.org/download/
Say Hello
setup()
only run once.
draw()
will continuously repeat the action inside of the {}
1void setup(){
2size(400,400);
3println("Hello!Nan");
4
5}
6void draw(){
7println("welcome to interaction station!");
8}
copy-paste the code above and observe the message from the console.
Now, let's try to draw something
 1void setup(){
 2size(1200,800);
 3background(0);
 4
 5}
 6void draw(){
 7stroke(250,250,140);
 8line(0,0,600,400);
 9//line(width/2, height/2, mouseX, mouseY);
10}
Sketch --> Run
Sketch --> Tweak
Sketch --> Present
Full screen!
 1void setup(){
 2//size(1200,800);
 3background(0);
 4fullScreen();
 5}
 6void draw(){
 7stroke(250,250,140);
 8//line(0,0,600,400);
 9line(width/2, height/2, mouseX, mouseY);
10}
Draw
 1void setup(){
 2
 3size(1200,800);
 4background(0);
 5//fullScreen();
 6
 7}
 8void draw(){
 9
10background(0);
11noStroke();
12fill(0,80,80);
13ellipse(width/2,height/2,200,200);
14strokeWeight(5);
15stroke(250,250,140);
16line(width/2, height/2, mouseX, mouseY);
17
18}
1. try to change the background(0); to the end of void draw() and see what happens.
2. try to use noStroke(), fill(), strokeWeight().
3. don't forget to use the reference page:
https://processing.org/reference/
4. Be patient carefully read the console and error message.
let's use a simple if statement to clear out the lines when we mouse is pressed:
 1void setup(){
 2
 3size(1200,800);
 4background(0);
 5//fullScreen();
 6
 7}
 8void draw(){
 9
10noStroke();
11fill(0,80,80);
12ellipse(width/2,height/2,200,200);
13strokeWeight(5);
14stroke(250,250,140);
15line(width/2, height/2, mouseX, mouseY);
16
17if(mousePressed){
18
19background(0);
20}
21
22}
Communication with Arduino
there are two ways to get processing sketches communicating with microcontrollers.
1. the first one is to use the microcontroller as an HID (Human Interface Device), like a mouse or keyboard. arduino-hid
2. however, sometimes, you want to send data directly from a microcontroller to processing.
in this case, we need to do write few lines of code in both Arduino and processing.
Send out data Arduino IDE:
 1#include <Adafruit_CircuitPlayground.h>
 2float X, Y, Z;
 3void setup() {
 4 Serial.begin(9600);
 5 CircuitPlayground.begin();
 6}
 7
 8void loop() {
 9
10  int leftButton = CircuitPlayground.leftButton();
11  X = CircuitPlayground.motionX();
12  Y = CircuitPlayground.motionY();
13  Z = CircuitPlayground.motionZ();
14
15  int xVal=map(X,-9,10,0,1920);
16 //somtime, if you move too fast the value will turn into a negative number.
17 //if the value is smaller than 0, we can multiply -1 (*=). and converts it back to a positive number
18  if(xVal<0){xVal*= -1;
19    }
20  int yVal=map(Y,-9,10,0,1080);
21  if(yVal<0){yVal*= -1;
22    }
23  Serial.print(xVal);
24  Serial.print("\t"); //instert a tap in between
25  Serial.print(yVal);
26  Serial.print("\t");//instert a tap in between
27  Serial.println(leftButton);
28
29  delay(10);
30 }
Receive the value in Processing:
1.Frist let's select the right serial Port
the communication between Arduino and processing is done by serial port(USB port).
when Arduino executing "Serial.print", it prints messages to the serial port, and processing needs to read the message from the serial port.
However, everyone have different USB port layouts, we need to know which usb port wen need to read.
 1import processing.serial.Serial;
 2//select serial port and set bauds rate
 3static final int PORT_INDEX=2,BAUDS=9600;
 4int[] vals= {};
 5void setup(){
 6  noLoop();
 7  frameRate(18);
 8  final String[] ports = Serial.list();
 9  printArray(ports);
10  new Serial(this, ports[PORT_INDEX], BAUDS).bufferUntil(ENTER);
11}
in this code, we are printing all the ports in setup() that's why it only runs once remember?
now you can see a list of USB ports in your console, find out which port is your Adafruit circuit playground express.
normally it is a /dev/cu.usbmodem.
in my case it is "[2] "/dev/cu.usbmodem11201"
so I need to go to second line of my code:
1static final int PORT_INDEX=2,BAUDS=9600;
make sure that the PORT_INDEX=2
For example, if YOUR Port is 3, you need to make sure that your PORT_INDEX=3
2. Now Processing is ready to receive messages!!!
 1import processing.serial.Serial;
 2//select serial port and set bauds rate
 3static final int PORT_INDEX=2,BAUDS=9600;
 4// create an array, a list of data will be used to store values from snesors.
 5int[] vals= {};
 6
 7void setup(){
 8  noLoop();
 9  frameRate(18);
10  final String[] ports = Serial.list();
11  printArray(ports);
12  new Serial(this, ports[PORT_INDEX], BAUDS).bufferUntil(ENTER);
13}
14
15void draw(){
16
17   print("x=");
18   println(vals[0]);
19   print("Y=");
20   println(vals[1]);
21   print("Button=");
22   println(vals[2]);
23    }
24void serialEvent(final Serial s) {
25// split the string from the serial port into 3 integers and store it in the list.
26  vals = int(splitTokens(s.readString()));
27  redraw = true;
28}
Add the lines back to this code
Now, please try to add the animated lines back to the code.
and use X and Y values from the motion sensor as mouse positions to draw the line.
and CPX button clicks to clear out the lines.
If you need help, cleck here--> ?! add lines
Draw a image:
Let' try to draw an image with PImage!
https://processing.org/reference/PImage.html
first, we need to create empty processing and save it somewhere on your computer.
in this case, we created a sketch folder, and inside of the sketch folder,
we need to create a new folder called "data" and save an image (jpg, png, gif,tga)in the "data" folder.
 1PImage images;
 2
 3void setup() {
 4
 5 fullScreen();
 6 images=loadImage("run.gif");
 7}
 8
 9void draw() {
10 // background(0);
11  image(images,0,0, images.width, images.height );
12}
Image sequence:
Step two:
let's make it move!
in order to do that we need to use a sequence of images.
you can copy the image sequences in the file folder from the physical interfaces@interaction station channel on Teams.
and here is how to use for loop to load a sequence of images:
copy and run the code from below and observe the console:
1 int numImages=120;
2 PImage[] images= new PImage[numImages];
3
4 for (int i = 0; i < numImages; i++) {
5   String imageName = "run-" + nf(i, 5) + ".png";
6  // images[i] = loadImage(imageName);
7   println(imageName);
8   println(nf(i,5));
9  }
now we understand how the code is loading all the images sequence, we can start drawing the image sequence:
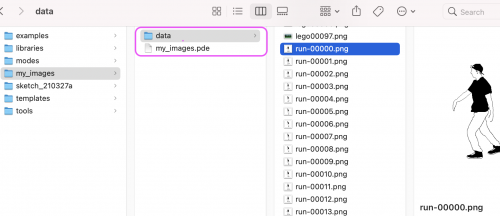
one important thing:
make sure you put the data folder in the right place: the same folder where your processing sketch is saved.
like this:
 1int numImages=23;
 2int startNumImages=1;
 3PImage[] images= new PImage[numImages];
 4int imgInSeq=1;
 5
 6void setup() {
 7 // size(1920, 1080);
 8 //let's give it a frame rate value so that we can change it later:-))
 9 frameRate(18);
10 fullScreen();
11
12 for (int i = 0; i < numImages; i++) {
13   String imageName = "run-" + nf(i, 5) + ".png";
14   images[i] = loadImage(imageName);
15  }
16}
17
18void draw() {
19 background(0);
20//we can use % (modulo) to cycle through the images. from 1- to numImages
21imgInSeq= (imgInSeq+1) % numImages;
22image(images[imgInSeq],0,0,images[imgInSeq].width,images[imgInSeq].height);
23
24}
now, let's make it interactive!
remember the first example where we use mouse position to draw lines?
we can also use mouseX position to control the animation.
let's comment out:
1imgInSeq= (imgInSeq+1) % numImages;
and replace it with :
1int imgInSeq = (int)map(mouseX, 0, width, 0, numImages - 1);
now, the images always display from the top left corner. let's move it to the center:
Question Time:
HOW TO DO THAT??
use other GIFs:
Now, let's try it by search online and find your own GIF and make your own image mouse-controlled animated images.
you can use a free online tool GIF frame extractor to split the gif file in image sequence:
About renaming the files in sequence:
if you are using macOS, you can just select all the images and right-click select "rename" and chose "format" to rename all your files in sequence.
like this:
However:
if you are using Window 10 after you rename a sequence of files, they might look like this: run-(1).png run-(2).png run-(3).png ...
don't panic, you can change the code from
1for (int i = 0; i < numImages; i++) {
2   String imageName = "run-" + nf(i, 5) + ".png";
3   images[i] = loadImage(imageName);
4  }
into
1for (int i = 0; i < numImages; i++) {
2   String imageName = "run-(" + i + ").png";
3   images[i] = loadImage(imageName);
4  }
Sensor controlled image sequence:
let's use higher resolution images and try to control the animation with the light sensor from CPX.
we can use the lego image sequence from the data folder on teams.
1. use the light sensor from CPX to animated the image sequences.
send out light senstor value from Arduino:
 1#include <Adafruit_CircuitPlayground.h>
 2
 3int value;
 4
 5void setup() {
 6  Serial.begin(9600);
 7  CircuitPlayground.begin();
 8}
 9
10void loop() {
11  value = CircuitPlayground.lightSensor();
12
13 // Serial.print("Light Sensor: ");
14  Serial.println(value);
15  delay(50);
16}
receive and draw in Processing:
 1import processing.serial.Serial;
 2static final int PORT_INDEX=2,BAUDS=9600;
 3int [] vals= {};
 4
 5int numImages=97;
 6int startNumImages=1;
 7PImage[] images= new PImage[numImages];
 8int imgInSeq=1;
 9
10void setup() {
11  size(1200,800);
12  noLoop();
13  final String[] ports = Serial.list();
14  printArray(ports);
15  new Serial(this, ports[PORT_INDEX], BAUDS).bufferUntil(ENTER);
16
17 //let's give it a frame rate value so that we can change it later:-))
18 frameRate(18);
19 //fullScreen();
20
21 for (int i = 0; i < numImages; i++) {
22   String imageName = "lego" + nf(i, 5) + ".png";
23   images[i] = loadImage(imageName);
24  }
25}
26
27void draw() {
28  background(0);
29  println(vals[0]);
30
31
32  imgInSeq = (int)map(vals[0], 0, 500, 0, numImages - 1);
33
34  image(images[imgInSeq],0,0,images[imgInSeq].width,images[imgInSeq].height);
35
36}
37
38void serialEvent(final Serial s) {
39  vals = int(splitTokens(s.readString()));
40  redraw = true;
41}
use the "if" statement
Now let's use other sensor values and an "if " statement to control the image sequences.
in this case, we can try to use the sound level value from CPX's mic.
and say: if the sound input is louder than a certain level, play the image sequence. else, pulse and do nothing.
send out sound value from Arduino:
 1#include <Adafruit_CircuitPlayground.h>
 2
 3int value;
 4
 5void setup() {
 6  Serial.begin(9600);
 7  CircuitPlayground.begin();
 8}
 9
10void loop() {
11  // Take 10 milliseconds of sound data to calculate
12  value = CircuitPlayground.mic.soundPressureLevel(10);
13
14 // Serial.print("Sound Sensor SPL: ");
15
16  int newVal=map(value,58,102,0,94);
17if (newVal<0){
18  newVal=0;
19    }
20  Serial.println(newVal);
21
22  delay(90);
23}
Receive and draw in Processing:
 1import processing.serial.Serial;
 2static final int PORT_INDEX=6,BAUDS=9600;
 3int [] vals= {};
 4
 5int numImages=97;
 6int startNumImages=1;
 7PImage[] images= new PImage[numImages];
 8int imgInSeq=1;
 9
10void setup() {
11  noLoop();
12  final String[] ports = Serial.list();
13  printArray(ports);
14  new Serial(this, ports[PORT_INDEX], BAUDS).bufferUntil(ENTER);
15
16 //let's give it a frame rate value so that we can change it later:-))
17 frameRate(20);
18 fullScreen();
19
20 for (int i = 0; i < numImages; i++) {
21   String imageName = "lego" + nf(i, 5) + ".png";
22   images[i] = loadImage(imageName);
23  }
24}
25
26void draw() {
27 background(0);
28 println(vals[0]);
29
30if (vals[0]>40){
31imgInSeq= (imgInSeq+1) % numImages;
32}
33
34image(images[imgInSeq],0,0,images[imgInSeq].width,images[imgInSeq].height);
35
36}
37
38void serialEvent(final Serial s) {
39  vals = int(splitTokens(s.readString()));
40  redraw = true;
41}
Question Time!!
if you want the image sequence to go back to the first frame after each trigger.
what do you need to add to this code?
if you are interested you can also check out how to write from Processing to Arduino
there:


