Simple Line Printer interface
LinePrinter Interface
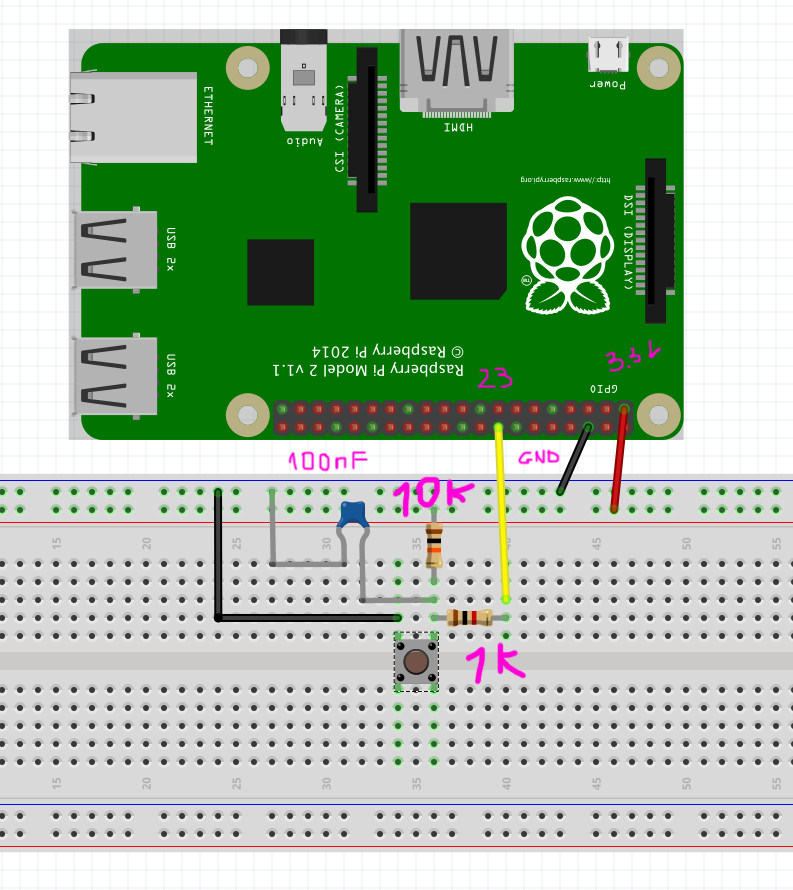
For a physical manifestation of Bibliotecha, we have added a receipt printer interface that prints out the instructions to upload and download books after pressing a button.
print on Press / hardware
Pull-ups/downs
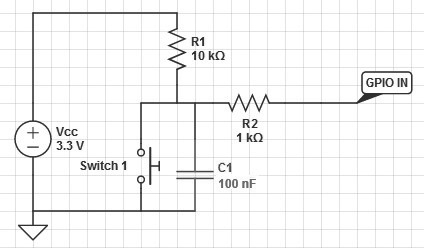
So we have pin 23 configured as an input. If there is nothing connected to the pin and your program reads the state of the pin, will it be high (pulled to VCC) or low (pulled to ground)? It is difficult to tell. This phenomena is referred to as floating. To prevent this unknown state, a pull-up or pull-down resistor will ensure that the pin is in either a high or low state, while also using a low amount of current.
With a pull-up resistor, the input pin will read a high state when the button is not pressed. In other words, a small amount of current is flowing between VCC and the input pin (not to ground), thus the input pin reads close to VCC. When the button is pressed, it connects the input pin directly to ground.
Switch Debounicng
Ok, so we have a push switch with a pull-up resistor. A small issue is that pressing the switch does not provide a clean edge. Meaning, we get multiple counts rather than the expected single count. The same can also occur on the release of a switch.
The problem is that the contacts within the switch don't make contact cleanly, but actually slightly 'bounce'.
So we need to do some so called Debouncing, in order to have a clean button press.
This we can do in software and in hardware.
In our circuit we have a simple debouncing option. The basic idea is to use a capacitor to filter out any quick changes in the switch signal.
Debouncing a switch in software is also possible. The basic idea is to sample the switch signal at a regular interval and filter out any glitches. LOOK DOWN for this.
Within the RPi.GPIO library that we use in our python code,

print on Press /software
Debouncing in software
The event_detected() function is designed to be used in a loop with other things, but it is not going to miss the change in state of an input while the CPU is busy working on other things.
GPIO.add_event_detect(channel, GPIO.RISING)  # add rising edge detection on a channel
do_something()
if GPIO.event_detected(channel):
   print('Button pressed')
Note that you can detect events for GPIO.RISING, GPIO.FALLING or GPIO.BOTH.
Waiting to detect the rising edge event and debouncing.
bouncetime=800 sets a time of 800 milliseconds during which time a second button press will be ignored. Thus filtering out the switch bouncing.
We are doing double work here, because the small capacitor does the same. But it doesn't hurt.
the text and commands for the printer
#!/usr/bin/env python

import sys
from time import sleep
#sys.stdout = open('/dev/usb/lp0', 'w')
#sys.stdout = open('/dev/usb/lp1', 'w')

art = """

    dBBBBBBBBBBBBBBBBBBBBBBBBb
   BP YBBBBBBBBBBBBBBBBBBBBBBBb
  dB   YBb   Bibliotecha   YBBBb
  dB    YBBBBBBBBBBBBBBBBBBBBBBBb
   Yb    YBBBBBBBBBBBBBBBBBBBBBBBb
    Yb    YBBBBBBBBBBBBBBBBBBBBBBBb
     Yb    YBBBBBBBBBBBBBBBBBBBBBBBb
      Yb    YBBBBBBBBBBBBBBBBBBBBBBBb
       Yb    YBBBBBBBBBBBBBBBBBBBBBBBb
        Yb   dBBBBBBBBBBBBBBBBBBBBBBBBb
         Yb dP=======================/
          YbB=======================(
           Ybb=======================\n
"""


title = "How to share book using Bibliotecha\n" #bold

instructions='''1. open your network preferences\n
2. select Bibliotecha WIFI network\n
3. interface Bibliotecha by opening your browser and typing any URL into it
(avoid https:// URLs)\n
4. Choose "Browse" to see the current book collection and download from it, or "Contribute" to upload books to Bibliotecha\n''' #\n carriage return

url="http://bibliotecha.info/\n"
emptylines= "\n\n\n\n"


escpos = {
    "init_printer":  "\x1B\x40",

    "justify_left": "\x1B\x61\x00",
    "justify_center": "\x1B\x61\x01",

    'halfwidth_on': "\x1B\x21\x01",
    'halfwidth_off': "\x1B\x21\x00",

    'doubleprinting_on': "\x1B\x47\x01",
    'doubleprinting_off': "\x1B\x47\x00",

    'emphasis_on': '\x1B\x45\x01',
    'emphasis_off': '\x1B\x45\x00',

    'largefont': "\x1B\x21\x90", # 0=None 70=very lage+intalic, 90= medium large
    'mediumfont': "\x1B\x21\x90",
    'normalfont': "\x1B\x21\x00",

    'space_btw_letters': '\x1B\x20\x01', # n [0,255]

    'feedamount': '\x1B\x33\x09', #?

    'paperfeed': '\x1B\x4A\x01' , #??
    'papercut':'\x1D\x56\x00',

    'direction_0': '\x1B\x56\x00' ,
    'direction_90': '\x1B\x56\x01' ,

    'pagedefault': '\x1B\x53' , #?
}

lp = open("/dev/usb/lp0","w")
#lp.write(escpos['halfwidth_on'])
lp.write(art)
lp.write(escpos['largefont']+title)
lp.write(escpos['normalfont']+instructions+emptylines+url+emptylines+emptylines+escpos['papercut'])
#lp.write(art+title+instructions+url+emptylines+cut)

lp.close()

#print(art+"\n",title+"\n",instructions+"\n",url+"\n",emptylines+"\x1D\x56\x00")
#print(escpos['papercut'])
The button pressing script that starts the printing script
#!/usr/bin/env python

import RPi.GPIO as GPIO
import time
import os
import subprocess
GPIO.setmode(GPIO.BCM)

# setup pin 23 as an intput
GPIO.setup(23,GPIO.IN)
GPIO.add_event_detect(23, GPIO.FALLING, bouncetime=800)


while True:
        if GPIO.event_detected(23):
		print 'click'
		os.popen("python /path/to/yourscript.py")


GPIO.cleanup()
