Difference between revisions of "Ubuntu (Linux)"
| Line 8: | Line 8: | ||
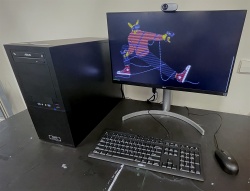
[[File:ubuntu-pc.jpg|left|250px|A desktop PC running Ubuntu]] After you've found a PC, you can press the power button on both the screen and computer. After waiting a few seconds you should see a blue logo with the words <span style="color:blue;">'''BlueChip'''</span>. After this screen comes another screen called the GRUB menu (when this menu appears, you need to interact with it within 5 seconds, otherwise the PC will start Windows automatically). Whitin the GRUB menu you can select the operating system (OS) you wish to boot in to. Because this tutorial is about starting Ubuntu, we will need to select Ubuntu in the GRUB menu. | [[File:ubuntu-pc.jpg|left|250px|A desktop PC running Ubuntu]] After you've found a PC, you can press the power button on both the screen and computer. After waiting a few seconds you should see a blue logo with the words <span style="color:blue;">'''BlueChip'''</span>. After this screen comes another screen called the GRUB menu (when this menu appears, you need to interact with it within 5 seconds, otherwise the PC will start Windows automatically). Whitin the GRUB menu you can select the operating system (OS) you wish to boot in to. Because this tutorial is about starting Ubuntu, we will need to select Ubuntu in the GRUB menu. | ||
<br/> | <br/> | ||
| − | To select Ubuntu, you use your '''arrow keys''' on your keyboard to move the selection bar. To go up, press the arrow key up. To go down, press the arrow key down etc. Using the arrow keys, select '''Ubuntu''' and press | + | To select Ubuntu, you use your '''arrow keys''' on your keyboard to move the selection bar. To go up, press the arrow key up. To go down, press the arrow key down etc. Using the arrow keys, select '''Ubuntu''' and press <code>Enter</code>. Congratulations! In a moment you will be greeted by the Ubuntu login screen. |
=== Log in in as a student === | === Log in in as a student === | ||
Revision as of 11:38, 23 December 2022
Getting started
Before you can continue with the tutorial you were reading, you need to find a desktop PC with Ubuntu installed. At the Interaction Station you can find these PC's at multiple locations. The first location to try is the Open Area Open Area (to view login with MyWDKA single sign on) behind our office. All the PC's (with the exception of the iMac) on the window side of the room has both Ubuntu & Windows installed. Another option is to ask one of the available instructors to open classroom WH.02.110 situated parallel to the Open Area. All the PC's in this room has both Ubuntu & Windows installed.
Starting the PC
After you've found a PC, you can press the power button on both the screen and computer. After waiting a few seconds you should see a blue logo with the words BlueChip. After this screen comes another screen called the GRUB menu (when this menu appears, you need to interact with it within 5 seconds, otherwise the PC will start Windows automatically). Whitin the GRUB menu you can select the operating system (OS) you wish to boot in to. Because this tutorial is about starting Ubuntu, we will need to select Ubuntu in the GRUB menu.
To select Ubuntu, you use your arrow keys on your keyboard to move the selection bar. To go up, press the arrow key up. To go down, press the arrow key down etc. Using the arrow keys, select Ubuntu and press Enter. Congratulations! In a moment you will be greeted by the Ubuntu login screen.

