Difference between revisions of "Using capacitive sensors to control Max Msp with Arduino"
| (4 intermediate revisions by the same user not shown) | |||
| Line 1: | Line 1: | ||
=Capacitive? sensing= | =Capacitive? sensing= | ||
| − | touch-sensitive electronics | + | |
| + | [[File:Capacitive example.png ]] | ||
| + | a sound installation / perhaps instrument /[https://vimeo.com/209081271 CLICK CLICK] | ||
| + | |||
| + | <br> | ||
| + | touch-sensitive electronics<br> | ||
Now that we all have them in our pockets, its nice to get a grip on how come our finger is so omnipowerful. | Now that we all have them in our pockets, its nice to get a grip on how come our finger is so omnipowerful. | ||
<br> | <br> | ||
| Line 33: | Line 38: | ||
= When Arduino talks to Max= | = When Arduino talks to Max= | ||
| + | [[File:Whispers.jpg]] | ||
==Max Msp== | ==Max Msp== | ||
| Line 49: | Line 55: | ||
=Trigger audio with Arduino and Max= | =Trigger audio with Arduino and Max= | ||
In the first example, we will use our capacitive sensor and Arduino to send data to Max trough serial communication. Then we will use the data we receive from the sensor to trigger sounds. | In the first example, we will use our capacitive sensor and Arduino to send data to Max trough serial communication. Then we will use the data we receive from the sensor to trigger sounds. | ||
| + | |||
| + | Find and download our examples [https://github.com/oyoana/capacitivesensing HERE:)] | ||
Revision as of 16:33, 1 November 2017
Capacitive? sensing
 a sound installation / perhaps instrument /CLICK CLICK
touch-sensitive electronics
Now that we all have them in our pockets, its nice to get a grip on how come our finger is so omnipowerful.
How does it work?
To understand how capacative sensors work, first you have to understand how a capacitor works.
A capacitor consists of 2 electrical conductive surfaces (also called electrodes), one is connected to the positive pole of the electrical circuit and the other is grounded. Between these surfaces there is a non-conductive layer wich is called a dielectric. The capacitor can be compared to a small battery. When sending a pulse to the capacitor, it quickly charges. When the signal goes to zero, the capacitor discharges. This creates a delay in the pulse due to the time it takes to charge and discharge the capacitor.
A capacative sensor works in the same way as a capacitor. The sensor itself is only a conductive surface and will start working as a capacitor by the proximity of any other conductive surface, for example by skin.
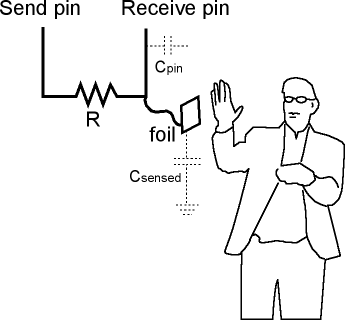
When making a capacative sensor with Arduino you will have an output that transmits a pulse, and an input which receives the pulse and compares it to the transmitted pulse. When you you put your finger on or near the sensor it creates a delay in the pulse, and this delay is recalculated by the CapSense library and generates a value you can use for triggering etc.
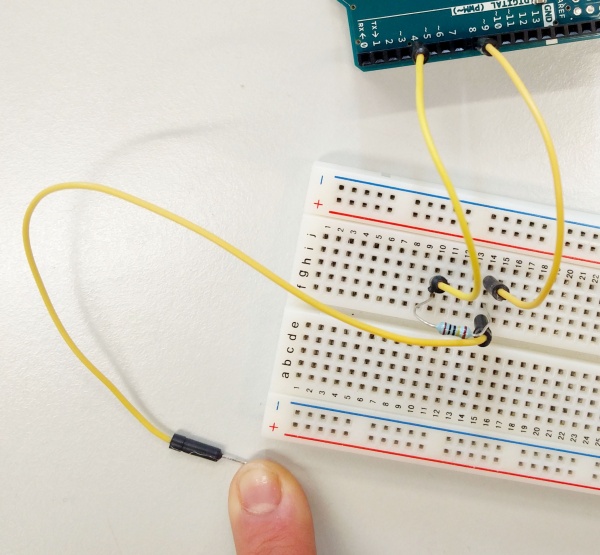
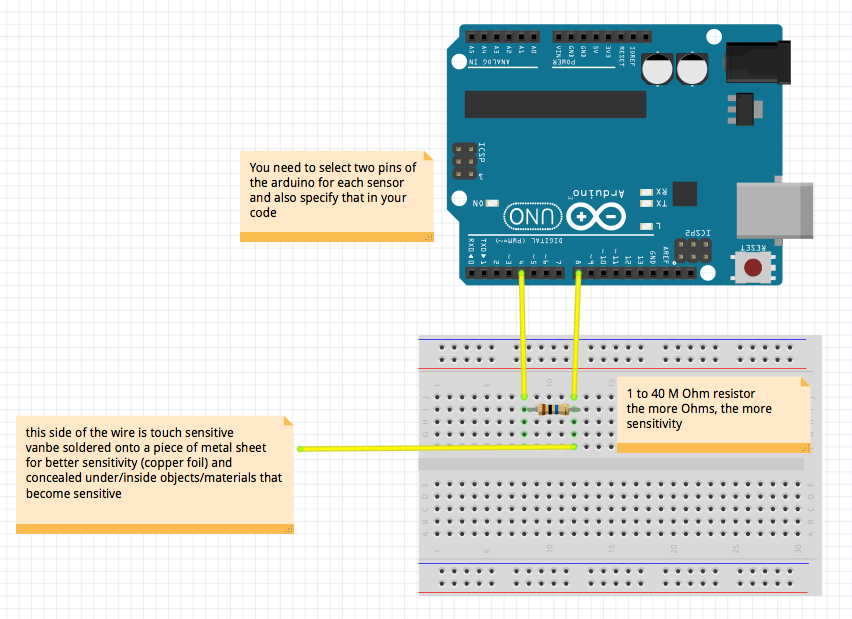
The capacitiveSensor library turns two or more Arduino pins into a capacitive sensor, which can sense the electrical capacitance of the human body. All the sensor setup requires is a medium to high value resistor and a piece of wire and a small (to large) piece of aluminum foil on the end. At its most sensitive, the sensor will start to sense a hand or body inches away from the sensor.
Capacitive sensing may be used in any place where low to no force human touch sensing is desirable. An Arduino and the library may be used to sense human touch through more than a quarter of an inch of plastic, wood, ceramic or other insulating material (not any kind of metal though), enabling the sensor to be completely visually concealed.
Capacitive sensing and Arduino
Making a simple capacitive sensor is easy with Arduino, even without the use of any external breakouts. Using the Capacitive Sensor library https://playground.arduino.cc/Main/CapacitiveSensor?from=Main.CapSense we can make a cap sensor using two ardino pins.
When Arduino talks to Max
Max Msp

Max is a visual programming language for sound and multimedia.
Max connects objects with virtual patch cords to create interactive sounds, graphics, and custom effects.
You can use Max's serial communications to interface with electronic sensors, motors, and other components using your Arduino board.
Find Max here [1]
Max is installed on the computers at the academy, so you can use and explore it.
Trigger audio with Arduino and Max
In the first example, we will use our capacitive sensor and Arduino to send data to Max trough serial communication. Then we will use the data we receive from the sensor to trigger sounds.
Find and download our examples HERE:)


