Difference between revisions of "Tutorial: Surfacing the CNC bed"
| (21 intermediate revisions by the same user not shown) | |||
| Line 9: | Line 9: | ||
B. Check if the collet is bit enough for the mill. You can assess this by looking at the thickness of the CNC mill. There are three sizes we use for the CNC mills, small, medium and big. For surfacing, we use the big one. If the collet is too small for the mill, unscrew the collet using two wrenches. | B. Check if the collet is bit enough for the mill. You can assess this by looking at the thickness of the CNC mill. There are three sizes we use for the CNC mills, small, medium and big. For surfacing, we use the big one. If the collet is too small for the mill, unscrew the collet using two wrenches. | ||
| − | [[File:COLLET.png| | + | [[File:COLLET.png|500px]] |
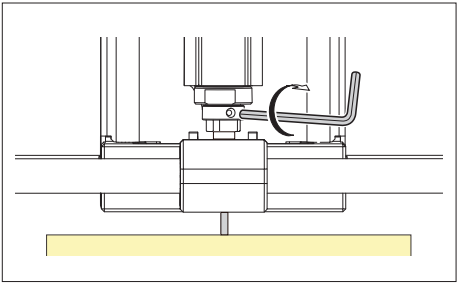
C. Now unscrew the nut in the collet using a hex key, install the mill, and screw it tight again. | C. Now unscrew the nut in the collet using a hex key, install the mill, and screw it tight again. | ||
| + | |||
| + | [[File:HEXMILL.png|500px]] | ||
<b>2. Setting your X,Y,Z position</b> | <b>2. Setting your X,Y,Z position</b> | ||
| Line 25: | Line 27: | ||
[[File:ArrowsOfV-Panel.png|500px]] | [[File:ArrowsOfV-Panel.png|500px]] | ||
| − | Now drop down the mill with the Z-arrows until almost touch the surface. !! Be careful not to hit the surface!! You will break the mill | + | Now drop down the mill with the Z-arrows until almost touch the surface. !! Be careful not to hit the surface!! You will break the mill. |
[[File:ZARROWS.png|500px]] | [[File:ZARROWS.png|500px]] | ||
| + | Make more precise adjustment by changing the Cursor step. | ||
| + | |||
| + | [[File:CursorStep.png|500px]] | ||
| + | |||
| + | When you are as close as possible to the surface. Unscrew the mill with the small hex key, let it drop | ||
| + | |||
| + | [[File:TOUCHINGZ.png|500px]] | ||
| + | |||
| + | and tighten it again. | ||
| + | |||
| + | [[File:TIGHTENINGHEX.png|500px]] | ||
| + | |||
| + | Now set the new origin point to G54 and click X/Y and Z. | ||
| + | |||
| + | [[File:NewOriginPointCNC.png|500px]] | ||
| + | |||
| + | X, Y, Z should now be 0, 0, 0. | ||
| + | |||
| + | [[File:0,0.png|500px]] | ||
| + | |||
| + | <b>3. Uploading the G-Code using an existing .nc file.</b> | ||
| + | |||
| + | This option is optimized for a 5mm or 6mm drill bit and will surface the bed with a 1mm depth. If you have a different mill or would like to surface it a bit deeper, follow the steps in 4. | ||
| + | |||
| + | A. Download Flatcam Surfacing .zip folder, unpack it. | ||
| + | |||
| + | [[File:FlatcamSurfacing.zip|500px]] | ||
| + | |||
| + | B. Open VPanel for SRM-20. | ||
| + | |||
| + | C. Press Cut | ||
| + | |||
| + | [[File:CUTCNC.png|500px]] | ||
| + | |||
| + | and press Add | ||
| + | |||
| + | [[File:CNCADD.png|500px]] | ||
| + | |||
| + | look for the file called "Schets_contour.gm1_cutout_1_paint_cnc.nc", open it. | ||
| + | |||
| + | [[File:OpenfileCNC.png|500px]] | ||
| + | |||
| + | D. Press "OUTPUT" to start the milling process. | ||
| + | |||
| + | [[File:OUTPUTFILECNC2.png|500px]] | ||
| + | |||
| + | <b> 4. Changing the depth of the surfacing G-Code.</b> | ||
| + | |||
| + | If you would like to make sure precise adjustments to the surfacing, like changing the depth or the size of the milling bit, you can do it by using Flatcam. Here I will explain how to change the depth. If you're using a different mill than a 5 or 6mm one, go to 5. | ||
| + | |||
| + | A. Download Flatcam Surfacing .zip folder, unpack it. | ||
| + | |||
| + | [[File:FlatcamSurfacing.zip|500px]] | ||
| + | |||
| + | Open Flatcam and Open "flatcamsurfacing.FlatPrj" from your unpacked archive. | ||
| + | |||
| + | B. Changing the surface depth. | ||
| + | |||
| + | If you just want to surface a bit more or less than 1mm, first delete the existing CNC job. | ||
| + | |||
| + | [[File:DeleteCNCJobFlatCAM.png|500px]] | ||
| + | |||
| + | Then double click "Schets_contour.gm1_cutout_1_paint" | ||
| + | |||
| + | [[File:HIGHCHANGE.png|500px]] | ||
| + | |||
| + | and change the CutZ to the preferred depth in mm (should always be negative!) | ||
| + | |||
| + | [[File:CNCDEPTH.png|500px]] | ||
| + | |||
| + | Now scroll down and press Generate CNCJob object. | ||
| + | |||
| + | [[File:GenerateCNC.png|500px]] | ||
| + | |||
| + | and press "Save CNC Code" and give it the name you like . | ||
| + | |||
| + | C. Continue with <b>3B</b>. | ||
| + | |||
| + | <5>Painting the surfacing traces for different mill sizes</b> | ||
| + | |||
| + | If you want to change the size of the mill in the setting, we need to paint new traces. | ||
| + | |||
| + | A. Download Flatcam Surfacing .zip folder, unpack it. | ||
| + | |||
| + | [[File:FlatcamSurfacing.zip|500px]] | ||
| + | |||
| + | Open Flatcam and Open "flatcamsurfacing.FlatPrj" from your unpacked archive. | ||
| + | |||
| + | B. Delete the CNC Job "Schets_countour.gm1_cutout_1_paint_cnc" and the Geometry "Schets_contour.gm1_cutout_1_paint" | ||
| + | |||
| + | [[File:SUPERDELETECNC.png|500px]] | ||
| + | |||
| + | C. Double click "Schets_contour.gm1_cutout_1" under Geometry | ||
| + | |||
| + | [[File:DOUBLECLICK.png|500px]] | ||
| + | |||
| + | scroll down and press Paint Tool under the TOOLS tab. | ||
| + | [[File:PAINTTOOLLFLL.png|500px]] | ||
| − | + | Change the Diameter to the mill you'd like to use in the Tools Table and the TT to C1. In this example I changed the mill to 3mm. | |
| − | |||
| − | + | [[File:Toooldimaterre.png|500px]] | |
| − | |||
| − | + | Make sure you highlight the Tool you'd like to use and press "Create Paint Geometry". | |
| − | + | [[File:Hgihlookalsfjksdaftool.png|500px]] | |
| − | + | D. Now you should see your need traces. Continue with <b>4B</b>. | |
Latest revision as of 12:59, 26 June 2024
Surfacing the CNC bed
1. Installing the surfacing Mill
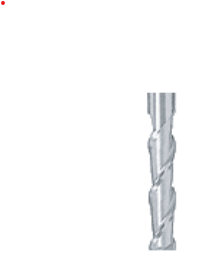
A. To surface the bed, you need the biggest 2 flute mill there is. The bigger the mill, the less time it will take to completely surface the bed. For this example we use a 6mm two flute mill. A 2 flute mill should look something like this:
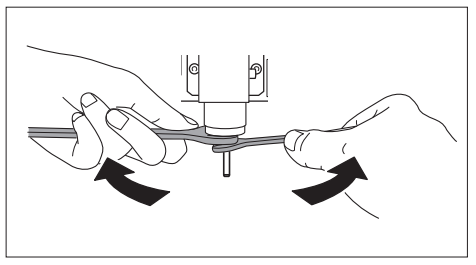
B. Check if the collet is bit enough for the mill. You can assess this by looking at the thickness of the CNC mill. There are three sizes we use for the CNC mills, small, medium and big. For surfacing, we use the big one. If the collet is too small for the mill, unscrew the collet using two wrenches.
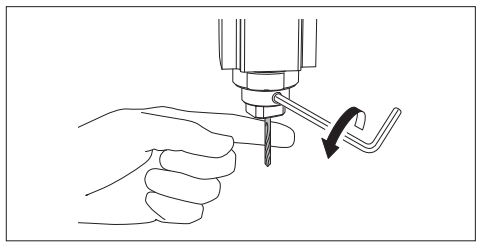
C. Now unscrew the nut in the collet using a hex key, install the mill, and screw it tight again.
2. Setting your X,Y,Z position
A. Open VPanel for SRM-20. Make sure the CNC is turned on and the lid is closed. Otherwise it the CNC does respond.
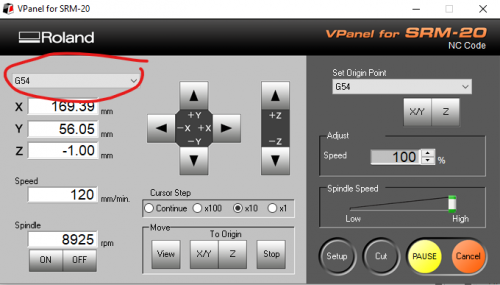
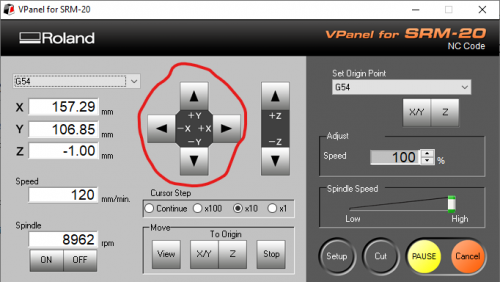
B. To properly surface the machine (or mill in general), we need the CNC to know where the face is it needs to mill. For surfacing we simply need to start at X = 0, and Y = 0, and set the right Z axis. To do this set the Machine Coordinate System of the top left to G54:
and move the Mill all the way to the bottom left using the arrows.
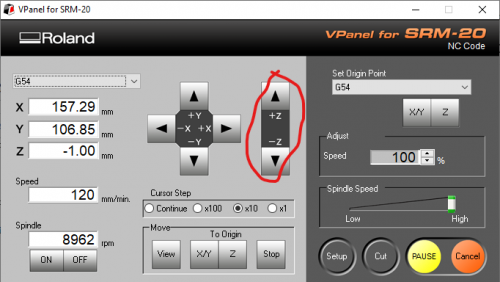
Now drop down the mill with the Z-arrows until almost touch the surface. !! Be careful not to hit the surface!! You will break the mill.
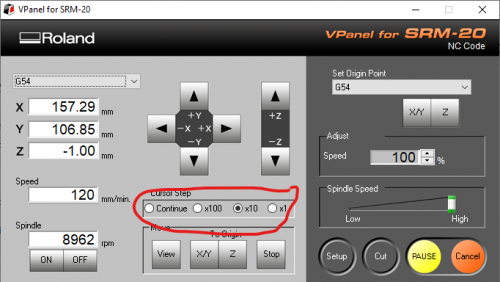
Make more precise adjustment by changing the Cursor step.
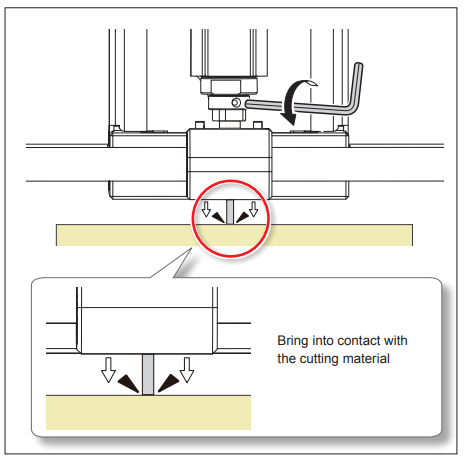
When you are as close as possible to the surface. Unscrew the mill with the small hex key, let it drop
and tighten it again.
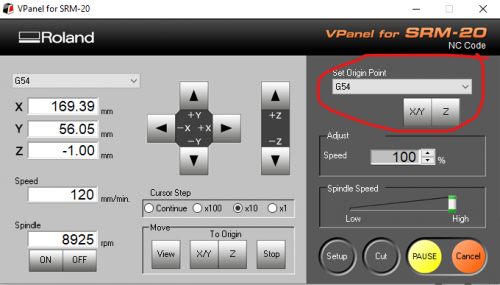
Now set the new origin point to G54 and click X/Y and Z.
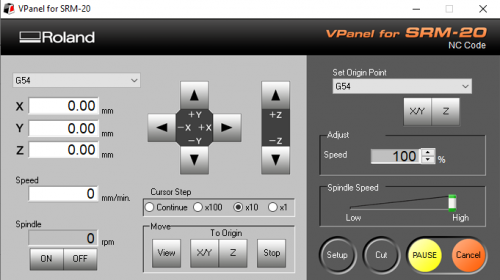
X, Y, Z should now be 0, 0, 0.
3. Uploading the G-Code using an existing .nc file.
This option is optimized for a 5mm or 6mm drill bit and will surface the bed with a 1mm depth. If you have a different mill or would like to surface it a bit deeper, follow the steps in 4.
A. Download Flatcam Surfacing .zip folder, unpack it.
B. Open VPanel for SRM-20.
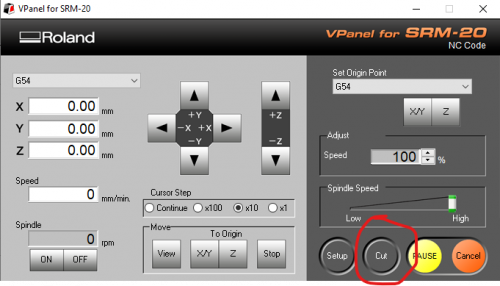
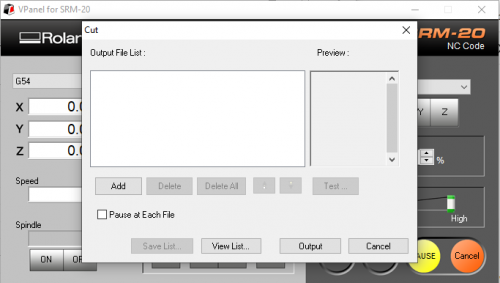
C. Press Cut
and press Add
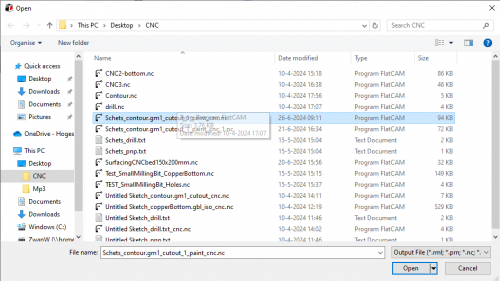
look for the file called "Schets_contour.gm1_cutout_1_paint_cnc.nc", open it.
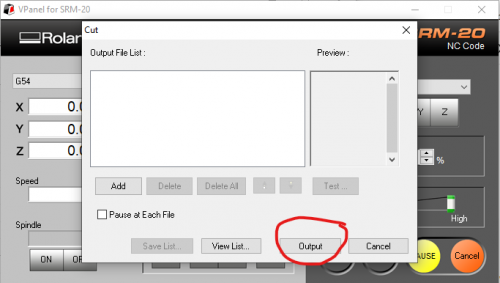
D. Press "OUTPUT" to start the milling process.
4. Changing the depth of the surfacing G-Code.
If you would like to make sure precise adjustments to the surfacing, like changing the depth or the size of the milling bit, you can do it by using Flatcam. Here I will explain how to change the depth. If you're using a different mill than a 5 or 6mm one, go to 5.
A. Download Flatcam Surfacing .zip folder, unpack it.
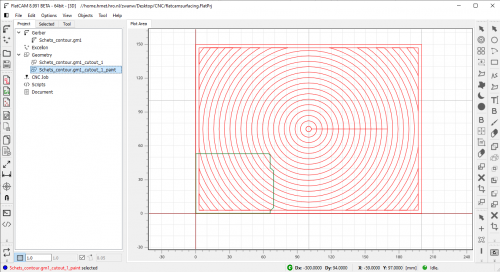
Open Flatcam and Open "flatcamsurfacing.FlatPrj" from your unpacked archive.
B. Changing the surface depth.
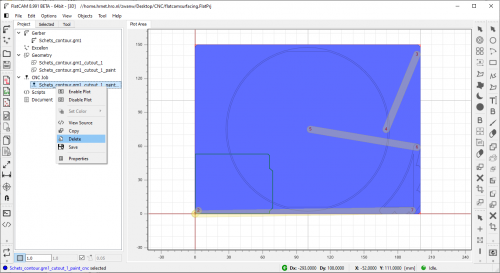
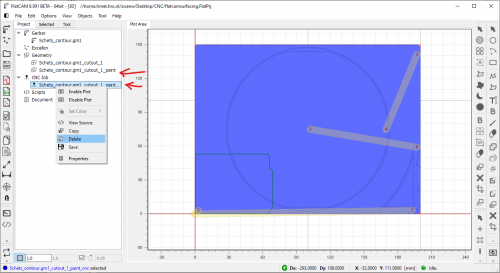
If you just want to surface a bit more or less than 1mm, first delete the existing CNC job.
Then double click "Schets_contour.gm1_cutout_1_paint"
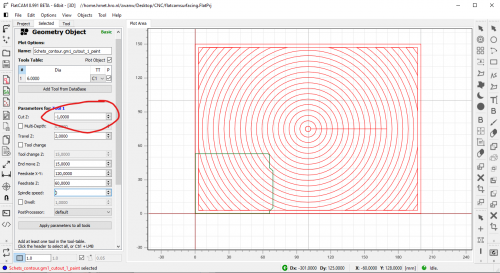
and change the CutZ to the preferred depth in mm (should always be negative!)
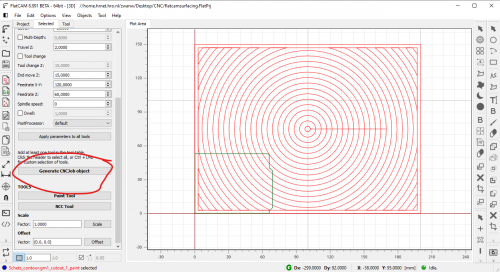
Now scroll down and press Generate CNCJob object.
and press "Save CNC Code" and give it the name you like .
C. Continue with 3B.
<5>Painting the surfacing traces for different mill sizes
If you want to change the size of the mill in the setting, we need to paint new traces.
A. Download Flatcam Surfacing .zip folder, unpack it.
Open Flatcam and Open "flatcamsurfacing.FlatPrj" from your unpacked archive.
B. Delete the CNC Job "Schets_countour.gm1_cutout_1_paint_cnc" and the Geometry "Schets_contour.gm1_cutout_1_paint"
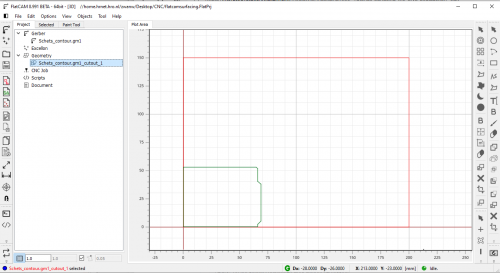
C. Double click "Schets_contour.gm1_cutout_1" under Geometry
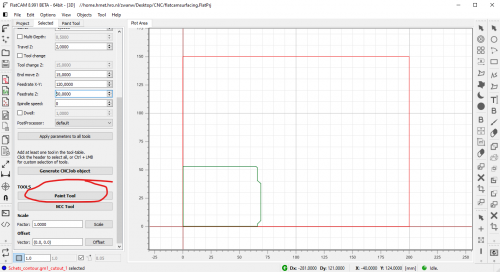
scroll down and press Paint Tool under the TOOLS tab.
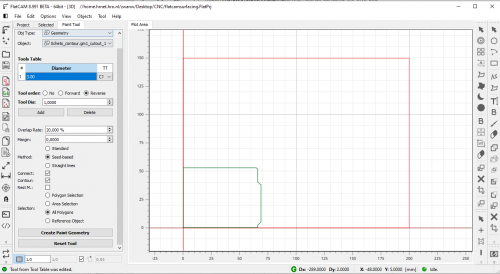
Change the Diameter to the mill you'd like to use in the Tools Table and the TT to C1. In this example I changed the mill to 3mm.
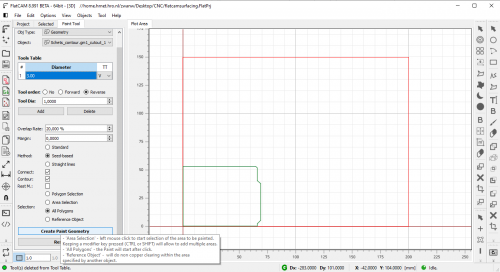
Make sure you highlight the Tool you'd like to use and press "Create Paint Geometry".
D. Now you should see your need traces. Continue with 4B.
