Difference between revisions of "Touch Board"
| Line 1: | Line 1: | ||
=What is the Touch Board?= | =What is the Touch Board?= | ||
| − | + | The Touch Board is a microcontroller (like [[Arduino]] for instance), with already build in capacitive sensors (also known as touch sensors) as well as an audio socket. This set up makes the board really convenient for projects having interaction through touch (or proximity) and a sound output. <br> | |
| − | [[File:Touchboard.png| 600px]] | + | [[File:Touchboard.png| 600px]]<br> |
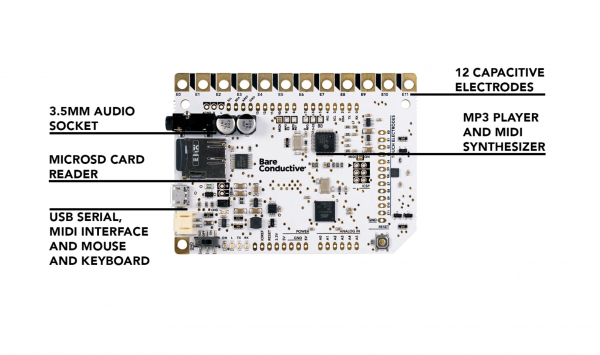
| − | + | In detail, the Touch Board has: | |
| + | * 12 CAPACITIVE ELECTRODES | ||
| + | The Touch Board has 12 capacitive electrodes that respond to a touch. These electrodes can be extended with conductive materials, like Electric Paint, | ||
| + | * MP3 PLAYER AND MIDI SYNTHESIZER | ||
| + | The Touch Board has on-board MP3 playback and a MIDI synthesizer. This means you can either play MP3 files or simulate a MIDI instrument by touching the electrodes. | ||
| + | *3.5MM AUDIO SOCKET | ||
| + | In order to hear the sounds coming from the Touch Board simply connect either headphones or speakers to the 3.5mm audio socket. | ||
| + | * MICROSD CARD READER | ||
| + | Upload MP3 files onto the supplied microSD card and change it without having to reprogram the Touch Board. | ||
| + | *USB SERIAL, MIDI INTERFACE AND MOUSE AND KEYBOARD | ||
| + | When plugged into a computer, the Touch Board can act as a USB serial device, USB MIDI interface or as a USB mouse or keyboard. Use the data from the electrodes as an input for software that utilises either serial, MIDI or keyboard strokes. | ||
| + | <br> | ||
| + | You can also have a look at the Technical Data Sheet [[https://cdn.shopify.com/s/files/1/0520/3669/8292/files/TB_tech_data_sheet.pdf?v=1614356709 here]]. | ||
===Some links about it=== | ===Some links about it=== | ||
Revision as of 13:24, 23 January 2023
What is the Touch Board?
The Touch Board is a microcontroller (like Arduino for instance), with already build in capacitive sensors (also known as touch sensors) as well as an audio socket. This set up makes the board really convenient for projects having interaction through touch (or proximity) and a sound output.

In detail, the Touch Board has:
- 12 CAPACITIVE ELECTRODES
The Touch Board has 12 capacitive electrodes that respond to a touch. These electrodes can be extended with conductive materials, like Electric Paint,
- MP3 PLAYER AND MIDI SYNTHESIZER
The Touch Board has on-board MP3 playback and a MIDI synthesizer. This means you can either play MP3 files or simulate a MIDI instrument by touching the electrodes.
- 3.5MM AUDIO SOCKET
In order to hear the sounds coming from the Touch Board simply connect either headphones or speakers to the 3.5mm audio socket.
- MICROSD CARD READER
Upload MP3 files onto the supplied microSD card and change it without having to reprogram the Touch Board.
- USB SERIAL, MIDI INTERFACE AND MOUSE AND KEYBOARD
When plugged into a computer, the Touch Board can act as a USB serial device, USB MIDI interface or as a USB mouse or keyboard. Use the data from the electrodes as an input for software that utilises either serial, MIDI or keyboard strokes.
You can also have a look at the Technical Data Sheet [here].
Some links about it
Use the Touch Board to play sounds
The Touch Board has a practical SD card reader, enabling us to upload sounds in MP3 format.
You can follow Changing the sounds of the board this instructions to change the sounds on the board.
You can use your own sounds, or look for free to use sound material online.
Here you can find a list of websites where you can find copyright free and ready to use sounds:
- https://freesound.org/
- https://www.nasa.gov/connect/sounds/index.html
- archive.org https://archive.org/details/audio
- youtube.com/audiolibrary - https://support.google.com/youtube/answer/3376882?hl=en-GB
- https://sound-effects.bbcrewind.co.uk/
- https://soundbible.com
- https://www.soundjay.com/
- https://free-loops.com/
- https://www.freesoundslibrary.com/
- https://sound-effects.bbcrewind.co.uk/
NB. Files can be converted by VLC or online, in case they are not in mp3 format.
Setting up your Touch Board with the Arduino Installer
The touch board can be programmed on the Arduino IDE software.
In order to do so it is first required to install some dependencies that make you able to work with the Touch Board. You can find the instructions here.
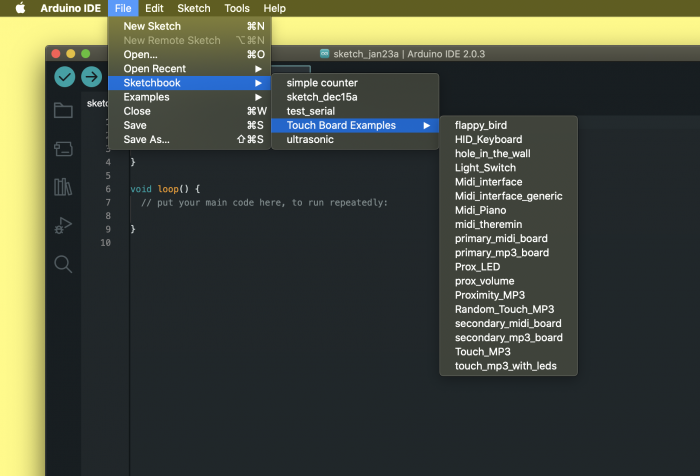
Once you completed the instructions you can check whether the library has been installed correctly by opening your Arduino IDE and go to:
File --> Sketchbook --> Touch Board Examples

You should be able to find already a bunch of example code you can use and modify to make it your own.
To play MP3 files from the SD card when touching the sensors you can use Touch_MP3. You can also use the touch board as a keyboard with the HID_keyboard sketch.
Making Distance Sensors: Trigger the Touch Board with proximity
Maybe you might want to use the touch board sensor in a different way, maybe without actual touching happening but only by proximity to the sensor. The board allows you to modify the sensitivity of the sensor to be able to detect presence without any touching. to do so you can follow the instructions here.
Hold electrode to play sound or Play only when touched
Here you can find an already made example code that allows you to play a track only while the sensor is touched. The sound will stop when releasing the sensor.
Hold To Play Code
Download this library
Playing more sounds simultaneously: Polyphonic Playback
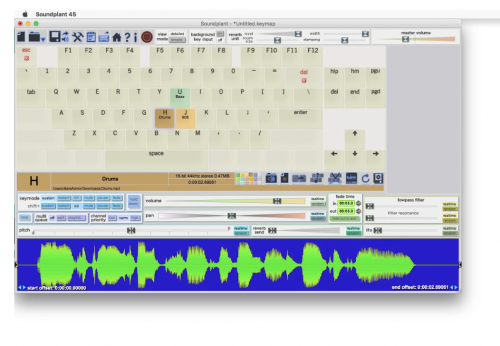
As you might have noticed, the Touch Board is not able to play multiple sounds at the same time - or to do what is called Polyphonic playback. You can still achieve this by using your touch board as a keyboard and play sounds with the help of a software. You can find here a guide on how to set up your Touch Board with Soundplant.
