Difference between revisions of "Tinkering workshop"
| Line 432: | Line 432: | ||
<syntaxhighlight lang="python" line='line'> | <syntaxhighlight lang="python" line='line'> | ||
| − | |||
import board | import board | ||
from adafruit_circuitplayground import cp | from adafruit_circuitplayground import cp | ||
| Line 438: | Line 437: | ||
import pulseio | import pulseio | ||
import array | import array | ||
| − | import | + | import sys |
| − | |||
# change into your own color by changing the rgb value | # change into your own color by changing the rgb value | ||
| − | myID_colour=(0,255, | + | myID_colour = (100, 55, 50) |
| − | # NeoPixel brightness | + | OFF = (0, 0, 0) |
| + | color_got_hit = (255, 0, 0) | ||
| + | color_got_saved = (100, 0, 100) | ||
| + | Neo_smiley_face = [1, 3, 5, 6, 7, 8, 9, 10] | ||
| + | full_board_led = [0, 1, 2, 3, 4, 5, 6, 7, 8, 9, 10] | ||
| + | counter = 0 | ||
| + | lifes = 10-counter | ||
| + | |||
| + | # Initializes NeoPixel ring | ||
| + | cp.pixels.brightness = 0.2 | ||
| + | # my id color | ||
| + | cp.pixels.fill(myID_colour) | ||
| + | |||
# Create IR input, maximum of 59 bits. | # Create IR input, maximum of 59 bits. | ||
| Line 480: | Line 490: | ||
return True | return True | ||
| − | + | ||
| − | |||
| − | |||
| − | |||
| − | |||
# serial print once when activated | # serial print once when activated | ||
| Line 490: | Line 496: | ||
while True: | while True: | ||
| − | # when button is pressed, send IR pulse | + | # when button is pressed, send IR pulse |
| − | # detection is paused then cleared and resumed after a short pause | + | # detection is paused then cleared and resumed after a short pause |
| − | # this prevents reflected detection of own IR | + | # this prevents reflected detection of own IR |
while cp.touch_A3: | while cp.touch_A3: | ||
pulseIn.pause() # pauses IR detection | pulseIn.pause() # pauses IR detection | ||
| Line 506: | Line 512: | ||
pulseIn.resume() | pulseIn.resume() | ||
# Wait for a pulse to be detected of desired length | # Wait for a pulse to be detected of desired length | ||
| − | + | # our array is 59 bytes so anything shorter ignore | |
| + | while len(pulseIn) >= 59: | ||
pulseIn.pause() | pulseIn.pause() | ||
# converts pulseIn raw data into useable array | # converts pulseIn raw data into useable array | ||
| Line 517: | Line 524: | ||
print('Received correct Button A control press!') | print('Received correct Button A control press!') | ||
t_end = time.monotonic() + 0.8 # saves time 2 seconds in the future | t_end = time.monotonic() + 0.8 # saves time 2 seconds in the future | ||
| − | while time.monotonic() < t_end: | + | while time.monotonic() < t_end: |
| + | |||
for x in range(10): | for x in range(10): | ||
| − | if x!= 0 and x!=2 and x!=4: | + | cp.pixels[x] = OFF |
| − | cp.pixels[x]=( | + | for x in range(10): |
| + | if x != 0 and x != 2 and x != 4: | ||
| + | cp.pixels[x] = (color_got_saved) | ||
| + | cp.play_file("rise.wav") | ||
| + | time.sleep(0.2) | ||
| + | |||
| + | if counter < 10 and counter > 0: | ||
| + | counter = counter-1 | ||
| + | lifes = 10-counter | ||
| + | for x in range(10): | ||
| + | cp.pixels[x] = OFF | ||
| + | else: | ||
| + | for i in range(lifes): | ||
| + | cp.pixels[full_board_led[i]] = myID_colour | ||
| + | pulseIn.clear() | ||
| + | pulseIn.resume() | ||
| + | |||
| + | |||
| − | |||
| − | |||
| − | |||
| − | |||
| − | |||
if fuzzy_pulse_compare(pulse_B, detected): | if fuzzy_pulse_compare(pulse_B, detected): | ||
| Line 532: | Line 552: | ||
t_end = time.monotonic() + 0.8 | t_end = time.monotonic() + 0.8 | ||
while time.monotonic() < t_end: | while time.monotonic() < t_end: | ||
| − | + | print(counter) | |
| − | cp.pixels. | + | print(lifes) |
| − | cp.play_file(" | + | for x in range(10): |
| − | time.sleep(0. | + | cp.pixels[x] = OFF |
| − | + | for x in range(10): | |
| + | cp.pixels[x] = (color_got_hit) | ||
| + | cp.play_file("dip.wav") | ||
| + | time.sleep(0.2) | ||
| + | counter = counter+1 | ||
| + | lifes = 10-counter | ||
| + | if lifes < 1: | ||
| + | sys.exit() | ||
| + | for x in range(10): | ||
| + | cp.pixels[x] = OFF | ||
| + | for i in range(lifes): | ||
| + | cp.pixels[full_board_led[i]] = myID_colour | ||
| + | else: | ||
| + | for i in range(lifes): | ||
| + | cp.pixels[full_board_led[i]] = myID_colour | ||
| + | pulseIn.clear() | ||
| + | pulseIn.resume() | ||
time.sleep(.1) | time.sleep(.1) | ||
pulseIn.clear() | pulseIn.clear() | ||
pulseIn.resume() | pulseIn.resume() | ||
| + | |||
</syntaxhighlight> | </syntaxhighlight> | ||
Revision as of 17:44, 8 April 2021
Yoana:
introduction on Adafruit Circuit Playground Express
install CircuitPython
install mu editor
Interacting to the Serial Console
The REPL
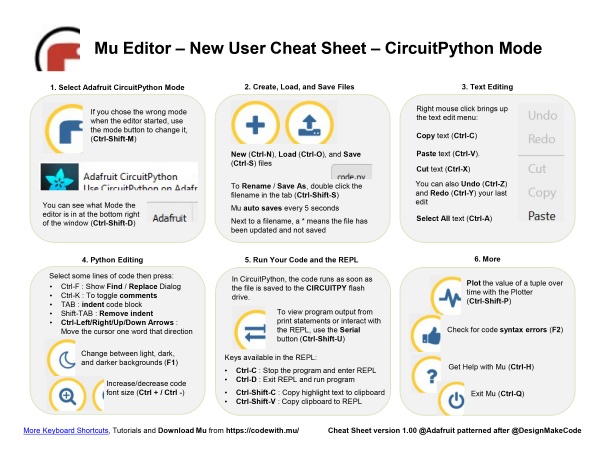
short cuts:
Indentation and commenting options
Python programs are Space holder Character Sensitive.
To indent the three lines, I selected them all and then pressed the Tab key.
To unindent, select some lines and press Shift-Tab. For commenting: select lines and press command(control)-k
http://interactionstation.wdka.hro.nl/wiki/Cpx-basic
Nan==
install library..
examples:
library CircuitPython Made Easy
1. Smiley face with NeoPixels
2. Capacitive Touch & NeoPixels
3. Play audio file
4. Drum machine
5. final infrared tagging games(maybe)
timing / schedule
start 13:00 end 17:00
13:00 - 14:00 Yoana introduction part
14:00 - 14:15 - break
14:15 - 16:00 Nan's part
16:00 - 16:15 break
16:15 - 17:00 Play
Introduction on Adafruit Circuit Playground Express
Install CircuitPython
Install mu editor
Python is the fastest-growing programming language. And CircuitPython is based on Python language but designed to run on microcontroller boards.
CircuitPython is designed with education in mind.
It's easy to start learning how to program and you get immediate feedback from the board.
Before we start we all have to do this to set up:
1. Install or update CircuitPython!
https://learn.adafruit.com/adafruit-circuit-playground-express/circuitpython-quickstart
*1. Click the link below and download the latest UF2 file:
https://circuitpython.org/board/circuitplayground_express/
*2. Plug your Circuit Playground Express into your computer via a (data)USB cable.
*3. Double-click the small Reset button in the middle of the CPX(short for circuit playground express).
 you will see all of the LEDs turn green. If they turn all red, check the USB cable, try another USB port, etc.
 (If double-clicking doesn't do it, try a single-click!)
*4. You will see a new disk drive appear called CPLAYBOOT
  Drag the adafruit-circuitpython-etc...uf2 file onto it.
*5. The CPLAYBOOT drive will disappear and a new disk drive will appear called CIRCUITPY
That's it! You're done :)
2. Installing Mu Editor
Download Mu from(if you are using computers from school, the Mu Editor is already installed)
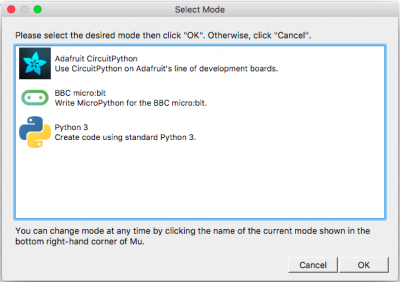
The first time you start Mu, you will be prompted to select your 'mode' -
you can always change your mind later. For now please select CircuitPython!
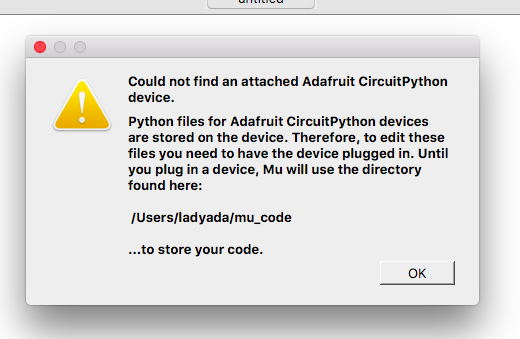
Mu attempts to auto-detect your board, so please plug in your CircuitPython device and make sure it shows up as a CIRCUITPY drive before starting Mu
Indentation and commenting options
Python programs are Space holder Character Sensitive.
To indent the three lines, I selected them all and then pressed the Tab key.
To unindent, select some lines and press Shift-Tab. For commenting: select lines and press command(control)-k
3. Hello World (Blink in Circuitpython)
 1    import board
 2    import digitalio
 3    import time
 4
 5    led = digitalio.DigitalInOut(board.D13)
 6    led.direction = digitalio.Direction.OUTPUT
 7
 8    while True:
 9        led.value = True
10        time.sleep(0.5)
11        led.value = False
12        time.sleep(0.5)
4. Interacting to the Serial Console
The REPL
The other feature of the serial connection is the Read-Evaluate-Print-Loop, or REPL.
The REPL allows you to enter individual lines of code and have them run immediately.
It's really handy if you're running into trouble with a particular program and can't figure out why.
It's interactive so it's great for testing new ideas.
To use the REPL, you first need to be connected to the serial console.
Once that connection has been established, you'll want to press Ctrl + C.
If there is code running, it will stop and you'll see Press any key to enter the REPL. Use CTRL-D to reload.
Follow those instructions, and press any key on your keyboard.
https://learn.adafruit.com/adafruit-circuit-playground-express/the-repl
CircuitPython Made Easy
Libraries:
Libraries are codes other people have written for you. The libraries we will be using are included as part of the CircuitPython code, but you still must import them into your program. Other libraries, for many uses, must be downloaded and placed in a folder named lib on the CIRCUITPY drive.
CircuitPython Libraries already included in CPX, But if you are using CPB, (CPX = Circuit Playground Express, CPB = Circuit Playground Bluefruit)
you need to install CircuitPython Libraries by download the file and put them in the folder named lib on the CIRCUITPY drive.
we will useCircuitPython Made Easy libraries, a simple way to include the Circuit Playground functionality in our code.
more reference and examples:
https://learn.adafruit.com/circuitpython-made-easy-on-circuit-playground-express
code examples
Neopixel smiley face
A Smiley Face😊
 1from adafruit_circuitplayground import cp
 2
 3# The NeoPixels are super-bright. Change the global brightness.
 4cp.pixels.brightness = 0.3
 5
 6while True:
 7    # The smiley's eyes
 8    cp.pixels[1] = (255, 0, 0)
 9    cp.pixels[3] = (255, 0, 0)
10
11    # The smiley's mouth
12    cp.pixels[5] = (255, 0, 255)
13    cp.pixels[6] = (255, 0, 255)
14    cp.pixels[7] = (255, 0, 255)
15    cp.pixels[8] = (255, 0, 255)
16    cp.pixels[9] = (255, 0, 255)
Let's blink a smiley face by using time.sleep
 1from adafruit_circuitplayground import cp
 2
 3# The NeoPixels are super-bright. Change the global brightness.
 4cp.pixels.brightness = 0.3
 5
 6import time
 7
 8while True:
 9    time.sleep(1)
10    # The smiley's eyes
11    cp.pixels[1] = (255, 0, 0)
12    cp.pixels[3] = (255, 0, 0)
13
14    # The smiley's mouth
15    cp.pixels[5] = (255, 0, 255)
16    cp.pixels[6] = (255, 0, 255)
17    cp.pixels[7] = (255, 0, 255)
18    cp.pixels[8] = (255, 0, 255)
19    cp.pixels[9] = (255, 0, 255)
20    time.sleep(1)
21
22    # The smiley's eyes
23    cp.pixels[1] = (0, 0, 0)
24    cp.pixels[3] = (0, 0, 0)
25
26    # The smiley's mouth
27    cp.pixels[5] = (0, 0, 0)
28    cp.pixels[6] = (0, 0, 0)
29    cp.pixels[7] = (0, 0, 0)
30    cp.pixels[8] = (0, 0, 0)
31    cp.pixels[9] = (0, 0, 0)
hmm... now the code seems to be too long
let's Shorten the code by implementing variables, "for" loops
 1import time
 2from adafruit_circuitplayground import cp
 3#neoPixel pins for the smiley face
 4pixels_pin=[1,  3,  5, 6, 7, 8, 9,10]
 5# The NeoPixels are super-bright. Change the global brightness.
 6cp.pixels.brightness = 0.1
 7light_colour=(105,0,105)
 8OFF=(0,0,0)
 9
10while True:
11    for i in range (7):
12        cp.pixels[pixels_pin[i]]=light_colour
13    time.sleep(1)
14    for i in range (7):
15        cp.pixels[pixels_pin[i]]=OFF
16    time.sleep(1)
much better!!! now if you add a time.sleep(0.5) in the for loop you will see a fading animation of the smiley face.
Touch sense
there are in total 7 touch pins on CPX. let's try to use the touch sensor to trigger the smiley face.
 1import time
 2from adafruit_circuitplayground import cp
 3#neoPixel pins for the smiley face
 4pixels_pin=[1,  3,  5, 6, 7, 8, 9,10]
 5# The NeoPixels are super-bright. Change the global brightness.
 6cp.pixels.brightness = 0.1
 7light_colour=(105,0,105)
 8OFF=(0,0,0)
 9
10while True:
11    if cp.touch_A4:
12        for i in range (7):
13            cp.pixels[pixels_pin[i]]=light_colour
14            time.sleep(.1)
15            print("A4-touched!")
16    else:
17        for i in range (7):
18            cp.pixels[pixels_pin[i]]=OFF
19            time.sleep(.1)
play audio file
 1import time
 2from adafruit_circuitplayground import cp
 3#neoPixel pins for the smiley face
 4pixels_pin=[1,  3,  5, 6, 7, 8, 9,10]
 5
 6# The NeoPixels are super-bright. Change the global brightness.
 7cp.pixels.brightness = 0.1
 8colour01=(105,0,105)
 9colour02=(0,100,105)
10OFF=(0,0,0)
11
12while True:
13    if cp.touch_A4:
14        for i in range (7):
15            cp.pixels[pixels_pin[i]]=colour01
16            time.sleep(0.03)
17            print("A4-touched!")
18        cp.play_file("rise.wav")
19    else:
20        for i in range (7):
21            cp.pixels[pixels_pin[i]]=OFF
22            time.sleep(0.03)
23    if cp.touch_A3:
24        for i in range (7):
25            cp.pixels[pixels_pin[i]]=colour02
26            time.sleep(0.03)
27            print("A3-touched!")
28
29        cp.play_file("dip.wav")
30    else:
31        for i in range (7):
32            cp.pixels[pixels_pin[i]]=OFF
33            time.sleep(0.03)
Drum Machine
https://learn.adafruit.com/adafruit-circuit-playground-express/playground-drum-machine
copy the drum samples there:
[samples]
 1# Circuit Playground 808 Drum machine
 2import time
 3import board
 4import touchio
 5import digitalio
 6
 7try:
 8    from audiocore import WaveFile
 9except ImportError:
10    from audioio import WaveFile
11
12try:
13    from audioio import AudioOut
14except ImportError:
15    try:
16        from audiopwmio import PWMAudioOut as AudioOut
17    except ImportError:
18        pass  # not always supported by every board!
19
20bpm = 120  # Beats per minute, change this to suit your tempo
21
22# Enable the speaker
23speaker_enable = digitalio.DigitalInOut(board.SPEAKER_ENABLE)
24speaker_enable.direction = digitalio.Direction.OUTPUT
25speaker_enable.value = True
26
27# Make the input capacitive touchpads
28capPins = (board.A1, board.A2, board.A3, board.A4, board.A5,
29           board.A6, board.TX)
30
31touchPad = []
32for i in range(7):
33    touchPad.append(touchio.TouchIn(capPins[i]))
34
35# The seven files assigned to the touchpads
36audiofiles = ["bd_tek.wav", "elec_hi_snare.wav", "elec_cymbal.wav",
37              "elec_blip2.wav", "bd_zome.wav", "bass_hit_c.wav",
38              "drum_cowbell.wav"]
39
40audio = AudioOut(board.SPEAKER)
41
42
43def play_file(filename):
44    print("playing file " + filename)
45    file = open(filename, "rb")
46    wave = WaveFile(file)
47    audio.play(wave)
48    time.sleep(bpm / 960)  # Sixteenth note delay
49
50
51while True:
52    for i in range(7):
53        if touchPad[i].value:
54            play_file(audiofiles[i])
connect to a proper speaker:
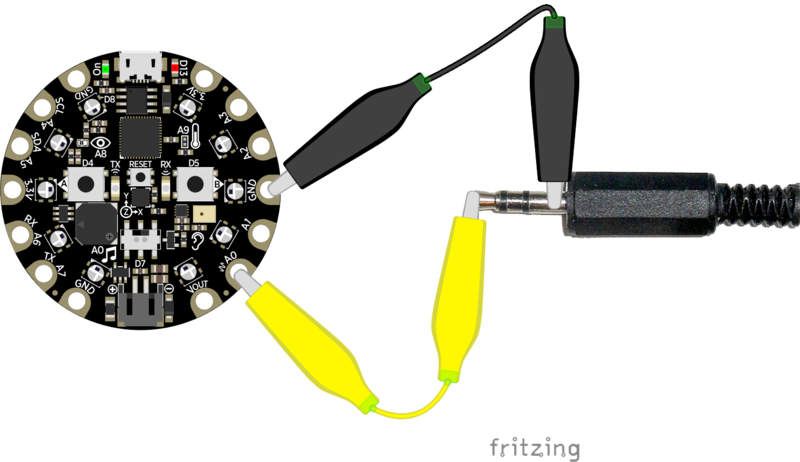
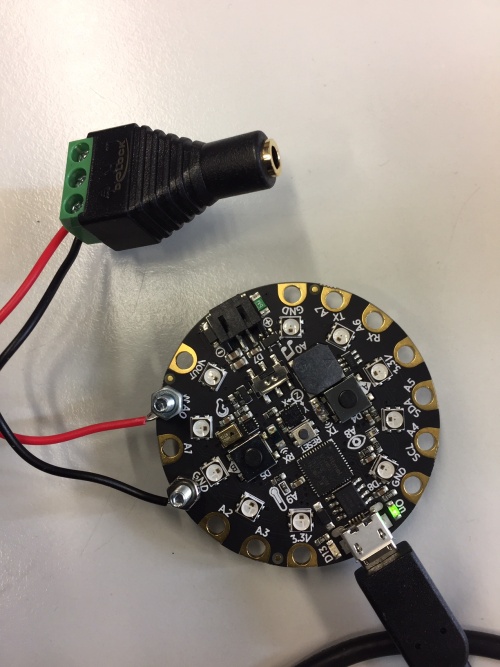
we can use A0 and GND as audio output and connect it to a proper speaker.
you can use M3 bolts and nuts to fix the electrical wire on the circuit playground express.
infrared tagging game:
  1import board
  2from adafruit_circuitplayground import cp
  3import time
  4import pulseio
  5import array
  6import sys
  7
  8# change into your own color by changing the rgb value
  9myID_colour = (100, 55, 50)
 10OFF = (0, 0, 0)
 11color_got_hit = (255, 0, 0)
 12color_got_saved = (100, 0, 100)
 13Neo_smiley_face = [1,  3,  5, 6, 7, 8, 9, 10]
 14full_board_led = [0, 1, 2, 3, 4, 5, 6, 7, 8, 9, 10]
 15counter = 0
 16lifes = 10-counter
 17
 18# Initializes NeoPixel ring
 19cp.pixels.brightness = 0.2
 20# my id color
 21cp.pixels.fill(myID_colour)
 22
 23
 24# Create IR input, maximum of 59 bits.
 25pulseIn = pulseio.PulseIn(board.IR_RX, maxlen=59, idle_state=True)
 26# Clears any artifacts
 27pulseIn.clear()
 28pulseIn.resume()
 29
 30# Creates IR output pulse
 31pwm = pulseio.PWMOut(board.IR_TX, frequency=38000, duty_cycle=2 ** 15)
 32pulse = pulseio.PulseOut(pwm)
 33
 34# Array for button A pulse, this is the pulse output when the button is pressed
 35# Inputs are compared against this same array
 36# array.array('H', [x]) must be used for IR pulse arrays when using pulseio
 37# indented to multiple lines so its easier to see
 38pulse_A = array.array('H', [1000, 3800, 65000, 950, 300, 200, 300, 1000, 350, 175,
 39    275, 215, 275, 250, 275, 215, 275, 225, 275, 215, 275, 1000, 300, 225, 275,
 40    950, 300, 950, 300, 1000, 300, 950, 300, 250, 275, 700, 300, 950, 300, 450,
 41    300, 475, 300, 215, 275, 725, 300, 950, 300, 200, 300, 715, 325, 900, 315,
 42    425, 315, 1000, 65000])
 43pulse_B = array.array('H', [1000, 3800, 65000, 960, 300, 200, 300, 950, 350, 190,
 44    215, 245, 300, 225, 275, 225, 275, 215, 275, 200, 300, 700, 300, 200, 300,
 45    700, 300, 1000, 315, 675, 300, 1000, 300, 200, 300, 700, 300, 950, 300,
 46    950, 300, 700, 300, 700, 300, 450, 300, 475, 275, 715, 300, 225, 275, 450,
 47    300, 450, 300, 1000, 65000])
 48
 49# Fuzzy pulse comparison function. Fuzzyness is % error
 50def fuzzy_pulse_compare(pulse1, pulse2, fuzzyness=0.5):
 51    if len(pulse1) != len(pulse2):
 52        return False
 53    for i in range(len(pulse1)):
 54        threshold = int(pulse1[i] * fuzzyness)
 55        if abs(pulse1[i] - pulse2[i]) > threshold:
 56            return False
 57    return True
 58
 59
 60
 61# serial print once when activated
 62print('IR Activated!')
 63
 64while True:
 65    # when button is pressed, send IR pulse
 66    # detection is paused then cleared and resumed after a short pause
 67    # this prevents reflected detection of own IR
 68    while cp.touch_A3:
 69        pulseIn.pause()  # pauses IR detection
 70        pulse.send(pulse_A)  # sends IR pulse
 71        time.sleep(.2)  # wait so pulses dont run together
 72        pulseIn.clear()  # clear any detected pulses to remove partial artifacts
 73        pulseIn.resume()  # resumes IR detection
 74    while cp.touch_A4:
 75        pulseIn.pause()
 76        pulse.send(pulse_B)
 77        time.sleep(.2)
 78        pulseIn.clear()
 79        pulseIn.resume()
 80# Wait for a pulse to be detected of desired length
 81    # our array is 59 bytes so anything shorter ignore
 82    while len(pulseIn) >= 59:
 83        pulseIn.pause()
 84# converts pulseIn raw data into useable array
 85        detected = array.array('H', [pulseIn[x] for x in range(len(pulseIn))])
 86#        print(len(pulseIn))
 87#        print(detected)
 88
 89    # Got a pulse, now compare against stored pulse_A and pulse_B
 90        if fuzzy_pulse_compare(pulse_A, detected):
 91            print('Received correct Button A control press!')
 92            t_end = time.monotonic() + 0.8  # saves time 2 seconds in the future
 93            while time.monotonic() < t_end:
 94
 95                for x in range(10):
 96                    cp.pixels[x] = OFF
 97                for x in range(10):
 98                    if x != 0 and x != 2 and x != 4:
 99                        cp.pixels[x] = (color_got_saved)
100                cp.play_file("rise.wav")
101                time.sleep(0.2)
102
103                if counter < 10 and counter > 0:
104                    counter = counter-1
105                    lifes = 10-counter
106                for x in range(10):
107                    cp.pixels[x] = OFF
108        else:
109            for i in range(lifes):
110                cp.pixels[full_board_led[i]] = myID_colour
111                pulseIn.clear()
112                pulseIn.resume()
113
114
115
116
117        if fuzzy_pulse_compare(pulse_B, detected):
118            print('Received correct Button B control press!')
119            t_end = time.monotonic() + 0.8
120            while time.monotonic() < t_end:
121                print(counter)
122                print(lifes)
123                for x in range(10):
124                    cp.pixels[x] = OFF
125                for x in range(10):
126                    cp.pixels[x] = (color_got_hit)
127                cp.play_file("dip.wav")
128                time.sleep(0.2)
129                counter = counter+1
130                lifes = 10-counter
131                if lifes < 1:
132                    sys.exit()
133
134                for x in range(10):
135                    cp.pixels[x] = OFF
136                for i in range(lifes):
137                    cp.pixels[full_board_led[i]] = myID_colour
138
139        else:
140            for i in range(lifes):
141                cp.pixels[full_board_led[i]] = myID_colour
142                pulseIn.clear()
143                pulseIn.resume()
144
145        time.sleep(.1)
146        pulseIn.clear()
147        pulseIn.resume()
