Difference between revisions of "MoreAboutServo"
| (4 intermediate revisions by one other user not shown) | |||
| Line 38: | Line 38: | ||
==Scripting considerations 3== | ==Scripting considerations 3== | ||
| − | There are 6 PWM PIN's on the Arduino, but you can attach servo's to all PIN's. After using the SERVO library and attaching to a PIN, the PWM doesn't function anymore (on any PIN). You can attach up to 12 Servo motors to one Arduino (so not limited to PWM number). | + | There are 6 PWM PIN's on the Arduino, but you can attach servo's to all PIN's. <BR> |
| + | After using the SERVO library and attaching to a PIN, the PWM doesn't function anymore (on any PIN). <BR> | ||
| + | You can attach up to 12 Servo motors to one Arduino (so not limited to PWM number).<BR> | ||
[http://forum.arduino.cc/index.php?topic=14434.0] | [http://forum.arduino.cc/index.php?topic=14434.0] | ||
On Teensy 3.1 you can run mny more servo's: | On Teensy 3.1 you can run mny more servo's: | ||
| Line 44: | Line 46: | ||
==Power considerations== | ==Power considerations== | ||
| − | You have to realize that servomotors use a lot of energy, electrical power. The Arduino can easily handle one, but two are already at the limit of the power the USB can provide. So you add batteries, and power the servo's directly using the battery. Then you get the problem that the | + | You have to realize that servomotors use a lot of energy, electrical power. The Arduino can easily handle one, but two are already at the limit of the power the USB can provide. So you add batteries, and power the servo's directly using the battery. Then you get the problem that the microcontroller restarts when the servo starts. This is because the servo is using a lot of energy starting up and the Voltage of the batteries suddenly drops. <BR> |
Two solutions (which have to be used both...). Adding a big capacitor, this works as a buffer for sudden drops in Voltage. But in the end you have to add a battery for the microcontroller. Giving both microcontroller and the servo's their own power source, only connecting the GND's will solve the problem.<BR> | Two solutions (which have to be used both...). Adding a big capacitor, this works as a buffer for sudden drops in Voltage. But in the end you have to add a battery for the microcontroller. Giving both microcontroller and the servo's their own power source, only connecting the GND's will solve the problem.<BR> | ||
| − | In this picture you can discover the 4 servo motors, the battery pack for the servo's, and the lipo battery for the | + | In this picture you can discover the 4 servo motors, the battery pack for the servo's, and the lipo battery for the microcontroller. This board has a RF12 transceiver for getting wireless commands, or send signals to other silhouets. And also there is a BlueSMiRf board [https://www.sparkfun.com/products/12577] (red bottom) for connecting to the Mindwave:<BR> |
[[File:Exaltation technology.jpg|300px]]<BR> | [[File:Exaltation technology.jpg|300px]]<BR> | ||
| Line 56: | Line 58: | ||
==How many servomotors can my project have?== | ==How many servomotors can my project have?== | ||
The servomotor uses a so called PWM PIN. That is a Pulse Width Modulation PIN. On the Arduino there are 6 PWM PIN's [http://www.arduino.cc/en/pmwiki.php?n=Tutorial/PWM]. <BR> | The servomotor uses a so called PWM PIN. That is a Pulse Width Modulation PIN. On the Arduino there are 6 PWM PIN's [http://www.arduino.cc/en/pmwiki.php?n=Tutorial/PWM]. <BR> | ||
| − | So you can attach 6 servomotors - if properly powered! (Actually you can attach many more to an ATMega328, see above). But of course a student wants 8. <BR><BR> | + | So you can attach 6 servomotors - if properly powered! (Actually you can attach many more to an ATMega328, see above "Scripting considerations 3"). But of course a student wants 8. <BR><BR> |
The solution was using the Teensy3.1, (or Teensy LC). These boards have a lot of PWM PIN's. Disadvantage is that these boards run on 3V. The Teensy3.1 functioned perfectly until ... by accident or something ... probably there was a 5V somewhere ... the Teensy3 was damaged.<BR> | The solution was using the Teensy3.1, (or Teensy LC). These boards have a lot of PWM PIN's. Disadvantage is that these boards run on 3V. The Teensy3.1 functioned perfectly until ... by accident or something ... probably there was a 5V somewhere ... the Teensy3 was damaged.<BR> | ||
See movie where the Teensy3.1 plays with 8 small blue servo's.[https://www.youtube.com/watch?v=zmn2pL9TALg]. <BR> | See movie where the Teensy3.1 plays with 8 small blue servo's.[https://www.youtube.com/watch?v=zmn2pL9TALg]. <BR> | ||
| Line 64: | Line 66: | ||
[[File:Dead servo.JPG|300px]]<BR> | [[File:Dead servo.JPG|300px]]<BR> | ||
You see that half of it's brain was BBQ-ed. | You see that half of it's brain was BBQ-ed. | ||
| + | [[Category:Motors]] | ||
Latest revision as of 12:09, 18 November 2022
The servomotor can normally only rotate a certain number of degrees ("normally", because you can hack it). The servo motor is used for instance for steering a car, not for driving. You can indicate the position of the servo motor lever.
The servomotor rotates, so the first movement is a circle. With some extra arms and mechanics you can change this into linear (horizontal, vertical) movement. Pushing can be done with 2 servomotors.
Getting one servo motor rotating is easy with an Arduino and this basic script (inside the Arduino Examples):
[1]
But several features occur when you start using more or try combining servo motors with other ATmega328 possiblities.
Pictures
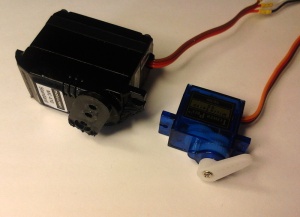
Servo motor, small and big:
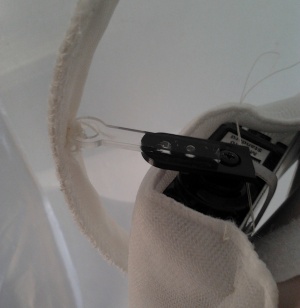
You can extend the arm, not too much though, depending on the force required.
Servo motor combination as a pusher, flat and rounded for on shoulder (and even more rounded)
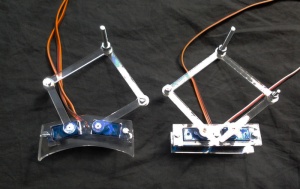
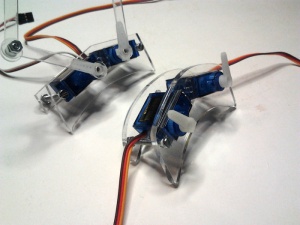
Design considerations
Servo motors pushers on a shoulder (project Exaltation of Jasna Rokegem):
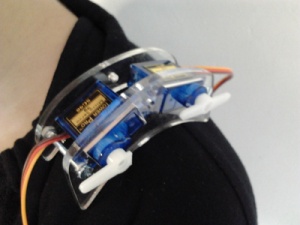
Scripting considerations 1: library collision
In the script you have to use a SERVO library. This is a piece of code which is hidden from your own script. If you use this library isolated (without adding other libraries) it will function fine. But for instance you cannot combine it with this library SoftwareSerial. These two libraries use the same functions (the timer) and will interfere with each other. What kind of situation will pose a problem? Say you want to have a bluetooth connection, this uses the Serial TX and RX. So opening Serial Window won't work. So you connect using a Softwareserial, which is also Serial, but on other PIN's than 0 and 1. Then you add a servo motor.
How to solve this?
The servomotor is needed, so the solution is not using SoftwareSerial. If you want debugging information you could switch to an LCD screen or another wireless connection, eg RF12.
Another example of library collision is using the interrupt and servo's at the same time: Taihen! Too bad!
(This problem occured in the coding for project "Ex-standing Waves" of Jasna Rokegem.
Scripting considerations 2: starting up
When you attach more servo's it is best not to have all servo's running at the same time. So after every servo.write(pos) it is smart to insert a small delay, say delay(15). While for the eye all is moving, for the electronics there is just one servo moving at the same time.
Scripting considerations 3
There are 6 PWM PIN's on the Arduino, but you can attach servo's to all PIN's.
After using the SERVO library and attaching to a PIN, the PWM doesn't function anymore (on any PIN).
You can attach up to 12 Servo motors to one Arduino (so not limited to PWM number).
[2]
On Teensy 3.1 you can run mny more servo's:
[3]
Power considerations
You have to realize that servomotors use a lot of energy, electrical power. The Arduino can easily handle one, but two are already at the limit of the power the USB can provide. So you add batteries, and power the servo's directly using the battery. Then you get the problem that the microcontroller restarts when the servo starts. This is because the servo is using a lot of energy starting up and the Voltage of the batteries suddenly drops.
Two solutions (which have to be used both...). Adding a big capacitor, this works as a buffer for sudden drops in Voltage. But in the end you have to add a battery for the microcontroller. Giving both microcontroller and the servo's their own power source, only connecting the GND's will solve the problem.
In this picture you can discover the 4 servo motors, the battery pack for the servo's, and the lipo battery for the microcontroller. This board has a RF12 transceiver for getting wireless commands, or send signals to other silhouets. And also there is a BlueSMiRf board [4] (red bottom) for connecting to the Mindwave:
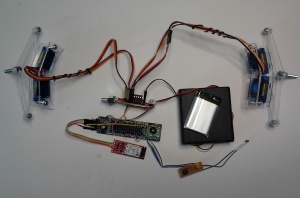
Electronics for fashion project "Ex-standing Waves" of Jasna Rokegem. Four servomotors in two pusher combinations.
Of course this is not enough for a student :-), why not 8 servo motors?
How many servomotors can my project have?
The servomotor uses a so called PWM PIN. That is a Pulse Width Modulation PIN. On the Arduino there are 6 PWM PIN's [5].
So you can attach 6 servomotors - if properly powered! (Actually you can attach many more to an ATMega328, see above "Scripting considerations 3"). But of course a student wants 8.
The solution was using the Teensy3.1, (or Teensy LC). These boards have a lot of PWM PIN's. Disadvantage is that these boards run on 3V. The Teensy3.1 functioned perfectly until ... by accident or something ... probably there was a 5V somewhere ... the Teensy3 was damaged.
See movie where the Teensy3.1 plays with 8 small blue servo's.[6].
Last but not least:
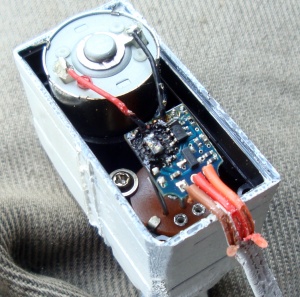
Servo motors can die:
You see that half of it's brain was BBQ-ed.
