Difference between revisions of "Workshop one"
| (13 intermediate revisions by one other user not shown) | |||
| Line 178: | Line 178: | ||
void loop() { | void loop() { | ||
// RGB | // RGB | ||
| − | CircuitPlayground.setPixelColor(0, 255, 0, 0 | + | CircuitPlayground.setPixelColor(0, 255, 0, 0); |
| − | |||
| − | |||
| − | |||
| − | |||
//Hexadecimal color code | //Hexadecimal color code | ||
| − | + | ||
| − | + | CircuitPlayground.setPixelColor(3, 0xFF0000); | |
| − | |||
| − | |||
| − | CircuitPlayground.setPixelColor( | ||
delay(1000); | delay(1000); | ||
CircuitPlayground.clearPixels(); | CircuitPlayground.clearPixels(); | ||
| Line 232: | Line 225: | ||
</syntaxhighlight> | </syntaxhighlight> | ||
| + | |||
| + | |||
| + | '''????? Now, it appears that the Neopixels are light up all the time.''' | ||
| + | |||
| + | '''let's try to turn all the Neopixels off for half a second after they all light up!''' | ||
| + | |||
| + | |||
| + | look at the last three lines of code from the previous example. | ||
===smiley face=== | ===smiley face=== | ||
| Line 238: | Line 239: | ||
#include <Adafruit_CircuitPlayground.h> | #include <Adafruit_CircuitPlayground.h> | ||
| − | |||
void setup() { | void setup() { | ||
CircuitPlayground.begin(); | CircuitPlayground.begin(); | ||
} | } | ||
| − | + | ||
void loop() { | void loop() { | ||
| − | + | ||
| − | + | ||
for (int i=0;i<10;i++){ | for (int i=0;i<10;i++){ | ||
if (i!=0 && i!=2 && i!=4){ | if (i!=0 && i!=2 && i!=4){ | ||
CircuitPlayground.setPixelColor(i, 255, 0, 0); | CircuitPlayground.setPixelColor(i, 255, 0, 0); | ||
| − | + | delay(100); | |
} | } | ||
| − | + | } | |
| + | |||
| + | delay(500); | ||
| + | for (int i=10;i>0;i--){ | ||
| + | if (i!=0 && i!=2 && i!=4){ | ||
| + | CircuitPlayground.setPixelColor(i, 0, 0, 0); | ||
| + | delay(100); | ||
| + | |||
| + | } | ||
| + | } | ||
| + | delay(500); | ||
} | } | ||
</syntaxhighlight> | </syntaxhighlight> | ||
| Line 348: | Line 358: | ||
delay(1000); | delay(1000); | ||
} | } | ||
| + | </syntaxhighlight> | ||
| + | |||
| + | |||
| + | <syntaxhighlight lang="C" line='line'> | ||
| + | |||
| + | #include <Adafruit_CircuitPlayground.h> | ||
| + | |||
| + | int value; | ||
| + | int toneValue; | ||
| + | void setup() { | ||
| + | Serial.begin(9600); | ||
| + | CircuitPlayground.begin(); | ||
| + | } | ||
| + | |||
| + | void loop() { | ||
| + | value = CircuitPlayground.lightSensor(); | ||
| + | |||
| + | Serial.print("Light Sensor: "); | ||
| + | Serial.println(value); | ||
| + | toneValue=value+150; | ||
| + | delay(10); | ||
| + | tone(A0, toneValue, 10); | ||
| + | } | ||
| + | |||
</syntaxhighlight> | </syntaxhighlight> | ||
| Line 355: | Line 389: | ||
<syntaxhighlight lang="C" line='line'> | <syntaxhighlight lang="C" line='line'> | ||
| + | #include <Adafruit_CircuitPlayground.h> | ||
| + | void setup() { | ||
| + | |||
| + | Serial.begin(9600); | ||
| + | CircuitPlayground.begin(); | ||
| + | } | ||
| + | |||
| + | void loop() { | ||
| + | //https://learn.adafruit.com/adafruit-circuit-playground-express/pinouts | ||
| + | // A0=D12, A1=D6, A2=D9, A3=D10, A4=D3, A5=D2, A6=D0,A7=D1 | ||
| + | Serial.print(" A1: "); Serial.print(CircuitPlayground.readCap(6)); | ||
| + | Serial.print(" A2: "); Serial.print(CircuitPlayground.readCap(9)); | ||
| + | Serial.print(" A3: "); Serial.print(CircuitPlayground.readCap(10)); | ||
| + | Serial.print(" A4: "); Serial.print(CircuitPlayground.readCap(3)); | ||
| + | Serial.print(" A5: "); Serial.print(CircuitPlayground.readCap(2)); | ||
| + | Serial.print(" A6: "); Serial.print(CircuitPlayground.readCap(0)); | ||
| + | Serial.print(" A7: "); Serial.println(CircuitPlayground.readCap(1)); | ||
| + | |||
| + | delay(50); | ||
| + | |||
| + | } | ||
| + | |||
| + | </syntaxhighlight> | ||
| + | <br> | ||
| + | <syntaxhighlight lang="C" line='line'> | ||
| + | #include <Adafruit_CircuitPlayground.h> | ||
| + | void setup() { | ||
| + | |||
| + | Serial.begin(9600); | ||
| + | CircuitPlayground.begin(); | ||
| + | } | ||
| + | |||
| + | void loop() { | ||
| + | //https://learn.adafruit.com/adafruit-circuit-playground-express/pinouts | ||
| + | // A0=D12, A1=D6, A2=D9, A3=D10, A4=D3, A5=D2, A6=D0,A7=D1 | ||
| + | Serial.println("0 "); | ||
| + | if (CircuitPlayground.readCap(6)>400){ | ||
| + | CircuitPlayground.setPixelColor(0, 255, 0, 0); | ||
| + | CircuitPlayground.playTone(523, 300); | ||
| + | } | ||
| + | |||
| + | if (CircuitPlayground.readCap(9)>400){ | ||
| + | CircuitPlayground.setPixelColor(1, 180, 60, 0); | ||
| + | CircuitPlayground.playTone(587, 300); | ||
| + | } | ||
| + | if (CircuitPlayground.readCap(10)>400){ | ||
| + | CircuitPlayground.setPixelColor(2, 100, 200, 0); | ||
| + | CircuitPlayground.playTone(659, 300); | ||
| + | } | ||
| + | if (CircuitPlayground.readCap(3)>400){ | ||
| + | CircuitPlayground.setPixelColor(3, 50, 250, 50); | ||
| + | CircuitPlayground.playTone(698, 300); | ||
| + | } | ||
| + | if (CircuitPlayground.readCap(2)>400){ | ||
| + | CircuitPlayground.setPixelColor(4, 0, 200, 100); | ||
| + | CircuitPlayground.playTone(784, 300); | ||
| + | } | ||
| + | if (CircuitPlayground.readCap(0)>400){ | ||
| + | CircuitPlayground.setPixelColor(5, 0, 150, 150); | ||
| + | CircuitPlayground.playTone(880, 300); | ||
| + | } | ||
| + | if (CircuitPlayground.readCap(1)>400){ | ||
| + | CircuitPlayground.setPixelColor(6, 255, 50, 200); | ||
| + | CircuitPlayground.playTone(988, 300); | ||
| + | } | ||
| + | delay(50); | ||
| + | CircuitPlayground.clearPixels(); | ||
| + | } | ||
</syntaxhighlight> | </syntaxhighlight> | ||
| Line 380: | Line 482: | ||
} | } | ||
</syntaxhighlight> | </syntaxhighlight> | ||
| + | <br> | ||
| + | |||
| + | <br> | ||
| + | <syntaxhighlight lang="C" line='line'> | ||
| + | |||
| + | #include <Adafruit_CircuitPlayground.h> | ||
| + | |||
| + | float value; | ||
| + | |||
| + | void setup() { | ||
| + | Serial.begin(9600); | ||
| + | CircuitPlayground.begin(); | ||
| + | } | ||
| + | |||
| + | void loop() { | ||
| + | // Take 10 milliseconds of sound data to calculate | ||
| + | value = CircuitPlayground.mic.soundPressureLevel(10); | ||
| + | |||
| + | Serial.print("Sound Sensor SPL: "); | ||
| + | Serial.println(value); | ||
| + | delay(50); | ||
| + | |||
| + | if(value>80){ | ||
| + | for (int i=0;i<10;i++){ | ||
| + | if (i!=0 && i!=2 && i!=4){ | ||
| + | CircuitPlayground.setPixelColor(i, 155, 0, 150); | ||
| + | delay(100); | ||
| + | if( i==9){ | ||
| + | delay(1000); | ||
| + | CircuitPlayground.clearPixels(); | ||
| + | } | ||
| + | } | ||
| + | } | ||
| + | |||
| + | } | ||
| + | } | ||
| + | |||
| + | |||
| + | </syntaxhighlight> | ||
| + | |||
<br> | <br> | ||
| Line 432: | Line 574: | ||
} | } | ||
</syntaxhighlight> | </syntaxhighlight> | ||
| + | <br> | ||
| + | <syntaxhighlight lang="C" line='line'> | ||
| + | #include <Adafruit_CircuitPlayground.h> | ||
| + | |||
| + | float X, Y, Z; | ||
| + | int zVal; | ||
| + | |||
| + | void setup() { | ||
| + | Serial.begin(9600); | ||
| + | CircuitPlayground.begin(); | ||
| + | } | ||
| + | |||
| + | void loop() { | ||
| + | X = CircuitPlayground.motionX(); | ||
| + | Y = CircuitPlayground.motionY(); | ||
| + | Z = CircuitPlayground.motionZ(); | ||
| + | Serial.print("X: "); | ||
| + | Serial.print(X); | ||
| + | Serial.print(" Y: "); | ||
| + | Serial.print(Y); | ||
| + | Serial.print(" Z: "); | ||
| + | Serial.println(Z); | ||
| + | Serial.println(zVal); | ||
| + | zVal=map(Z,-20,20,100,800); | ||
| + | |||
| + | // tone(A0, zVal, 10); | ||
| + | delay(10); | ||
| + | if(X>5){ | ||
| + | for (int i=0;i<5;i++){ | ||
| + | CircuitPlayground.setPixelColor(i, 200, 100, 0); | ||
| + | delay(10);} | ||
| + | }else{CircuitPlayground.clearPixels();} | ||
| + | |||
| + | if(X<-5){ | ||
| + | for (int i=5;i<10;i++){ | ||
| + | CircuitPlayground.setPixelColor(i, 200, 100, 0); | ||
| + | delay(10);} | ||
| + | }else{CircuitPlayground.clearPixels();} | ||
| + | if(Z<1){ | ||
| + | for (int i=0;i<10;i++){ | ||
| + | CircuitPlayground.setPixelColor(i, 50, 100, 100); | ||
| + | delay(10);} | ||
| + | }else{CircuitPlayground.clearPixels();} | ||
| + | } | ||
| + | </syntaxhighlight> | ||
| + | |||
| + | [[Category:Electronics]] | ||
| + | [[Category:Microcontrollers]] | ||
Latest revision as of 13:00, 21 November 2022
Microcontrollers
Computer and processor are generic terms for anything that can run a program, basically.
A controller or microcontroller usually refers to a simple processor that does only one task, like listening to sensors.
In explaining microcontrollers, we’ll distinguish them from computers, which contain more powerful processors that can run an operating system.
Arduino
what is an Arduino?
Arduino is an open source physical computing platform based on a simple input/output (I/O) board and a development environment that implements the Processing language. Arduino can be used to develop standalone interactive objects
or can be connected to software on your computer.
Arduino is composed of two major parts: the Arduino board, which is the piece of hardware you work on when you build your objects;
and the Arduino IDE, the piece of software you run on your computer. You use the IDE to createa sketch (a little computer program)
that you upload to the Arduino board. The sketch tells the board what to do.
In the meantime, HERE you can find ANYTHING about Arduino, including download the software
find a detailed introduction here [[1]]
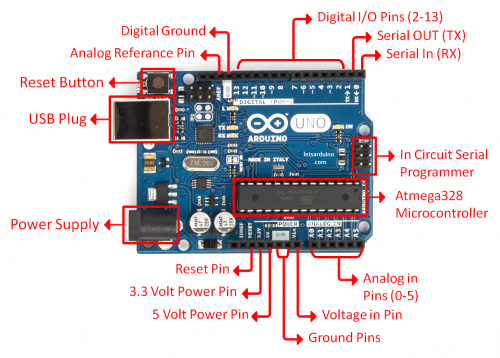
The pins on your Arduino are the places where you connect wires to construct a circuit (probably in conjunction with a breadboard and some wire. They usually have black plastic ‘headers’ that allow you to just plug a wire right into the board. The Arduino has several different kinds of pins, each of which is labeled on the board and used for different functions.
Adafruit Circuit Playground Express
How's that different?
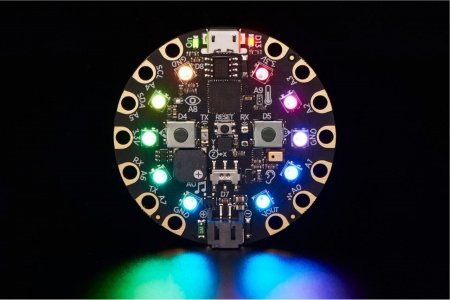
The Circuit Playground Express is also a microcontroller, produced by Adafruit, just like the Arduino Uno, however, it includes a bunch of build-in sensors to detect motion, temperature, light, and infrared light, and also has neopixel lights, and mini speakers. Circuit Playground Express can be programmed using Arduino IDE, CircuitPython, and Microsoft MakeCode.
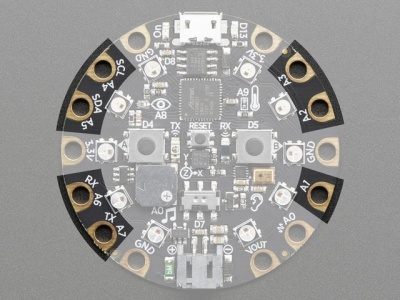
On the hardware side, Circuit Playground Express(we call it CPX in short) has connection pads while Arduino has pin headers.
Alligator/Croc Clip Pads:
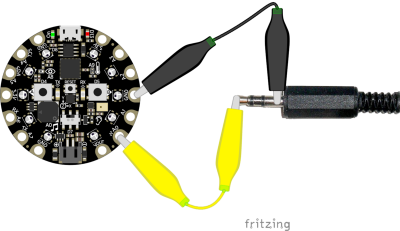
To make it super-easy to connect to the microcontroller, cpx has 14 connection pads. You can solder to them, use alligator/croc clips, sew with conductive thread, even use small m3 metal screws!
Set Up Arduino IDE
The Arduino Integrated Development Environment (IDE) is a cross-platform application (for Windows, macOS, Linux) that is written in functions from C and C++.[3] It is used to write and upload programs to Arduino compatible boards, but also, with the help of third-party cores, other vendor development boards including circuit playground express.
Download and install Arduino IDE:
https://www.arduino.cc/en/software
And follow the step here:
https://learn.adafruit.com/adafruit-circuit-playground-express/set-up-arduino-ide
we need 3 steps to set up Arduino IDE for circuit playground express.
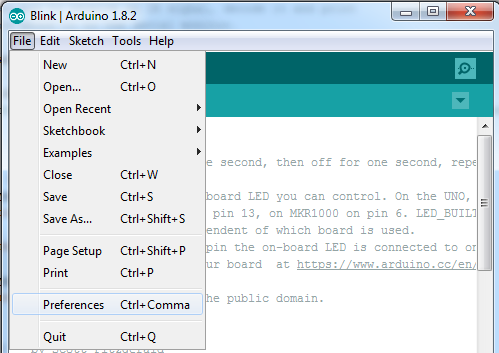
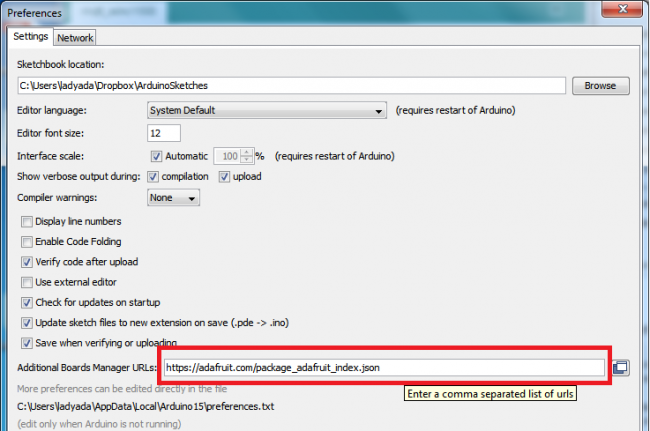
1. First activate the Adafruit URL
go to File --> preferences
copy the link below to Additional Boards Manager URLs:
https://adafruit.github.io/arduino-board-index/package_adafruit_index.json
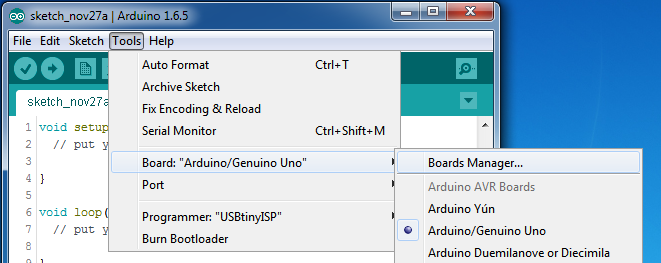
2. Then install the Adafruit SAMD package
open the Boards Manager by navigating to the Tools->Board menu.
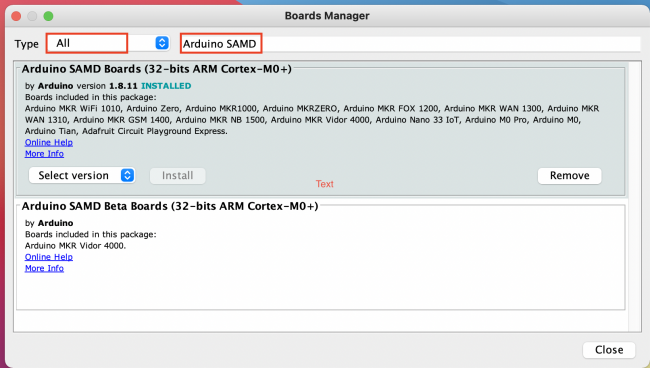
You can type Arduino SAMD in the top search bar, then when you see the entry, click Install
3. install Circuit Playground Library.
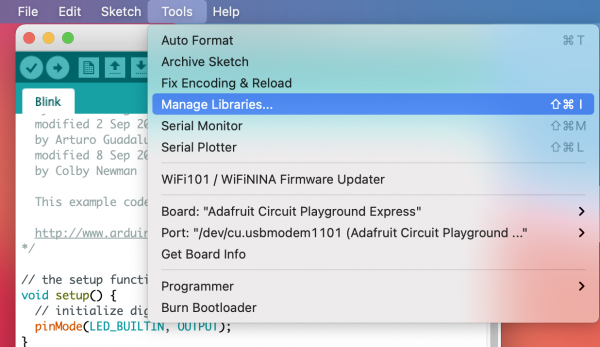
Go to Tools --> Manage Libraries.
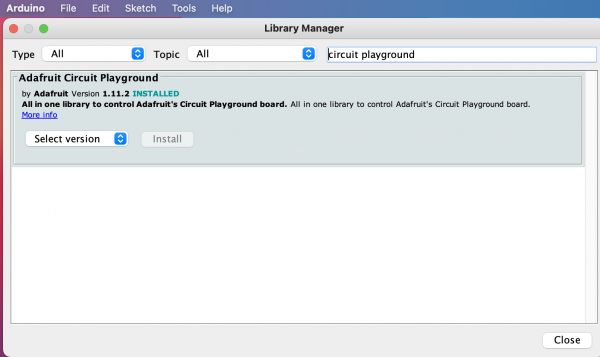
Type Circuit Playground in the top search bar then install circuit playground Library.
CPX onboard sensors & Pinouts
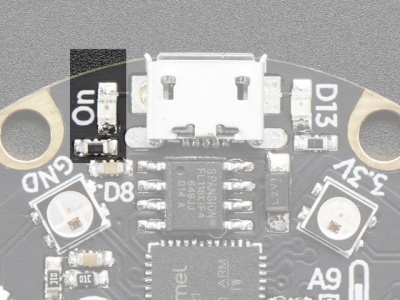
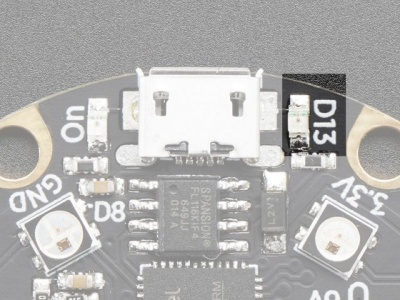
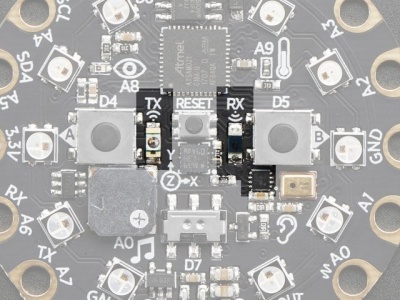
1. Green LED lets you know that the CPX is powered on.------ 2. Red LED on Digital pin#13
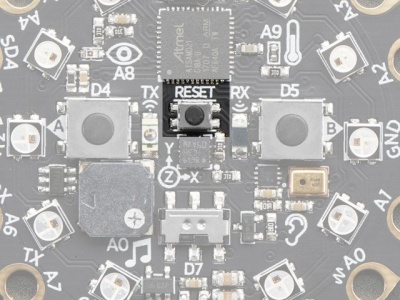
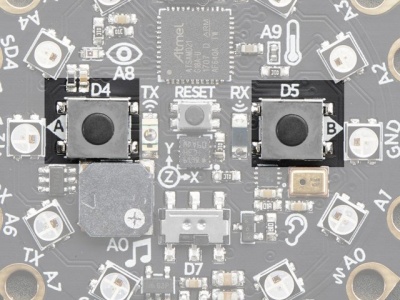
3. This small button is for Resetting the board. ------------------ 4. Button A and B on Digital pin #4 and #5
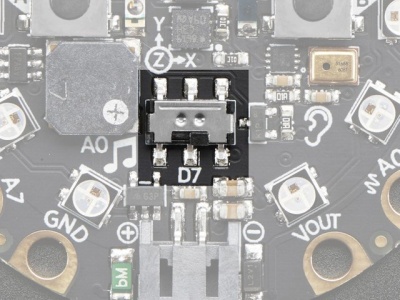
5. slide switch on Digital pin #7 - - - - - - - - - - - - - - - - - - - - - - 6. 7 Capacitive Touch pads from A1-A7
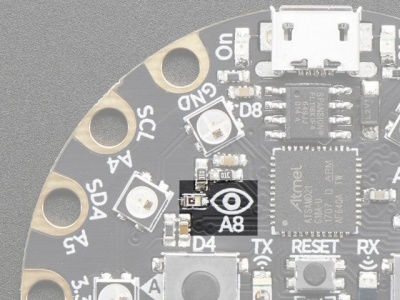
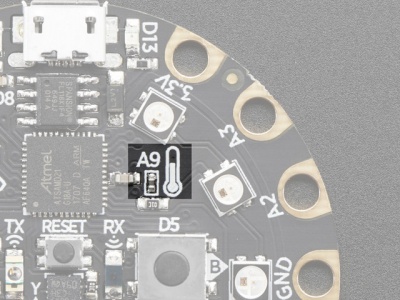
7. Light Sensor on pin A8 - - - - - - - - - - - - - - - - - - - - - - - - - - - 8. Temperature Sensor on A9
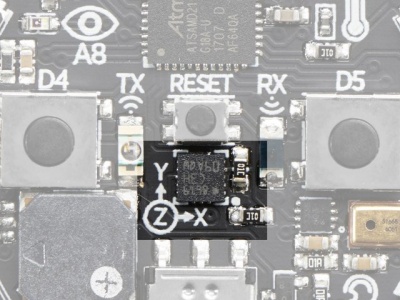
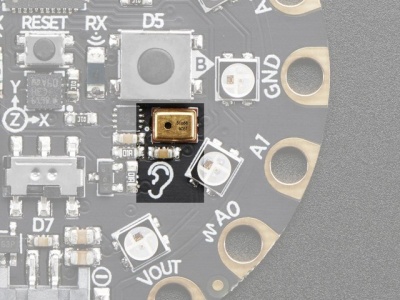
9. motion sensor (LIS3DH xyz) - - - - - - - - - - - - - - - - - - - - - - - - - 10. Microphone Audio Sensor
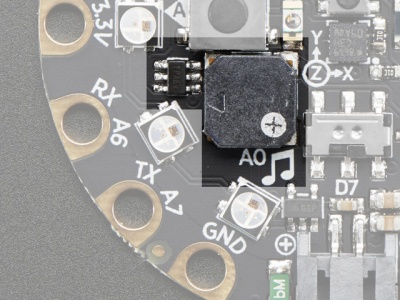
11. speaker and audio output pin on A0
12. Infrared Receive/Transmit
Pinouts:
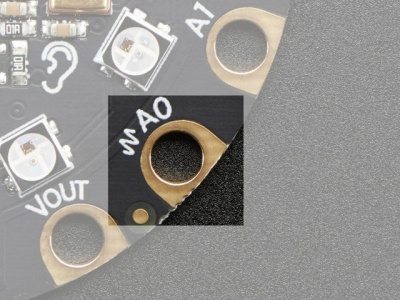
A0 / D12 - true analog output so it's great for playing audio clips.
A1 / D6 - digital I/O, or analog Input, PWM output,capacitive touch sensor
A2 / D9 - digital I/O, or analog Input, PWM output,capacitive touch sensor
A3 / D10 - digital I/O, or analog Input.PWM output,capacitive touch sensor
A4 / D3 - digital I/O, or analog Input, capacitive touch sensor
A5 / D2 - digital I/O, or analog Input, capacitive touch sensor
A6 / D0 - digital I/O, or analog Input, PWM output,capacitive touch sensor
A7 / D1 - digital I/O, or analog Input, PWM output,capacitive touch sensor
Examples
Compile Upload and Blink
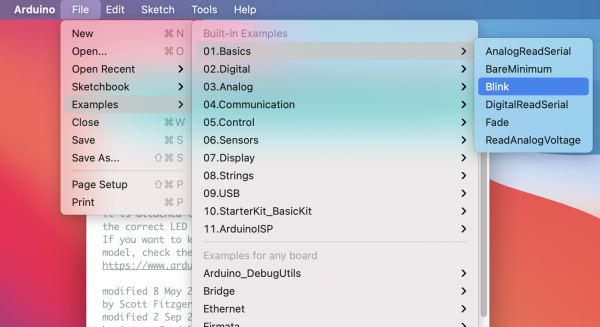
let's Open Arduino IDE and open the Blink example.
GO TO File--> Examples -->01.Basics --> Blink this will open example Blink.
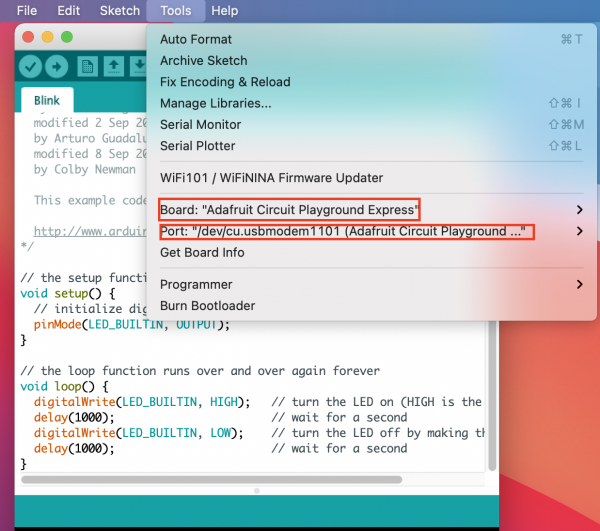
Select Board and Port :
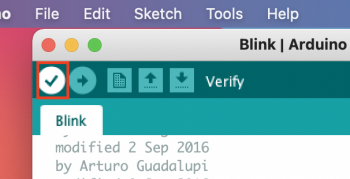
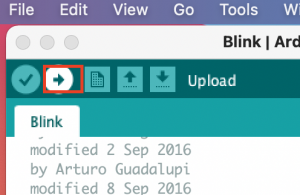
Verify and upload the code
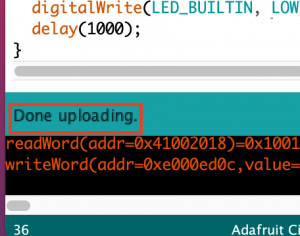
when it finished uploading you can see a message "Done uploading "at the bottom left corner:
This example turns an onboard LED on for one second, then off for one second, repeatedly. normally onboard led is on Pin 13.
in this case, is the Red LED on CPX.
NeoPixels
 1#include <Adafruit_CircuitPlayground.h>
 2
 3void setup() {
 4  CircuitPlayground.begin();
 5}
 6
 7void loop() {
 8// RGB
 9  CircuitPlayground.setPixelColor(0, 255,   0,   0);
10//Hexadecimal color code
11
12  CircuitPlayground.setPixelColor(3, 0xFF0000);
13  delay(1000);
14  CircuitPlayground.clearPixels();
15  delay(500);
16}
light up Neopixels one after another in a for loops:
"for"statement:
https://www.arduino.cc/reference/en/language/structure/control-structure/for/
 1//light up Neopixels one after another
 2#include <Adafruit_CircuitPlayground.h>
 3
 4void setup() {
 5  CircuitPlayground.begin();
 6}
 7
 8void loop() {
 9
10
11for (int i=0;i<10;i++){
12
13    CircuitPlayground.setPixelColor(i, 200,   100,   0);
14    delay(100);
15
16 }
17
18}
????? Now, it appears that the Neopixels are light up all the time.
let's try to turn all the Neopixels off for half a second after they all light up!
look at the last three lines of code from the previous example.
smiley face
 1#include <Adafruit_CircuitPlayground.h>
 2void setup() {
 3  CircuitPlayground.begin();
 4}
 5
 6void loop() {
 7
 8
 9for (int i=0;i<10;i++){
10    if (i!=0 && i!=2 && i!=4){
11    CircuitPlayground.setPixelColor(i, 255,   0,   0);
12    delay(100);
13     }
14      }
15
16delay(500);
17
18for (int i=10;i>0;i--){
19    if (i!=0 && i!=2 && i!=4){
20    CircuitPlayground.setPixelColor(i, 0,   0,   0);
21    delay(100);
22
23     }
24      }
25delay(500);
26}
"if"statement:
https://www.arduino.cc/reference/en/language/structure/control-structure/if/
"if…else":
https://www.arduino.cc/reference/en/language/structure/control-structure/else/
Buttons-DigitalRead
 1#include <Adafruit_CircuitPlayground.h>
 2
 3int leftButton;
 4int rightButton;
 5
 6void setup() {
 7  Serial.begin(9600);
 8  CircuitPlayground.begin();
 9}
10
11void loop() {
12  leftButton = CircuitPlayground.leftButton();
13  rightButton = CircuitPlayground.rightButton();
14
15   Serial.print("Left Button: ");
16   Serial.print(leftButton);
17   Serial.print("   Right Button: ");
18   Serial.print(rightButton);
19   Serial.println();
20   delay(30);
21}
 1#include <Adafruit_CircuitPlayground.h>
 2
 3int leftButton;
 4int rightButton;
 5
 6void setup() {
 7  Serial.begin(9600);
 8  CircuitPlayground.begin();
 9}
10
11void loop() {
12  leftButton = CircuitPlayground.leftButton();
13  rightButton = CircuitPlayground.rightButton();
14  if (leftButton==1) {
15    for (int i=0;i<10;i++){
16      if(i!=0 && i!=2 && i!=4){
17        CircuitPlayground.setPixelColor(i, 200,   100,   0);
18        delay(100);}
19     }
20   }
21
22  if (rightButton==1) {
23    CircuitPlayground.clearPixels();
24   }
25   Serial.print("Left Button: ");
26   Serial.print(leftButton);
27   Serial.print("   Right Button: ");
28   Serial.print(rightButton);
29   Serial.println();
30   delay(30);
31}
Light Sensor-AnalogRead
 1#include <Adafruit_CircuitPlayground.h>
 2
 3int value;
 4
 5void setup() {
 6  Serial.begin(9600);
 7  CircuitPlayground.begin();
 8}
 9
10void loop() {
11  value = CircuitPlayground.lightSensor();
12
13  Serial.print("Light Sensor: ");
14  Serial.println(value);
15
16  delay(1000);
17}
 1#include <Adafruit_CircuitPlayground.h>
 2
 3int value;
 4int toneValue;
 5void setup() {
 6  Serial.begin(9600);
 7  CircuitPlayground.begin();
 8}
 9
10void loop() {
11  value = CircuitPlayground.lightSensor();
12
13  Serial.print("Light Sensor: ");
14  Serial.println(value);
15  toneValue=value+150;
16  delay(10);
17  tone(A0, toneValue, 10);
18}
analog and digital
Capacitive touch sensor
 1#include <Adafruit_CircuitPlayground.h>
 2void setup() {
 3
 4  Serial.begin(9600);
 5  CircuitPlayground.begin();
 6}
 7
 8void loop() {
 9   //https://learn.adafruit.com/adafruit-circuit-playground-express/pinouts
10  // A0=D12, A1=D6, A2=D9, A3=D10, A4=D3, A5=D2, A6=D0,A7=D1
11  Serial.print(" A1: "); Serial.print(CircuitPlayground.readCap(6));
12  Serial.print(" A2: "); Serial.print(CircuitPlayground.readCap(9));
13  Serial.print(" A3: "); Serial.print(CircuitPlayground.readCap(10));
14  Serial.print(" A4: "); Serial.print(CircuitPlayground.readCap(3));
15  Serial.print(" A5: "); Serial.print(CircuitPlayground.readCap(2));
16  Serial.print(" A6: "); Serial.print(CircuitPlayground.readCap(0));
17  Serial.print(" A7: "); Serial.println(CircuitPlayground.readCap(1));
18
19  delay(50);
20
21}
 1#include <Adafruit_CircuitPlayground.h>
 2void setup() {
 3
 4  Serial.begin(9600);
 5  CircuitPlayground.begin();
 6}
 7
 8void loop() {
 9  //https://learn.adafruit.com/adafruit-circuit-playground-express/pinouts
10  // A0=D12, A1=D6, A2=D9, A3=D10, A4=D3, A5=D2, A6=D0,A7=D1
11   Serial.println("0 ");
12 if (CircuitPlayground.readCap(6)>400){
13     CircuitPlayground.setPixelColor(0, 255,   0,   0);
14     CircuitPlayground.playTone(523, 300);
15     }
16
17 if (CircuitPlayground.readCap(9)>400){
18      CircuitPlayground.setPixelColor(1, 180,   60,   0);
19       CircuitPlayground.playTone(587, 300);
20      }
21 if (CircuitPlayground.readCap(10)>400){
22      CircuitPlayground.setPixelColor(2, 100,   200,   0);
23       CircuitPlayground.playTone(659, 300);
24      }
25 if (CircuitPlayground.readCap(3)>400){
26      CircuitPlayground.setPixelColor(3, 50,   250,   50);
27       CircuitPlayground.playTone(698, 300);
28      }
29  if (CircuitPlayground.readCap(2)>400){
30      CircuitPlayground.setPixelColor(4, 0,   200,   100);
31       CircuitPlayground.playTone(784, 300);
32      }
33   if (CircuitPlayground.readCap(0)>400){
34      CircuitPlayground.setPixelColor(5, 0,   150,   150);
35       CircuitPlayground.playTone(880, 300);
36      }
37    if (CircuitPlayground.readCap(1)>400){
38      CircuitPlayground.setPixelColor(6, 255,   50,   200);
39       CircuitPlayground.playTone(988, 300);
40      }
41    delay(50);
42    CircuitPlayground.clearPixels();
43}
Sound sensor
 1#include <Adafruit_CircuitPlayground.h>
 2
 3float value;
 4
 5void setup() {
 6  Serial.begin(9600);
 7  CircuitPlayground.begin();
 8}
 9
10void loop() {
11  // Take 10 milliseconds of sound data to calculate
12  value = CircuitPlayground.mic.soundPressureLevel(10);
13
14  Serial.print("Sound Sensor SPL: ");
15  Serial.println(value);
16
17  delay(90);
18}
 1#include <Adafruit_CircuitPlayground.h>
 2
 3float value;
 4
 5void setup() {
 6  Serial.begin(9600);
 7  CircuitPlayground.begin();
 8}
 9
10void loop() {
11  // Take 10 milliseconds of sound data to calculate
12  value = CircuitPlayground.mic.soundPressureLevel(10);
13
14  Serial.print("Sound Sensor SPL: ");
15  Serial.println(value);
16  delay(50);
17
18 if(value>80){
19  for (int i=0;i<10;i++){
20    if (i!=0 && i!=2 && i!=4){
21    CircuitPlayground.setPixelColor(i, 155,   0,   150);
22    delay(100);
23    if( i==9){
24       delay(1000);
25      CircuitPlayground.clearPixels();
26      }
27    }
28  }
29
30 }
31}
Most Common Data Types:
int, float, string
integer: numbers that can be written without a fractional component such as 1 4 5 -8 -10
float: numbers with a decimal point such as 1.5 55.67
string: message inside double quotes ("Abc") "Button Value".
you can convert data types by using int(); float(); Sting();
and map() can help us to Re-maps a number from one range to another.
map(value, fromLow, fromHigh, toLow, toHigh)
https://www.arduino.cc/reference/en/language/functions/math/map/
Motion Sensor
accelerometer
 1#include <Adafruit_CircuitPlayground.h>
 2
 3float X, Y, Z;
 4
 5void setup() {
 6  Serial.begin(9600);
 7  CircuitPlayground.begin();
 8}
 9
10void loop() {
11  X = CircuitPlayground.motionX();
12  Y = CircuitPlayground.motionY();
13  Z = CircuitPlayground.motionZ();
14
15  Serial.print("X: ");
16  Serial.print(X);
17  Serial.print("  Y: ");
18  Serial.print(Y);
19  Serial.print("  Z: ");
20  Serial.println(Z);
21
22  delay(1000);
23}
 1#include <Adafruit_CircuitPlayground.h>
 2
 3float X, Y, Z;
 4int zVal;
 5
 6void setup() {
 7  Serial.begin(9600);
 8  CircuitPlayground.begin();
 9}
10
11void loop() {
12  X = CircuitPlayground.motionX();
13  Y = CircuitPlayground.motionY();
14  Z = CircuitPlayground.motionZ();
15  Serial.print("X: ");
16  Serial.print(X);
17  Serial.print("  Y: ");
18  Serial.print(Y);
19  Serial.print("  Z: ");
20  Serial.println(Z);
21  Serial.println(zVal);
22  zVal=map(Z,-20,20,100,800);
23
24 // tone(A0, zVal, 10);
25  delay(10);
26  if(X>5){
27    for (int i=0;i<5;i++){
28       CircuitPlayground.setPixelColor(i, 200,   100,   0);
29       delay(10);}
30   }else{CircuitPlayground.clearPixels();}
31
32  if(X<-5){
33    for (int i=5;i<10;i++){
34       CircuitPlayground.setPixelColor(i, 200,   100,   0);
35        delay(10);}
36   }else{CircuitPlayground.clearPixels();}
37   if(Z<1){
38    for (int i=0;i<10;i++){
39       CircuitPlayground.setPixelColor(i, 50,   100,   100);
40        delay(10);}
41   }else{CircuitPlayground.clearPixels();}
42}
