Difference between revisions of "RPi/datalogger"
m |
|||
| (2 intermediate revisions by 2 users not shown) | |||
| Line 20: | Line 20: | ||
[[File:RPIDL DISP GPS Connected.jpg|300px|GPS disconnected]]<br> | [[File:RPIDL DISP GPS Connected.jpg|300px|GPS disconnected]]<br> | ||
The last line will show the actual time in UTC and the GPS status shows either if it is waiting for a GPS fix or (when the blue light on the GPS is blinking) the LAT and LON coordinates of the last received message. | The last line will show the actual time in UTC and the GPS status shows either if it is waiting for a GPS fix or (when the blue light on the GPS is blinking) the LAT and LON coordinates of the last received message. | ||
| − | + | <br> | |
| + | <br> | ||
=Preparing a new install= | =Preparing a new install= | ||
Create a Dexter GrovePi SD card following one of the following paths explained in the Dexter Industries GrovePi manual: https://www.dexterindustries.com/BrickPi/brickpi-tutorials-documentation/getting-started/pi-prep/ | Create a Dexter GrovePi SD card following one of the following paths explained in the Dexter Industries GrovePi manual: https://www.dexterindustries.com/BrickPi/brickpi-tutorials-documentation/getting-started/pi-prep/ | ||
| Line 32: | Line 33: | ||
<br> | <br> | ||
Copy <code>grovepi_sensorlogger/fs/etc/rc.local</code> into <code>/etc/rc.local</code> on the PI or create your own startup script starting <code>sensorlogger.py</code>. | Copy <code>grovepi_sensorlogger/fs/etc/rc.local</code> into <code>/etc/rc.local</code> on the PI or create your own startup script starting <code>sensorlogger.py</code>. | ||
| + | <br> | ||
<br> | <br> | ||
=Attaching the sensor= | =Attaching the sensor= | ||
| Line 147: | Line 149: | ||
cat /boot/sensor.txt | grep -v "#" | xargs sudo python /home/pi/grovepi_sensorlogger/sensorlogger.py & | cat /boot/sensor.txt | grep -v "#" | xargs sudo python /home/pi/grovepi_sensorlogger/sensorlogger.py & | ||
</syntaxhighlight> | </syntaxhighlight> | ||
| + | |||
| + | |||
| + | [[Category:Raspberry Pi]] | ||
| + | [[Category:Sensors]] | ||
Latest revision as of 09:36, 22 November 2022
Overview
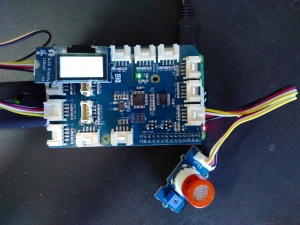
The data logger is a grovepi+ shield with attached:
- a grove sensor
- a grove OLED 128x64 display
- a GPS USB dongle
The PI can be powered by a USB power bank.
Note: When using a Raspberry PI A or B (not B+) the sudden current draw may cause the powerbank to shutdown. Quickly unplugging an plugging back in can help. If not, remove the grove shield, plug in the powerbank and attach the shield. From B+ and up this problem does not occur.
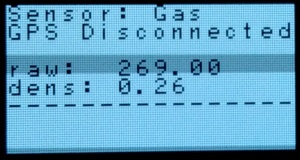
As soon as the datalogger is booted (can take a while) the OLED screen will show something similar as:

It shows the following:
- type of sensor
- GPS status
- sensor data
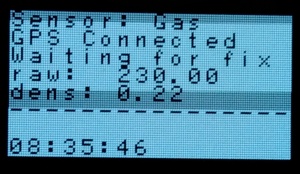
If the GPS is switched on (blue led on the GPS dongle is on) the display will show the following:

The last line will show the actual time in UTC and the GPS status shows either if it is waiting for a GPS fix or (when the blue light on the GPS is blinking) the LAT and LON coordinates of the last received message.
Preparing a new install
Create a Dexter GrovePi SD card following one of the following paths explained in the Dexter Industries GrovePi manual: https://www.dexterindustries.com/BrickPi/brickpi-tutorials-documentation/getting-started/pi-prep/
Next in the home directory clone the grovepy_sensorlogger git repository:
git clone https://github.com/mywdka/grovepi_sensorlogger.git
Copy grovepi_sensorlogger/fs/boot/sensors.txt into the boot partition of the SD card (/boot on the PI itself). Adjust according to the installed sensor as outlined below.
Copy grovepi_sensorlogger/fs/etc/rc.local into /etc/rc.local on the PI or create your own startup script starting sensorlogger.py.
Attaching the sensor
Currently there are 7 sensors possible:
- Sound sensor (connected to A0)
- Moist sensor (connected to A0)
- Temperature & Humidity (connected to D4)
- Gas sensor MQ-9 (connected to A0)
- LDR (non-grove) (connected to A0)
- Air quality sensor (connected to A0)
- UV sensor (connected to A0)
The OLED display has to be connector to I2C-1
The datalogger needs to be told what sensor is connected. To do this there is a file in the BOOT partition of the Raspberry PI SD card. This file is called sensors.txt. In this file uncomment the sensor connected and comment the rest by placing a # in front of the sensor name.
Reading the log file
As soon as the datalogger is turned on and the GPS is connected it will start logging data in the log.csv file in the BOOT partition of the Raspberry PI SD card. It will start logging even if there is no valid GPS fix. So the logger can be used indoors as well. Wheter there is a valid GPS coordinate associated with a log entry can be seen by the Fix field in the log file. If this field contains a 0 the coordinates for this entry are either the last valid coordinates or the coordinates hardcoded if there has not been a fix before.
The log.csv is a standard CSV file with the following columns:
- timestamp (UTC)
- latitude
- longitude
- signal quality
- sensor type
- following column(s) are sensor dependant
Each time the datalogger is started a new header and entries are appended to any existing log file. Hence it is possible for the log.csv file to contain multiple headers. If a clean log file is needed, remove it before starting the datalogger or remove previous entries up to the last occurrence of the header.
Example log entry
timestamp (UTC),latitude,longitude,signal quality,sensor type,density
13:38:54,51.918777,4.486358,0,"Grove gas MQ9 sensor (CO, Coal, Liquified)",0.12
Adding new sensors
The code can be found in the MyWDKA GitHub repository: https://github.com/mywdka/grovepi_sensorlogger Sensor entries are in the sensors subdirectory. It is easiest to have a look at the existing sensors and copy e.g. simple_light.py as a general framework:
 1import time
 2import grovepi
 3from threading import Thread
 4
 5class Sensor(Thread):
 6    def __init__ (self, pin, avg_fraction=0.8):
 7        Thread.__init__(self)
 8        self.name = "Simple light sensor"
 9        self.shortname = "light"
10        self.pin = pin
11        self.avg_fraction = avg_fraction
12        self.value = 0
13        self.avg_value = 0
14        self.stop = False
15
16        grovepi.pinMode(pin, "INPUT")
17
18    def get_log_header(self, delimiter):
19        return "raw%caverage" % (delimiter)
20
21    def get_log_string(self, delimiter):
22        return "%.2f%c%.2f" % (self.value, delimiter, self.avg_value)
23
24    def get_str1(self):
25        return "val: %.2f" % (self.value)
26
27    def get_str2(self):
28        return "avg: %.2f" % (self.avg_value)
29
30    def avg(self, current, new, fraction):
31        return (current * (1.0-fraction)) + (new * fraction)
32
33    def run(self):
34        while not self.stop:
35            try:
36                self.value = grovepi.analogRead(self.pin)
37                self.avg_value = self.avg(self.avg_value, self.value, self.avg_fraction)
38            except IOError as e:
39                print ("light sensor exception: %s" % (e))
40            time.sleep(0.01)
Add a corresponding entry to the import select statement (or better, improve this ugly thing :) in sensorlogger.py
16if SENSOR == 'sound':
17    from sensors.sound import Sensor
18    sensor = Sensor(0, 0.5)
19elif SENSOR == 'dht':
20    from sensors.dht import Sensor
21    sensor = Sensor(4)
22elif SENSOR == 'uv':
23    from sensors.uv import Sensor
24    sensor = Sensor(0)
25elif SENSOR == 'dust':
26    from sensors.dust import Sensor
27    sensor = Sensor()
28elif SENSOR == 'gas':
29    from sensors.gas import Sensor
30    sensor = Sensor(0)
31elif SENSOR == 'air':
32    from sensors.air import Sensor
33    sensor = Sensor(0)
34elif SENSOR == 'moist':
35    from sensors.moist import Sensor
36    sensor = Sensor(0)
37elif SENSOR == 'simple_light':
38    from sensors.simple_light import Sensor
39sensor = Sensor(0)
Start the datalogger.py script with the sensor as first argument. This can be done in rc.local or any other startup script. As example:
cat /boot/sensor.txt | grep -v "#" | xargs sudo python /home/pi/grovepi_sensorlogger/sensorlogger.py &
