Difference between revisions of "Zoönology"
| Line 106: | Line 106: | ||
==== Schematic ==== | ==== Schematic ==== | ||
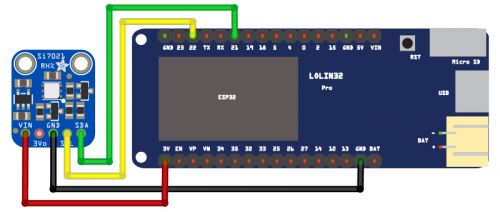
| + | [[File:TempHumidity-fritzing.jpeg|500px|frameless|center]] | ||
==== Code ==== | ==== Code ==== | ||
Revision as of 15:49, 3 February 2023
Zoöp
"Zoöp" is an experimental model for organizations to transition towards ecological justice - by not only preaching, but radically practicing it. In a Zoöp, non-humans have an equal voice next to humans, on all levels of the organization and its decision-making. As the initiators describe it: “Zoöp is short for Zoöperation: coöperation with zoë – (Greek for ‘life’) Together with other Zoöps we work towards the transformation of our economy into a regenerative human-inclusive ecosystem, a network of exchange of matter, energy and meaning that supports all bodies in their existence”. [Zoöp manifesto]
Zoönology: Observing & Sensing
The name of this workshop, "Zoönology", is the combination of technology and zoë. It may seem paradoxical to combine computation and the model of Zoöp as computation depends on the extraction of finite resources. Therefore, as we make the connection during the workshop by making, the question arises to whether computing and network technologies could have a place in regenerative, human-inclusive, reciprocal ecosystems [zoop.earth]. In the workshop we will use a low powered ESP32 micro controller and a environmental sensor to observe non-human or non-living entities.
Environmental sensors
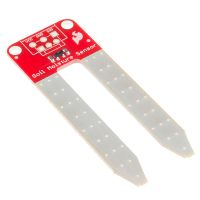
Soil moisture sensor
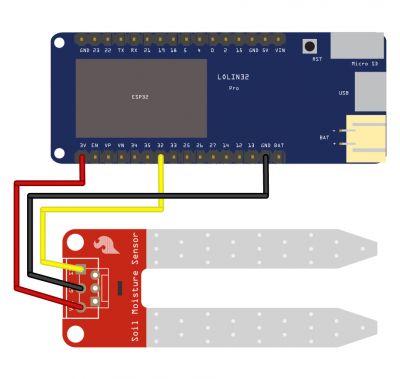
Schematic
Code
int soilPin = 32; // the sensor signal pin is connected to pin 32 on the board
int soilValue = 0; // we set the initial value of the soil sensor to 0

void setup() {
  Serial.begin(9600); // make a connection to the computer
}

void loop() {
  soilValue = analogRead(soilPin); // read value from the soil pin (32)
  Serial.println(soilValue); // send value to the computer
  delay(1000); // wait 1 second (1000 milliseconds)
}
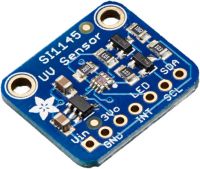
UV/IR/Visible Light sensor
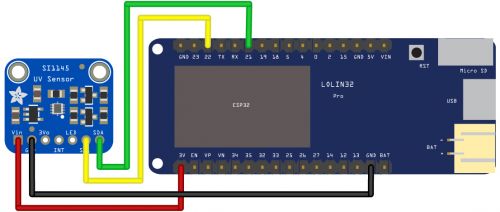
Schematic
Code
#include <Wire.h>
#include "Adafruit_SI1145.h"

Adafruit_SI1145 uv = Adafruit_SI1145(); // adafruit library to talk to the Si1145 sensor

float uvIndex; // variable to store the uv index sensor value

void setup() {
  Serial.begin(9600); // make a connection to the computer

  if (! uv.begin()) {
    // this checks if the board can find the Si1145 sensor
    Serial.println("Didn't find Si1145");
    while (1); // and stops if it cannot find the sensor
  }
}

void loop() {
  uvIndex = uv.readUV() / 100.0; // the UV is multiplied by 100 so we divide to get the UV index

  Serial.print("UV Index: ");
  Serial.println(uvIndex);

  delay(1000); // wait 1 second (1000 milliseconds)
}
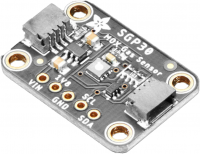
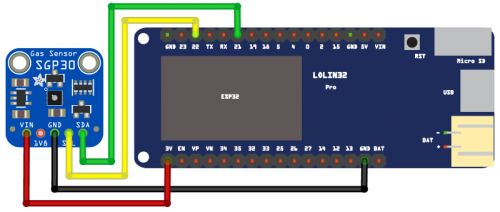
Air Quality Sensor
Schematic
Code
#include <Wire.h>
#include "Adafruit_SGP30.h"

Adafruit_SGP30 sgp; // adafruit library to talk to the SGP30 sensor

void setup() {
  Serial.begin(9600); // make a connection to the computer

  if (! sgp.begin()){
    // this checks if the board can find the SGP30 sensor
    Serial.println("Didn't find SGP30");
    while (1);
  }
}

void loop() {
  if (! sgp.IAQmeasure()) {
    // this checks if we can make a measurement
    Serial.println("Measurement failed");
    return;
  }

  // Output the eC02 value to the computer
  Serial.print("eCO2: ");
  Serial.print(sgp.eCO2);
  Serial.println(" ppm");

  delay(1000); // wait 1 second (1000 milliseconds)
}
Temperature/Humidity Sensor
Schematic
Code
#include "Adafruit_Si7021.h"

Adafruit_Si7021 sensor = Adafruit_Si7021(); // adafruit library to talk to the Si7021 sensor

void setup() {
  Serial.begin(9600); // make a connection to the computer

  if (!sensor.begin()) {
    // this checks if the board can find the SGP30 sensor
    Serial.println("Did not find the Si7021 sensor!");
    while (true);
  }
}

void loop() {
  Serial.print("Humidity:    ");
  Serial.print(sensor.readHumidity(), 2); // read humidity value with 2 digits after comma

  Serial.print("\tTemperature: ");
  Serial.println(sensor.readTemperature(), 2); // read temperature value with 2 digits after comma

  delay(1000); // wait 1 second (1000 milliseconds)
}
Pressure/Temperature/Altitude sensor
Code
All the starter templates and final code can be found on our Github page.
Planning:
Week 1: (7th of February)
* Introduction in the ESP32 micro controller & sensors
* Picking your environmental sensor for coming weeks
* Research your sensor
Week 2: (14th of February)
* Connecting your sensor to the Lolin D32 Pro
* Saving sensor data to the SD card
Week 3: (21st of February)
* Displaying sensor values on a local captive portal
Week 5: (7th of March)
* Field testing
Week 6: (14th of March)
* Extracting sensor values from the field test
* Documenting findings on the captive portal
Week 7: (21th of March)
No class
Week 8: (28th of March)
* Finishing up the captive portal
Tutorials
To be added ...


