Difference between revisions of "Adafruit Motor Shield V2"
| Line 123: | Line 123: | ||
Upload the code and see what happens. | Upload the code and see what happens. | ||
| + | |||
| + | <b>Analyzing and altering the example sketch</b> | ||
Let's see what we can alter in the code. First this line: | Let's see what we can alter in the code. First this line: | ||
Revision as of 09:30, 18 July 2024
Adafruit Motor Shield V2
Adafruit Motor Shield V2 allows you to easily control the speed and direction of 4 DC motors, the position of 2 servo motors and the steps of 2 stepper motors. The shield is made for the Arduino UNO and can be easily installed on it.
The shield uses I2C to operate, which is a communication protocol between the Arduino and the shield. This means that all the other non-I2C pins (so everything other than A4 and A5) can be uses to read sensor data or control other things. I2C also means that the shield is stackable. You can use up to 32 shields at the same time, meaning that you can use up to 64 steppers or 128 DC motors!
!The Adafruit Motor Shield can handle 4 DC motors with each using a maximum of 1,3A, so it's made for small to medium sized motors!
DC Motors
One Adafruit Motor Shield can be used to control the speed and direction of 4 DC motors at the same time. Here I'll give you an example of how to run 1 motor.
Wiring
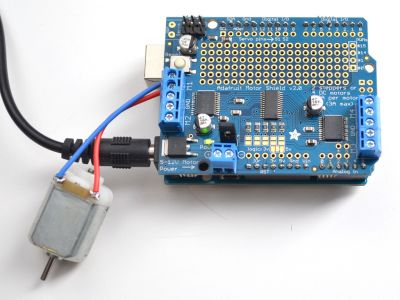
Now let's wire a motor to the shield.
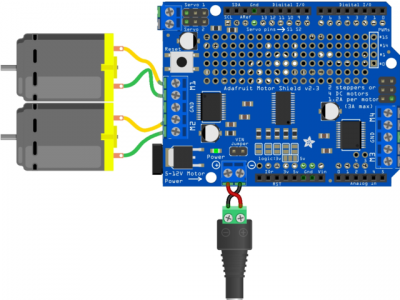
Connect the wires of your motor to one of the terminals. In our case you'll use the M1 terminal.
Now connect your power supply to the power terminals of the shield. You'll want to connect a barrel jack to the power terminal to attach an appropriate external power source to the Shield. The Shield will not function without an external power source!
Connect the positive side of the power terminal to the positive side of the barrel jack. Connect the negative side of the power terminal to the negative side of the barrel jack.
In the picture two motors are attached, but in our example we'll only use 1.
Programming
To program the shield, we need to upload a code to the Arduino UNO using Arduino IDE. Luckily we don't need to write the whole code ourselves, but we can start with examples that are in the the Adafruit Motor Shield V2 library.
Do you have Arduino IDE? If not, go to https://www.arduino.cc/en/software and download the latest version.
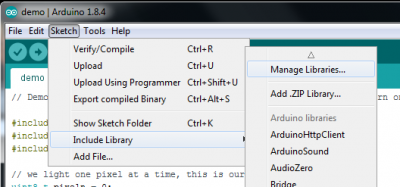
Open Arduino IDE and go to Sketch -> Include Library -> Manage Libraries...
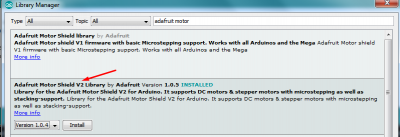
Now look for Adafruit Motor Shield in the search bar and install Adafruit Motor Shield V2 Library by Adafruit.
Once you've installed the library, you can open an example sketch to understand how the library works. To do this, go to
File -> Examples -> Adafruit Motor Shield V2 Library -> DC Motor Test
Once open, you should see this:
/*
This is a test sketch for the Adafruit assembled Motor Shield for Arduino v2
It won't work with v1.x motor shields! Only for the v2's with built in PWM
control

For use with the Adafruit Motor Shield v2
---->	http://www.adafruit.com/products/1438
*/

#include <Adafruit_MotorShield.h>

// Create the motor shield object with the default I2C address
Adafruit_MotorShield AFMS = Adafruit_MotorShield();
// Or, create it with a different I2C address (say for stacking)
// Adafruit_MotorShield AFMS = Adafruit_MotorShield(0x61);

// Select which 'port' M1, M2, M3 or M4. In this case, M1
Adafruit_DCMotor *myMotor = AFMS.getMotor(1);
// You can also make another motor on port M2
//Adafruit_DCMotor *myOtherMotor = AFMS.getMotor(2);

void setup() {
  Serial.begin(9600);           // set up Serial library at 9600 bps
  Serial.println("Adafruit Motorshield v2 - DC Motor test!");

  if (!AFMS.begin()) {         // create with the default frequency 1.6KHz
  // if (!AFMS.begin(1000)) {  // OR with a different frequency, say 1KHz
    Serial.println("Could not find Motor Shield. Check wiring.");
    while (1);
  }
  Serial.println("Motor Shield found.");

  // Set the speed to start, from 0 (off) to 255 (max speed)
  myMotor->setSpeed(150);
  myMotor->run(FORWARD);
  // turn on motor
  myMotor->run(RELEASE);
}

void loop() {
  uint8_t i;

  Serial.print("tick");

  myMotor->run(FORWARD);
  for (i=0; i<255; i++) {
    myMotor->setSpeed(i);
    delay(10);
  }
  for (i=255; i!=0; i--) {
    myMotor->setSpeed(i);
    delay(10);
  }

  Serial.print("tock");

  myMotor->run(BACKWARD);
  for (i=0; i<255; i++) {
    myMotor->setSpeed(i);
    delay(10);
  }
  for (i=255; i!=0; i--) {
    myMotor->setSpeed(i);
    delay(10);
  }

  Serial.print("tech");
  myMotor->run(RELEASE);
  delay(1000);
}
Upload the code and see what happens.
Analyzing and altering the example sketch
Let's see what we can alter in the code. First this line:
Adafruit_DCMotor *myMotor = AFMS.getMotor(1);
Here we can select which motors we are using. If you want to use more motors, we'll have to change this bit. Let's say we use 4 DC motors. Then we should write this:
Adafruit_DCMotor *myMotor = AFMS.getMotor(1);
Adafruit_DCMotor *myOtherMotor1 = AFMS.getMotor(2);
Adafruit_DCMotor *myOtherMotor2 = AFMS.getMotor(3);
Adafruit_DCMotor *myOtherMotor3 = AFMS.getMotor(4);
And change the rest of the code accordingly.
Now let's look at the void loop(). Here we can see how we can program the direction and speed of the motor. The first part looks like this:
  myMotor->run(FORWARD);
  for (i=0; i<255; i++) {
    myMotor->setSpeed(i);
    delay(10);
  }
  for (i=255; i!=0; i--) {
    myMotor->setSpeed(i);
    delay(10);
  }
To determine the direction of the motor, you can do myMotor->run(direction). The three options are:
  myMotor->run(FORWARD); //Run the motor forward
  myMotor->run(BACKWARD); //Run the motor reverse
  myMotor->run(RELEASE); //Stop the motor
In the code, there is a thing called a 'for loop', that speeds up the motor incrementally.
  for (i=0; i<255; i++) {
    myMotor->setSpeed(i);
    delay(20);
  }
It will go through the for look 255 times, adding a 1 to the PWM value every time until it reaches 255, the maximum value. Every loop has a delay of 20ms. To make the motor speed up slower and faster you can change the delay() to a higher value. To speed it up you make de delay smaller, like so:
  for (i=0; i<255; i++) {
    myMotor->setSpeed(i);
    delay(2);
  }
And to slow down the speeding up:
  for (i=0; i<255; i++) {
    myMotor->setSpeed(i);
    delay(200);
  }
You can also change the min max speed value when it speeds up by changing the value after 'i < ...'. Let's change it to half of the speed (so approximate 127 instead of 255, you cannot do decimals) like so:
  for (i=0; i<127; i++) {
    myMotor->setSpeed(i);
    delay(20);
  }
Or we can speed it up by changing the increments, like so:
  for (i=0; i<127; i+5) {
    myMotor->setSpeed(i);
    delay(20);
  }
Servo Motors
Wiring
Programming
Stepper Motors
Wiring
Programming


