Difference between revisions of "P2"
(Created page with "=the Liberty mouse mover= [http://mousemover.biz/ is a real thing] =Let's make ours= =Input= ==Sensors== File:Analog-or-digital-signal.png ===Analog Sensors=== <br>...") |
|||
| Line 212: | Line 212: | ||
<br><br> | <br><br> | ||
[http://www.youtube.com/watch?feature=player_embedded&v=HrG98HJ3Z6w A video by the Make magazine people ] | [http://www.youtube.com/watch?feature=player_embedded&v=HrG98HJ3Z6w A video by the Make magazine people ] | ||
| + | |||
| + | [https://www.youtube.com/watch?v=q_Q5s9AhCR0&t=189s How to use the breadboard] | ||
<br> | <br> | ||
<br> | <br> | ||
Revision as of 09:07, 12 May 2021
the Liberty mouse mover
Let's make ours
Input
Sensors
Analog Sensors
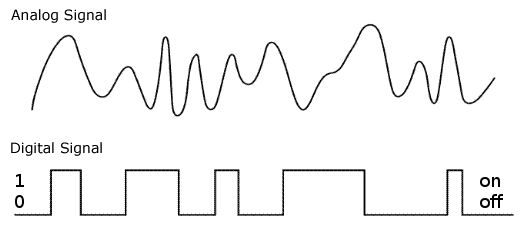
Analog sensors on the other hand, gives range. You connect this types of Analog sensors to Analog Input pins which is measuring the incoming voltage between 0V-5V*. Arduino converts this incoming voltage into the number between 0-1023.
Analog data is transmitted as a continuous signal, almost like a wave. In other words, an analog sensor doesn’t send a burst of 1s and 0s like digital sensors do; instead, the sensor modulates a continuous signal to transmit data.
Microcontrollers are capable of detecting binary signals: is the button pressed or not? These are digital signals. When a microcontroller is powered from five volts, it understands zero volts (0V) as a binary 0 and a five volts (5V) as a binary 1. The world however is not so simple and likes to use shades of gray. What if the signal is 2.72V? Is that a zero or a one? We often need to measure signals that vary; these are called analog signals. A 5V analog sensor may output 0.01V or 4.99V or anything inbetween. Luckily, nearly all microcontrollers have a device built into them that allows us to convert these voltages into values that we can use in a program to make a decision.
An Analog to Digital Converter (ADC) is a very useful feature that converts an analog voltage on a pin to a digital number. By converting from the analog world to the digital world, we can begin to use electronics to interface to the analog world around us.
Not every pin on a microcontroller has the ability to do analog to digital conversions. On the Arduino board, these pins have an ‘A’ in front of their label (A0 through A5) to indicate these pins can read analog voltages.
ADCs can vary greatly between microcontroller. The ADC on the Arduino is a 10-bit ADC meaning it has the ability to detect 1,024 (210) discrete analog levels. Some microcontrollers have 8-bit ADCs (28 = 256 discrete levels) and some have 16-bit ADCs (216 = 65,536 discrete levels).
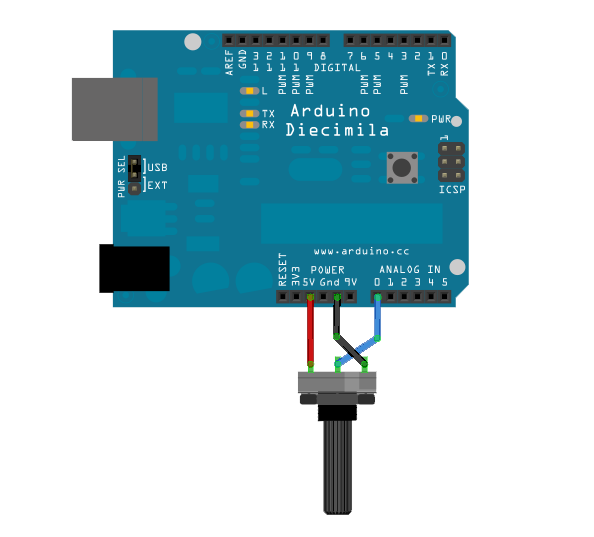
The knob example (hello world)
Good read to go in detail about voltage dividers HERE
/*
  AnalogReadSerial

  Reads an analog input on pin 0, prints the result to the Serial Monitor.
  Graphical representation is available using Serial Plotter (Tools > Serial Plotter menu).
  Attach the center pin of a potentiometer to pin A0, and the outside pins to +5V and ground.

  This example code is in the public domain.

  http://www.arduino.cc/en/Tutorial/AnalogReadSerial
*/

// the setup routine runs once when you press reset:
void setup() {
  // initialize serial communication at 9600 bits per second:
  Serial.begin(9600);
}

// the loop routine runs over and over again forever:
void loop() {
  // read the input on analog pin 0:
  int sensorValue = analogRead(A0);
  // print out the value you read:
  Serial.println(sensorValue);
  delay(1);        // delay in between reads for stability
}
Digital Sensors
Digital sensors are the sensors that gives 2 state (on/off, 5V/0V). You will connect them to digital Pins and set them as INPUT.
Digital data consists exclusively of 0s and 1s .
For example, consider a push button switch. This is one of the simplest forms of sensors. It has two discrete values. It is on, or it is off. Other 'discrete' sensors might provide you with a binary value.
Another example of a digital sensor is an accelerometer, which sends a series of data points (speed, direction, and so on) to the Arduino. Usually digital sensors need a chip in the sensor to interpret the physical data.
Ultrasonic distance sensor
#define echoPin 9 // attach pin D2 Arduino to pin Echo of HC-SR04
#define trigPin 10 //attach pin D3 Arduino to pin Trig of HC-SR04

// defines variables
long duration; // variable for the duration of sound wave travel
int distance; // variable for the distance measurement


void setup() {
  pinMode(trigPin, OUTPUT); // Sets the trigPin as an OUTPUT
  pinMode(echoPin, INPUT); // Sets the echoPin as an INPUT
  Serial.begin(9600); // // Serial Communication is starting with 9600 of baudrate speed
  Serial.println("Ultrasonic Sensor HC-SR04 Test"); // print some text in Serial Monitor
  Serial.println("with Arduino UNO R3");
}
void loop() {
  // Clears the trigPin condition
  digitalWrite(trigPin, LOW);
  delayMicroseconds(2);
  // Sets the trigPin HIGH (ACTIVE) for 10 microseconds
  digitalWrite(trigPin, HIGH);
  delayMicroseconds(10);
  digitalWrite(trigPin, LOW);
  // Reads the time the echoPin is high, returns the sound wave travel time in microseconds
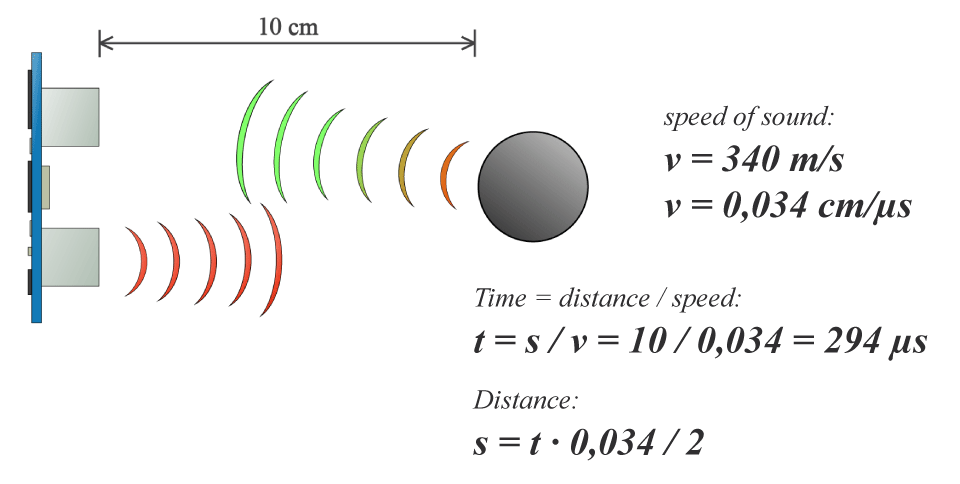
  duration = pulseIn(echoPin, HIGH);
  // Calculating the distance
  distance = duration * 0.034 / 2; // Speed of sound wave divided by 2 (go and back)
  // Displays the distance on the Serial Monitor
  Serial.print("Distance: ");
  Serial.print(distance);
  Serial.println(" cm");

}
Output
Servo
Servo motor
Now we will hookup a servo motor and instruct it to behave a certain way.
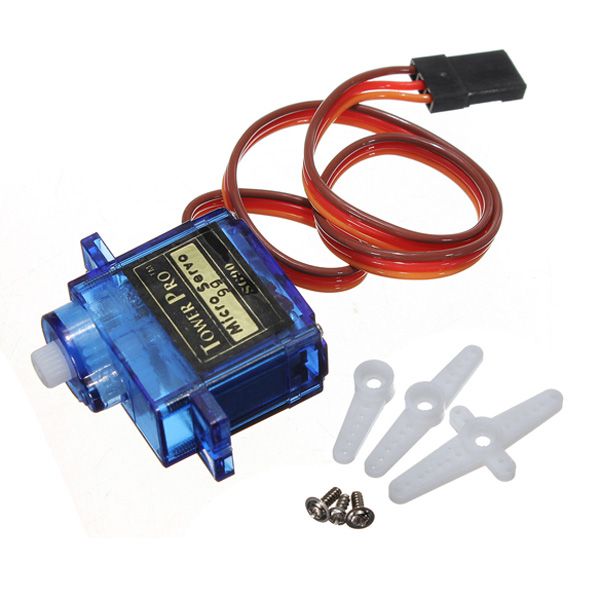
This is a servo, a very small one
Hookup
The servo has 3 wires, we need to connect them all to the arduino.
red is for 5V
you will find it easy to plug one end of a jumper wire inside the connectors of the servo motor, and the other end to the corresponding pin of the Arduino make sure you use corresponding colors for the jumpers, in bigget setups messy wire can cause you more time to debug
black is for GND
to GND of the Arduino
and orange is for signal
signal is going into the pin of the Arduino we will use to control the servo motor We will look for a pin that has a wave next to the number ( look at the Arduino board). Those pins are able to output Pulse Width Modulation (PWM) is a fancy term for describing a type of digital signal. Pulse width modulation is used in a variety of applications including sophisticated control circuitry. Also in our case control the servo motor. The control wire is used to send this pulse. For more info how servos work look here [[1]]
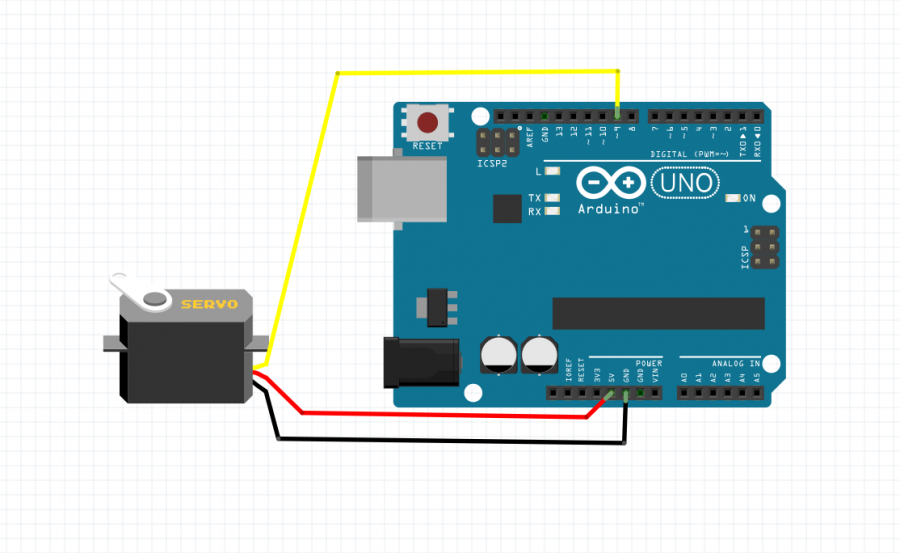
We will use another example to see if our servos work
Sweep
Now with knowing where the examples are located, find a servo example sketch called sweep.
you should have a code that looks like this
/* Sweep
 by BARRAGAN <http://barraganstudio.com>
 This example code is in the public domain.

 modified 8 Nov 2013
 by Scott Fitzgerald
 http://www.arduino.cc/en/Tutorial/Sweep
*/

#include <Servo.h>

Servo myservo;  // create servo object to control a servo
// twelve servo objects can be created on most boards

int pos = 0;    // variable to store the servo position

void setup() {
  myservo.attach(9);  // attaches the servo on pin 9 to the servo object
}

void loop() {
  for (pos = 0; pos <= 180; pos += 1) { // goes from 0 degrees to 180 degrees
    // in steps of 1 degree
    myservo.write(pos);              // tell servo to go to position in variable 'pos'
    delay(15);                       // waits 15ms for the servo to reach the position
  }
  for (pos = 180; pos >= 0; pos -= 1) { // goes from 180 degrees to 0 degrees
    myservo.write(pos);              // tell servo to go to position in variable 'pos'
    delay(15);                       // waits 15ms for the servo to reach the position
  }
}
Let's upload the sketch to the board
Observe the motor---->sweeping?
Breadboarding
OK, first, what's with the name....bread board? Bread, like in food?
Well yes, kind of.
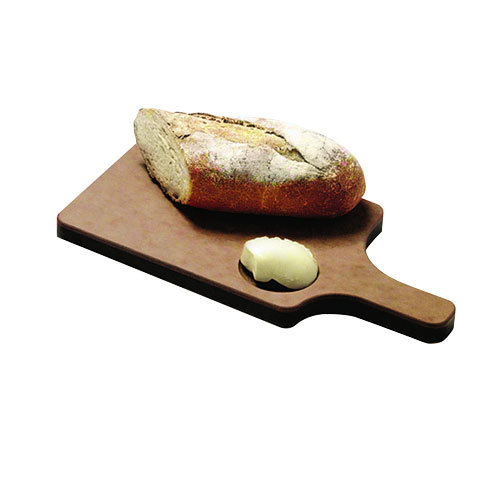
This terminology goes way back in the days.
Generally, you would mount electronic components to a piece of wood (the actual "breadboard"), and do all the wiring with point-point wire and the components just hanging between the various devices.
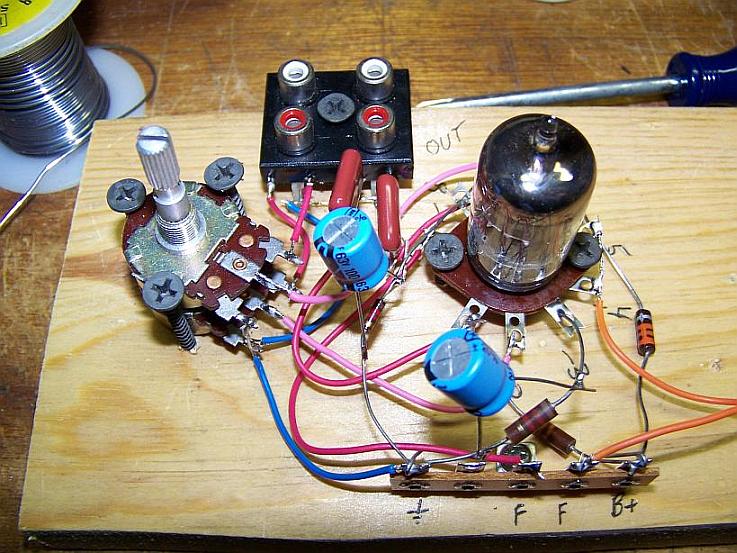
The story goes that an engineer had an idea for a vacuum tube device late one night. Looking around the house, the only base for his prototype that he found was indeed his wife's breadboard, from the breadbox.
A video by the Make magazine people
Ok, but why do we need to breadboard?
Well, they are useful for making temporary circuits and prototyping, and they require absolutely no soldering.
Prototyping is the process of testing out an idea by creating a preliminary model from which other forms are developed or copied, and it is one of the most common uses for breadboards.
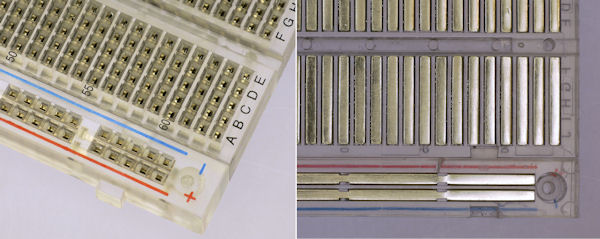
The best way to explain how a breadboard works is to take it apart and see what’s inside.
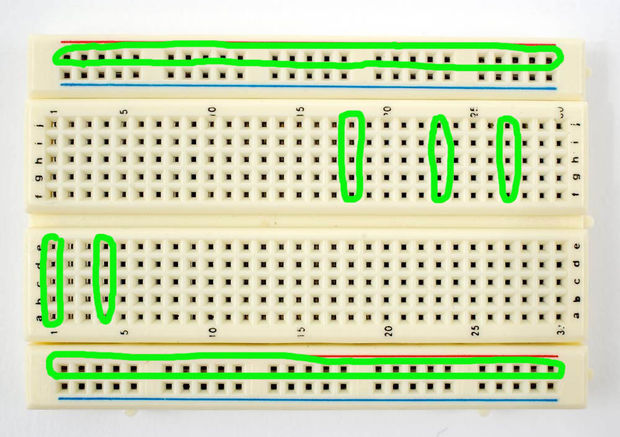
connections lines are connected like this
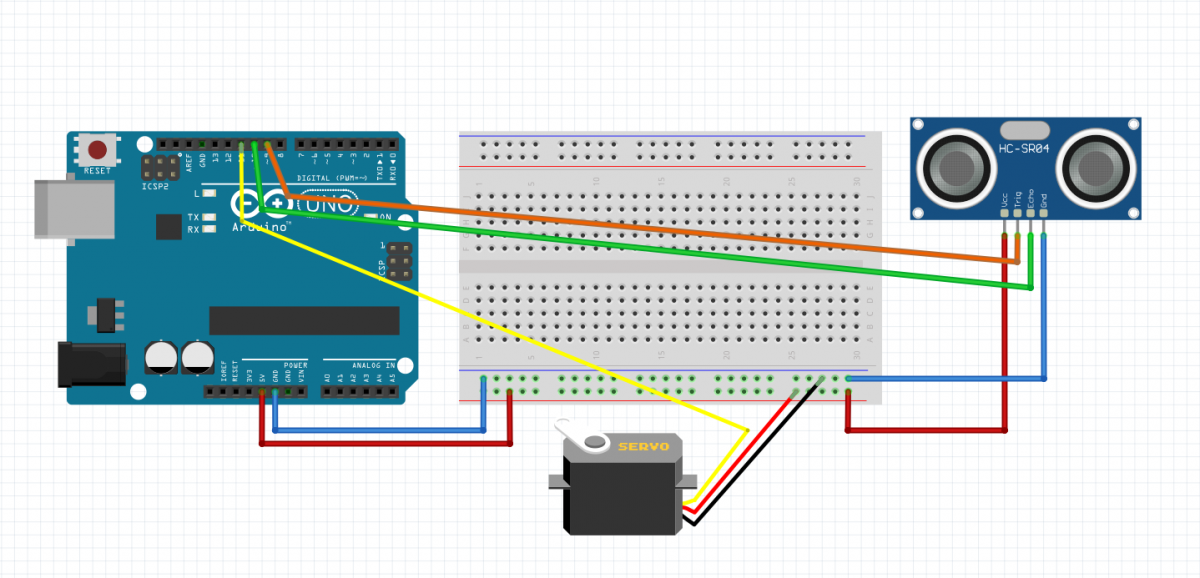
The Mouse Wiggler mechanism
All together now
#include <Servo.h>
#define echoPin 10 // attach pin D10 Arduino to pin Echo of HC-SR04
#define trigPin 9 //attach pin D9 Arduino to pin Trig of HC-SR04

// defines variables
long duration; // variable for the duration of sound wave travel
int distance; // variable for the distance measurement
int ServoPos = 0;

Servo myservo;

void setup() {
  myservo.attach(11);
  pinMode(trigPin, OUTPUT); // Sets the trigPin as an OUTPUT
  pinMode(echoPin, INPUT); // Sets the echoPin as an INPUT
  Serial.begin(9600); // // Serial Communication is starting with 9600 of baudrate speed
  Serial.println("Ultrasonic Sensor HC-SR04 Test"); // print some text in Serial Monitor
  Serial.println("with Arduino UNO R3");
}
void loop() {
  // Clears the trigPin condition
  digitalWrite(trigPin, LOW);
  delayMicroseconds(2);
  // Sets the trigPin HIGH (ACTIVE) for 10 microseconds
  digitalWrite(trigPin, HIGH);
  delayMicroseconds(10);
  digitalWrite(trigPin, LOW);
  // Reads the echoPin, returns the sound wave travel time in microseconds
  duration = pulseIn(echoPin, HIGH);
  // Calculating the distance
  distance = duration * 0.034 / 2; // Speed of sound wave divided by 2 (go and back)
  // Displays the distance on the Serial Monitor
  Serial.print("Distance: ");
  Serial.print(distance);
  Serial.println(" cm");

  if (distance > 100){
  wiggle();
  }
}


void wiggle() {
  // sweep the servo from 0 to 180 degrees in steps
  // of 1 degrees
  for (ServoPos = 10; ServoPos <= 180; ServoPos += 1) {
    // tell servo to go to position in variable 'pos'
    myservo.write(ServoPos);
    // wait 15 ms for servo to reach the position
    delay(6); // Wait for 15 millisecond(s)
  }
  for (ServoPos = 180; ServoPos >= 10; ServoPos -= 1) {
    // tell servo to go to position in variable 'pos'
    myservo.write(ServoPos);
    // wait 15 ms for servo to reach the position
    delay(6); // Wait for 15 millisecond(s)
}
}
