DFPlayer
With this example, you will learn how to use some basic function of DFPlayer. The DFPlayer enables you to easily play and amplify songs from a microSD card. By controlling it with an Arduino, you can also add sensors, knobs and buttons to:
- Play specific .wav and mp3 files
- Loop specific .wav and mp3 files
- Adjust the volume
- Use forward, back and pause functions in a playlist
In this example you will learn how to play specific mp3 files, triggers by different buttons. We will also learn how to use a potentiometer to change the volume of the DFPlayer. For this example you will need:
-Arduino Uno
-DFPlayer module
-up to 32GB microSD card (FAT32 formatted)
-Jumper wires
-3 buttons
-10kOhm potentiometer
FILE FORMATTING
First, insert the microSD into your laptop. Make a folder called 'MP3' on the root directory (directly when you open the SD card). You need to place your audio files into this folder. To play the files using Arduino code, they need a specific name. Track 1 should be called '0001.mp3 or 0001.wav', track 2 '0002.mp3' or '0002.wav' etc. Often the file type is not visible, so you don't need to add .wav or .mp3, just make sure the files are of these types. After you're done, you can insert the microSD card into the DFPlayer.
WIRING WITH ARDUINO
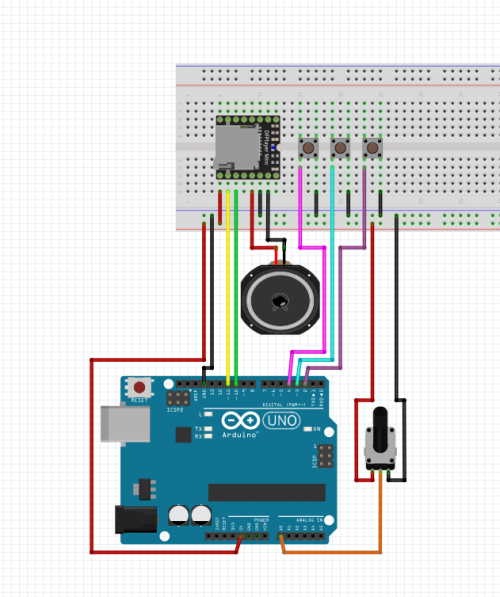
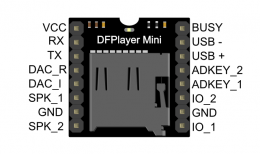
Place the DFPlayer mini on the middle of the breadboard. On both sides there are 8 pins. We will only use the pins on the left side (if you hold the board so you can read the letters). From top to button, we will call the pins 1 to 8, where 1 is the most top one. You need to connect:
1: 5V
2: D11
3: D10
4: nothing
5: nothing
6: speaker -
7: GND
8: speaker +
Also place the 3 buttons on the middle of the breadboard. Connect one side to ground and the other to digital pins 2, 3 and 4. With these buttons we will control the tracks.
Connect the potentiometers pins to (from left to right): 1. GND 2. A0 (analog 0) 3. 5V
PROGRAMMING THE ARDUINO IN ARDUINO IDE
Open Arduino IDE.
For this sketch to work you need the DFPlayerMini_Fast library. This library can be found in Tools > Manage libraries and search for DFPlayerMini_Fast by PowerBroker2. In this specific version of the sketch, buttons can be used to play various tracks.
Copy and past this code into Arduino IDE:
// The sketch plays individual tracks on the microSD card inserted in the DFPlayer. These tracks need to be places a folder called MP3 on
// your microSD card and need specific names to be read properly. For example, track 1 should be called 0001.mp3, track 2 0002.mp3, etc.

// For this sketch to work you need the DFPlayerMini_Fast library. This library can be found in Tools > Manage libraries and search for
// DFPlayerMini_Fast by PowerBroker2. In this specific version of the sketch, buttons can be used to play various tracks. The library is
// nice and simple, but if you find it hard to use or are missing soem features, feel free to check out other libraries.

// Here the library is included and ACTIVATED is set to LOW. This will be used to check if the buttons are pressed. For the buttons to work
// hook up one pin of the button to a digital pin set to HIGH and a button to GND. If the button is pressed, the Arduino will read LOW on the
// input (zero volts).

#include <DFPlayerMini_Fast.h>
# define ACTIVATED LOW

#if !defined(UBRR1H)
#include <SoftwareSerial.h>

// Change the pins used for communication with the DFPlayer here.
SoftwareSerial mySerial(10, 11); // RX, TX
#endif

// Set the input buttons here.
int buttonTrack1 = 2;
int buttonTrack2 = 3;
int buttonTrack3 = 4;

// In the sketch a potentiometer is used to control the volume. If you don't need this feature and just want to set it to one volume level, you
// can comment this out.
int analogValue = 0;
int potPin = 0;
int volumeLevel = 0;

DFPlayerMini_Fast myMP3;

void setup()
{
  // In the setup, we set the buttons to inputs and the voltage to HIGH, so the Arduino will read the status. When the button is pressed, the
  // status will change from HIGH to LOW.
  pinMode(buttonTrack1, INPUT);
  digitalWrite(buttonTrack1, HIGH);
  pinMode(buttonTrack2, INPUT);
  digitalWrite(buttonTrack2, HIGH);
  pinMode(buttonTrack3, INPUT);
  digitalWrite(buttonTrack3, HIGH);

  Serial.begin(115200);

// Setting the serial communication between the Arduino and the DFPlayer board.
#if !defined(UBRR1H)
  mySerial.begin(9600);
  myMP3.begin(mySerial, true);
#else
  Serial1.begin(9600);
  myMP3.begin(Serial1, true);
#endif
// Setting the default volume. The range is 0 to 30. Change the number 10 to any number you want to alter it.
  Serial.println("Setting volume to medium");
  myMP3.volume(10);
// Setting the default song that will be played.
  Serial.println("Looping track 1");
  myMP3.loop(1);
}

// The void loop is the code that is repeated constantly.
void loop()
{
// Here the potPin will determine the volume of the output. Delete this if you don't want to use it.
  analogValue = analogRead(potPin); // get value from pot
  volumeLevel = map(analogValue, 0, 1023, 0, 30);   //scale the pot value and volume level
  myMP3.volume(volumeLevel);

// Here it checks if the button is pressed, and loops a different track depending on the button pressed. You can of course use different sensors
// or add more buttons and adjust it to your own desires.
if (digitalRead(buttonTrack1) == ACTIVATED)
  { myMP3.playFromMP3Folder(1); }
if (digitalRead(buttonTrack2) == ACTIVATED)
  { myMP3.playFromMP3Folder(2); }
if (digitalRead(buttonTrack3) == ACTIVATED)
  { myMP3.playFromMP3Folder(3); }

  //if you would like to loop mp3 files instead you can use the loop function. For this it is important to have the files on the root of
  // your SD card (so not in a folder) and you can only use odd numbers as names (0001.mp3, 0003.mp3). Here is the loop function used. To use it
  //remove the /* */ around it.

  /*if (digitalRead(buttonTrack1) == ACTIVATED)
  { myMP3.playFromMP3Folder(1); }
if (digitalRead(buttonTrack2) == ACTIVATED)
  { myMP3.playFromMP3Folder(2); }
if (digitalRead(buttonTrack3) == ACTIVATED)
  { myMP3.playFromMP3Folder(3); }*/

}

