    __  __                 _ __ _                              __
   / / / /___ _      __   (_) /( )_____   ____ ___  ____ _____/ /__
  / /_/ / __ \ | /| / /  / / __/// ___/  / __ `__ \/ __ `/ __  / _ \
 / __  / /_/ / |/ |/ /  / / /_  (__  )  / / / / / / /_/ / /_/ /  __/
/_/ /_/\____/|__/|__/  /_/\__/ /____/  /_/ /_/ /_/\__,_/\__,_/\___/
2022-09-08
- WH.02.125 (Prototyping Space IAS) 9:00 - 16:00
Introduction
1. Circuit bending
2. Introduction Arduino
Hello World!
void setup() {
}

void loop() {
  Serial.println("Hello World!");   //sends a message to the computer
}
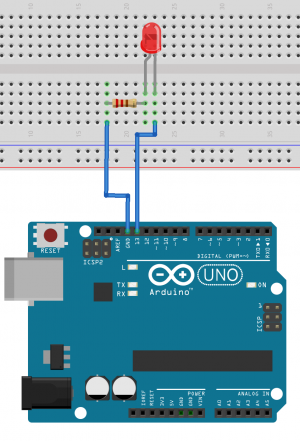
Simple Led blink example
int ledPin = 13;               //the int ledPin is 13

void setup() {
  pinMode(ledPin,OUTPUT);      //ledPin is a OUTPUT
}

void loop() {
  digitalWrite(ledPin,HIGH);   //turns pin 13 on
  delay(500);                  //stops the loop for 500 milliseconds
  digitalWrite(ledPin,LOW);    //turns pin 13 off
  delay(500);                  //stops the loop for 500 milliseconds
}
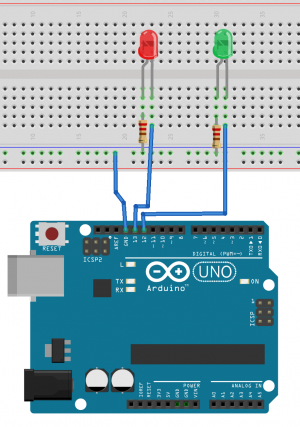
Traffic light example
int RedLedPin = 13;                 //the int RedLedPin is 13
int GreenLedPin = 12;               //the int GreenLedPin is 12

void setup() {
  pinMode(RedLedPin,OUTPUT);        //ledPin is a OUTPUT
  pinMode(GreenLedPin,OUTPUT);      //ledPin is a OUTPUT

}

void loop() {
  digitalWrite(GreenLedPin,HIGH);   //turns green led  on
  delay(5000);                      //stops the loop for 5000 milliseconds
  for(int i = 0; i < 5; i++){       //this for loop gets 5 times repeated
    digitalWrite(GreenLedPin,LOW);  //turns green led off
    delay(500);                     //stops the loop for 500 milliseconds
    digitalWrite(GreenLedPin,HIGH); //turns green led off
    delay(500);                     //stops the loop for 500 milliseconds
  }
  digitalWrite(GreenLedPin,LOW);    //turns green led off
  digitalWrite(RedLedPin,HIGH);     //turns red led on
  delay(5000);                      //stops the loop for 5000 milliseconds
  digitalWrite(RedLedPin,LOW);      //turns red led on
}
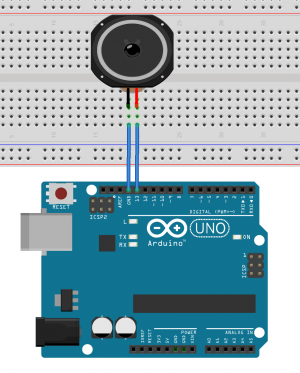
Speaker example
int speaker = 13;                   //int speaker is 13

void setup() {
  pinMode(speaker, OUTPUT);         //pin 13 is an output
}

void loop() {
  for(int i = 100; i< 1000;i++){    //for loop counts from 100 to 1000
    tone(speaker, i);               //generates a tone on pin 13 with the frequency of int i
    delay(10);                      //stops the code for 10 milliseconds
  }
}
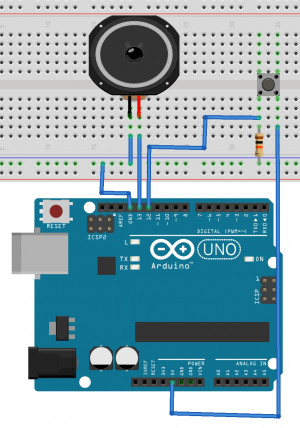
Speaker and button example
//code generates on button press a random tone
int speaker = 13;                  //int speaker is 13
int button = 12;                   //int speaker is 12

void setup() {
  Serial.begin(115200);            //makes a serial connection to the computer
  pinMode(speaker, OUTPUT);        //pin 13 is an output
  pinMode(button, OUTPUT);         //pin 12 is an output
}

void loop() {
  bool buttonState = digitalRead(button);    //reads pin 12 & bool is a on or off value
  if(buttonState == HIGH){                   //if the button is HIGH(pressed)
    int randomValue = random(100,1000);      // creates an int called randomValue with a random value between 100 and 1000
    tone(speaker, randomValue);              //creates an tone on pin 13 with the random value as frequency
    delay(500);                              //stops the loop for 500 milliseconds
  }
}
2022-09-15
- WH.02.125 (Prototyping Space IAS) 10:00 - 16:00
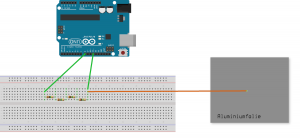
Capacitive Sensor printing values to Serial Monitor
#include <CapacitiveSensor.h>
CapacitiveSensor   sensor = CapacitiveSensor(8,11);
long raw;
void setup(){
   sensor.set_CS_AutocaL_Millis(0xFFFFFFFF);
   Serial.begin(115200);
   Serial.println("raw");
}
void loop(){
  raw = sensor.capacitiveSensor(10);
  Serial.println(raw);
  delay(10);
}
Theremin
#include <CapacitiveSensor.h>

CapacitiveSensor   sensor = CapacitiveSensor(8,11);

int speaker = 13;               //connect a speaker between pin 13 and GND
long raw;


void setup(){
   sensor.set_CS_AutocaL_Millis(0xFFFFFFFF);
   Serial.begin(115200);
   Serial.println("raw");
}
void loop(){
  raw = sensor.capacitiveSensor(10);                 //lowest  450 & highest 750
  raw = min(raw, 750);                               //max value of raw is 750
  raw = max(raw, 10);                                //min value of raw is 10
  long speakerValue = map(raw,450,750,100,4000);     //scales to value from 450 and 750 to 100 and 4000
  tone(speaker,speakerValue);                        //plays the frequency (raw) on port 13(speaker)
  Serial.print(raw);
  Serial.print(" ");
  Serial.println(speakerValue);

}
Capactive sensor as button
#include <CapacitiveSensor.h>

CapacitiveSensor   sensor = CapacitiveSensor(8,11);

int speaker = 13;
long raw;


void setup(){
   sensor.set_CS_AutocaL_Millis(0xFFFFFFFF);
   Serial.begin(115200);
   Serial.println("raw");
}
void loop(){
  raw = sensor.capacitiveSensor(10);         //lowest  450 & highest 750
  if(raw > 600){                             //if raw is bigger than 600
    Serial.println("touched");               //print "touched"
    tone(speaker,440);                       //play a tone with 440 hz
    delay(1000);                             //stop 1000 second
    noTone(speaker);                         //stop playing the tone
  }
  delay(10);

}
Servo motor movement between 0 and 90 degrees
#include <Servo.h>

Servo theServo;

void setup() {
  Serial.begin(115200);
  theServo.attach(3);
}

void loop() {
  for(int i = 0; i < 90; i++){
    theServo.write(i);
    Serial.println(i);
    delay(50);
  }
  for(int i = 90; i > 0; i--){
    theServo.write(i);
    Serial.println(i);
    delay(10);
  }
}
automatic trash can - servo motor connected capactive sensor
#include <Servo.h>
#include <CapacitiveSensor.h>

CapacitiveSensor   sensor = CapacitiveSensor(8,11);

Servo theServo;
long raw;

void setup() {
  Serial.begin(115200);
  theServo.attach(3);
  sensor.set_CS_AutocaL_Millis(0xFFFFFFFF);
  Serial.begin(115200);
  Serial.println("raw");
}

void loop() {
  raw = sensor.capacitiveSensor(10);    //lowest  450 & highest 750
  if(raw > 600){                        //if raw is bigger than 600
    open();                             //do void open
    delay(4000);                        //wait for 4 seconds
    close();                            //close void opne
  }
}

void open(){
  //open
  for(int i = 0; i < 90; i++){          //count from 0 to 90
    theServo.write(i);                  //move the servo from 0 to 90
    Serial.println(i);
    delay(50);
  }
}

void close(){
  //close
  for(int i = 90; i > 0; i--){
    theServo.write(i);
    Serial.println(i);
    delay(10);
  }
}
trash can controlled by serial commands
//in this sketch the servo is controlled by serial commands from the computer
//if you send the letter "o" to the arudino it will execute "void open()"
//if you send the letter "c" to the arduino it will execute "void close()"
#include <Servo.h>  //import the servo library

Servo theServo;    //create a servo

void setup() {
  Serial.begin(115200);            //serial connection
  theServo.attach(3);              //theServo is at port 3 (remeber the ~(PWM)-Symbol
}

void loop() {
  if(Serial.available()){        //if there is a serial command comming
    char command = Serial.read();   //read the serial command
    if(command == 'o'){             //is the command and 'o'
      open();                       //do void open
    }
    if(command == 'c'){
      close();
    }
  }
}

void open(){
  //open
  for(int i = 0; i < 90; i++){                //count from 0 to 90 with int i
    theServo.write(i);                        //i is the servo position
    Serial.println(i);                        //print the servo position to the serial monitor
    delay(50);                                //wait for 50 milliseconds
  }
}

void close(){
  //close
  for(int i = 90; i > 0; i--){
    theServo.write(i);
    Serial.println(i);
    delay(10);
  }
}
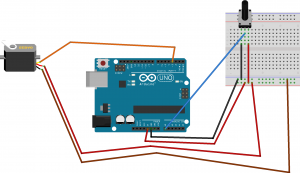
Potentiometer opening the trash can
//in this sketch the servo is controlled by an potentiometer
//a potentiometer is a variable resistor that can be changed by rotation
#include <Servo.h>  //import the servo library

Servo theServo;    //create a servo

void setup() {
  Serial.begin(115200);            //serial connection
  theServo.attach(3);              //theServo is at port 3 (remeber the ~(PWM)-Symbol
}

void loop() {
  int value = analogRead(A0);      //read the analog pin A0 the value is between 0 and 1023
  value = map(value,0,1023,0,180); //adjust value from 0 to 1023 to 0 and 180 because the servo works with degrees
  theServo.write(value);
}
2022-09-22
- WH.02.110 (Instruction Room IAS) 10:00 - 16:00
presentation
painting machine
controlling light
2022-09-29
- WH.02.110 (Instruction Room IAS) 9:00 - 16:00
2022-10-06
- WH.02.110 (Instruction Room IAS) 9:00 - 16:00
Heartbeat controlling light
2022-10-13
- WH.02.110 (Instruction Room IAS) 9:00 - 16:00
