Difference between revisions of "CPX-CircuitPython"
| (13 intermediate revisions by the same user not shown) | |||
| Line 1: | Line 1: | ||
| + | |||
| + | '''[[Physical Computing | Physical Computing & Model of Communication]]''' | ||
| + | |||
| + | [[About Arduino|See Arduino for reference]] | ||
| + | |||
| + | When you see an interactive work, don't you wonder how information was detected, delivered, processed, and output or feedback to the viewers? <br> | ||
| + | Physical Computing uses electronics to prototype new materials for designers and artists. | ||
| + | <br> | ||
| + | Physical Computing is an approach to computer-human interaction design that starts by considering how humans express themselves physically. In physical computing, we take the human body and its capabilities as the starting point and attempt to design interfaces, both software and hardware, that can sense and respond to what humans can physically do. | ||
| + | |||
| + | Communications in Physical Computing: | ||
| + | |||
| + | '''sensing signals-> computing and sending commands -> and executing.''' | ||
| + | |||
| + | The Shannon and Weaver Model of Communication | ||
| + | |||
| + | It is known as the “mother of all models” because of its wide popularity. The model is also known as ‘information theory’. | ||
| + | The Shannon and Weaver Model named after: | ||
| + | Claude Shannon was a mathematician from the United States. | ||
| + | Warren Weaver was an electrical engineer from the United States. | ||
| + | The Shannon-Weaver theory was first proposed in 1948, and this model still applicable today. | ||
| + | |||
| + | [[File:Communication-models-01.jpg|800px]]<br><br><br> | ||
| + | |||
=First things first: what is a microcontroller?= | =First things first: what is a microcontroller?= | ||
Computer and processor are generic terms for anything that can run a program, basically. <br> | Computer and processor are generic terms for anything that can run a program, basically. <br> | ||
| Line 178: | Line 202: | ||
[[File:Mu CircuitPython Mode Cheat Sheet 1.jpg |600px]] | [[File:Mu CircuitPython Mode Cheat Sheet 1.jpg |600px]] | ||
| − | |||
| − | |||
| − | |||
| − | |||
| − | |||
| − | |||
| − | |||
| − | |||
| − | |||
| − | |||
| − | |||
| − | |||
| − | |||
| − | |||
| − | |||
| − | |||
| − | |||
| − | |||
| − | |||
| − | |||
| − | |||
| − | |||
| − | |||
| − | |||
==='''6. CircuitPython Made Easy'''=== | ==='''6. CircuitPython Made Easy'''=== | ||
| Line 345: | Line 345: | ||
| − | ======''' | + | ======'''Tap to play tone and neopixel'''====== |
<syntaxhighlight lang="Python"> | <syntaxhighlight lang="Python"> | ||
from adafruit_circuitplayground import cp | from adafruit_circuitplayground import cp | ||
| + | |||
| + | import time | ||
# Change to 1 for detecting a single-tap! | # Change to 1 for detecting a single-tap! | ||
cp.detect_taps = 2 | cp.detect_taps = 2 | ||
| Line 368: | Line 370: | ||
cp.pixels[i]=(0,0,255) | cp.pixels[i]=(0,0,255) | ||
</syntaxhighlight> | </syntaxhighlight> | ||
| − | |||
| − | |||
| − | |||
====='''capacitive touch piano:'''===== | ====='''capacitive touch piano:'''===== | ||
| Line 428: | Line 427: | ||
'''"else"''' creates a single action, when the if the condition is false. | '''"else"''' creates a single action, when the if the condition is false. | ||
| + | |||
| + | '''for loop''' | ||
| + | |||
| + | A for loop is used for iterating over a sequence. (in our previous example, we iterated through all the Neopixels on CPX using for loop) | ||
| + | |||
There is a CircuitPython reference PDF: | There is a CircuitPython reference PDF: | ||
| Line 434: | Line 438: | ||
please read it after this lesson. | please read it after this lesson. | ||
| − | |||
| − | |||
| − | |||
| − | |||
| − | |||
| − | |||
| − | |||
| − | |||
| − | |||
| − | |||
====='''8. Play audio file'''===== | ====='''8. Play audio file'''===== | ||
| Line 449: | Line 443: | ||
https://learn.adafruit.com/circuitpython-made-easy-on-circuit-playground-express/play-file | https://learn.adafruit.com/circuitpython-made-easy-on-circuit-playground-express/play-file | ||
<syntaxhighlight lang="Python"> | <syntaxhighlight lang="Python"> | ||
| + | |||
#https://learn.adafruit.com/circuitpython-made-easy-on-circuit-playground-express/play-file | #https://learn.adafruit.com/circuitpython-made-easy-on-circuit-playground-express/play-file | ||
| Line 457: | Line 452: | ||
if cp.button_a: | if cp.button_a: | ||
cp.play_file("dip.wav") | cp.play_file("dip.wav") | ||
| − | + | for x in range(5,10,1): | |
| − | + | cp.pixels[x]=(0,0,0) | |
| − | + | ||
| − | + | for y in range(0,5,1): | |
| − | + | cp.pixels[y]=(255,0,0) | |
| − | |||
| − | |||
| − | |||
| − | |||
| − | |||
| − | |||
if cp.button_b: | if cp.button_b: | ||
cp.play_file("rise.wav") | cp.play_file("rise.wav") | ||
| − | + | for j in range(5,10,1): | |
| − | + | cp.pixels[j]=(0,255,50) | |
| − | + | ||
| − | + | for i in range(0,5,1): | |
| − | + | cp.pixels[i]=(0,0,0) | |
| + | |||
| + | </syntaxhighlight> | ||
| + | ====='''9. Acceleration'''===== | ||
| + | |||
| + | https://learn.adafruit.com/circuitpython-made-easy-on-circuit-playground-express/acceleration | ||
| + | <syntaxhighlight lang="Python"> | ||
| + | # SPDX-FileCopyrightText: 2021 ladyada for Adafruit Industries | ||
| + | # SPDX-License-Identifier: MIT | ||
| + | |||
| + | """ | ||
| + | This example uses the accelerometer on the Circuit Playground. It prints the values. Try moving | ||
| + | the board to see the values change. If you're using Mu, open the plotter to see the values plotted. | ||
| + | """ | ||
| + | import time | ||
| + | from adafruit_circuitplayground import cp | ||
| + | |||
| + | while True: | ||
| + | x, y, z = cp.acceleration | ||
| + | print((x, y, z)) | ||
| − | + | time.sleep(0.1) | |
| − | |||
| − | |||
| − | |||
| − | |||
</syntaxhighlight> | </syntaxhighlight> | ||
| + | |||
| + | Now, try to use the "if" condition to turn on Neopixels and change colors according to the x,y z values. | ||
===7. CPX external inputs and outputs Wiring=== | ===7. CPX external inputs and outputs Wiring=== | ||
| + | for some external components that are not on board sensors. | ||
| + | |||
| + | we need to install some library to make it work. | ||
| + | |||
| + | that means we need to create a folder called "lib" on CIRCUITPY. | ||
| + | |||
| + | and copy some files there. you can download the lib folder '''here:''' | ||
| + | |||
| + | [[File:Lib.zip]] | ||
| + | |||
| + | if you want to download and explore the full Bundle you can find they here: | ||
| + | |||
| + | https://circuitpython.org/libraries | ||
[[File: Circuit playground Adafruit Circuit Playground Express Pinout.png|600px]] | [[File: Circuit playground Adafruit Circuit Playground Express Pinout.png|600px]] | ||
===='''Simple digital and analog inputs and output'''==== | ===='''Simple digital and analog inputs and output'''==== | ||
| − | |||
| Line 544: | Line 562: | ||
print("analog voltage:", sensor) | print("analog voltage:", sensor) | ||
time.sleep(0.01) | time.sleep(0.01) | ||
| + | |||
===='''Other external wiring'''==== | ===='''Other external wiring'''==== | ||
| Line 554: | Line 573: | ||
'''Connect to servo motors:''' | '''Connect to servo motors:''' | ||
| + | |||
| + | https://learn.adafruit.com/circuitpython-essentials/circuitpython-servo | ||
| + | |||
| + | download lib here:[[File:Lib.zip]] | ||
single motor: | single motor: | ||
Latest revision as of 23:33, 23 April 2024
Physical Computing & Model of Communication
When you see an interactive work, don't you wonder how information was detected, delivered, processed, and output or feedback to the viewers?
Physical Computing uses electronics to prototype new materials for designers and artists.
Physical Computing is an approach to computer-human interaction design that starts by considering how humans express themselves physically. In physical computing, we take the human body and its capabilities as the starting point and attempt to design interfaces, both software and hardware, that can sense and respond to what humans can physically do.
Communications in Physical Computing:
sensing signals-> computing and sending commands -> and executing.
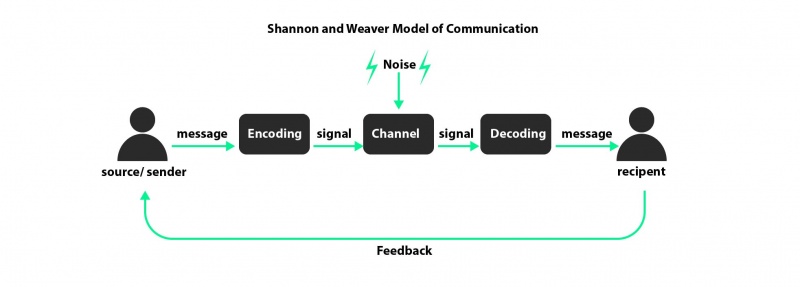
The Shannon and Weaver Model of Communication
It is known as the “mother of all models” because of its wide popularity. The model is also known as ‘information theory’. The Shannon and Weaver Model named after: Claude Shannon was a mathematician from the United States. Warren Weaver was an electrical engineer from the United States. The Shannon-Weaver theory was first proposed in 1948, and this model still applicable today.
First things first: what is a microcontroller?
Computer and processor are generic terms for anything that can run a program, basically.
A controller or microcontroller usually refers to a simple processor that does only one task, like listening to sensors.
In explaining microcontrollers, we’ll distinguish them from computers, which contain more powerful processors that can run an operating system.
One of the most used microcontroller is Arduino. In this case though we will be talking about Adafruit Circuit Playground, a board with a hand design for several project.
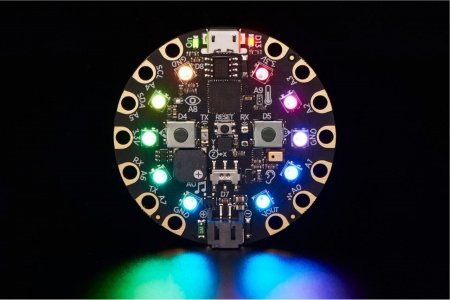
Adafruit Circuit Playground Express
How's that different from an Arduino?
The Circuit Playground Express & Blue Fruit, produced by Adafruit, are microcontrollers, just like the Arduino Uno, but designed for wearable projects.
Thus, is a little different from the normal boards from the hardware side, since the pins go out to those big wide sewable pads, instead of normal pin headers (like on the Uno)
because Circuit Playground Express running on a faster processor compared to Arduino Uno. We can also use it for audio-based projects.
CircuitPython & MU Editor
Python is the fastest-growing programming language. And CircuitPython is based on Python language but designed to run on microcontroller boards.
CircuitPython is designed with education in mind.
It's easy to start learning how to program and you get immediate feedback from the board.
Before we start we all have to do this to set up:
1. Install or update CircuitPython!
https://learn.adafruit.com/adafruit-circuit-playground-express/circuitpython-quickstart
*1. Click the link below and download the latest UF2 file:
https://circuitpython.org/board/circuitplayground_express/
*2. Plug your Circuit Playground Express into your computer via a (data)USB cable.
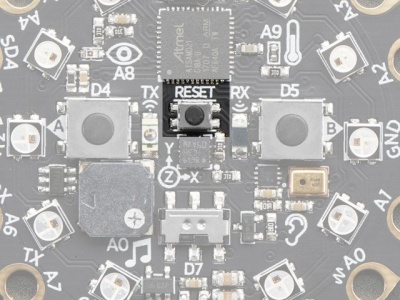
*3. Double-click the small Reset button in the middle of the CPX(short for circuit playground express).
 you will see all of the LEDs turn green. If they turn all red, check the USB cable, try another USB port, etc.
 (If double-clicking doesn't do it, try a single-click!)
*4. You will see a new disk drive appear called CPLAYBOOT
  Drag the adafruit-circuitpython-etc...uf2 file onto it.
*5. The CPLAYBOOT drive will disappear and a new disk drive will appear called CIRCUITPY
That's it! You're done :)
2. Installing Mu Editor
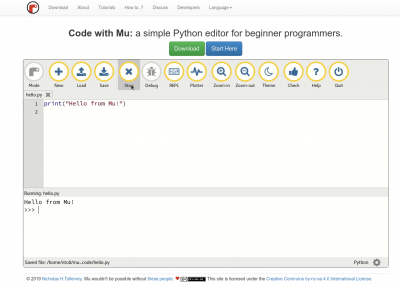
Download Mu from(if you are using computers from school, the Mu Editor is already installed)
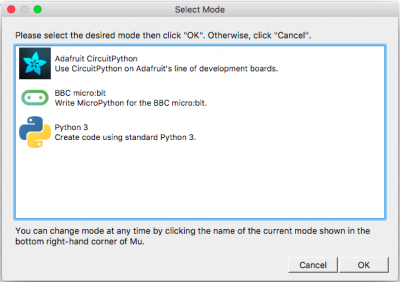
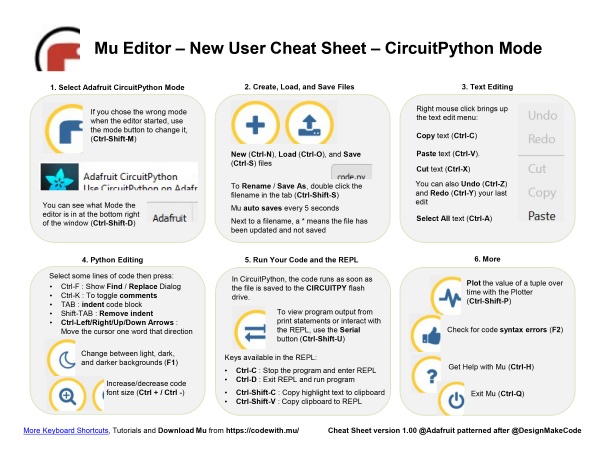
The first time you start Mu, you will be prompted to select your 'mode' -
you can always change your mind later. For now please select CircuitPython!
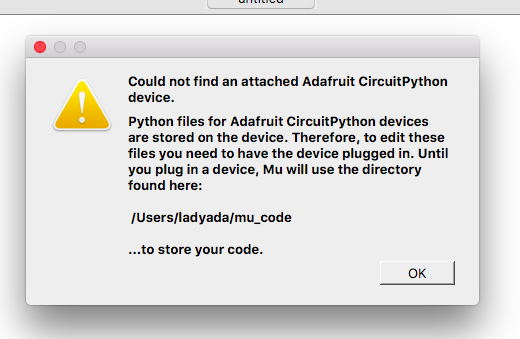
Mu attempts to auto-detect your board, so please plug in your CircuitPython device and make sure it shows up as a CIRCUITPY drive before starting Mu
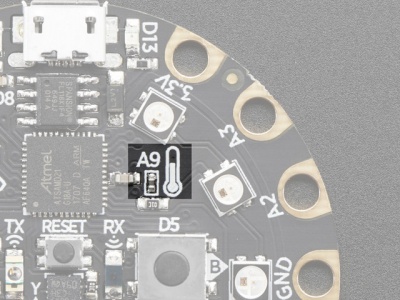
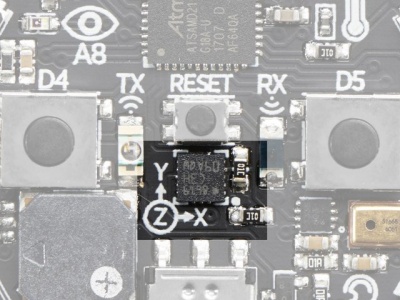
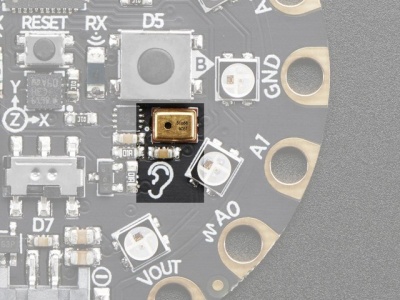
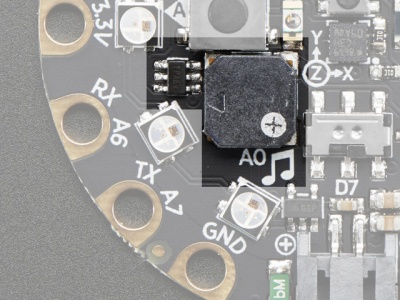
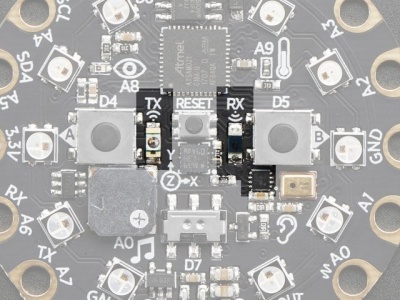
CPX onboard sensors & Pinouts
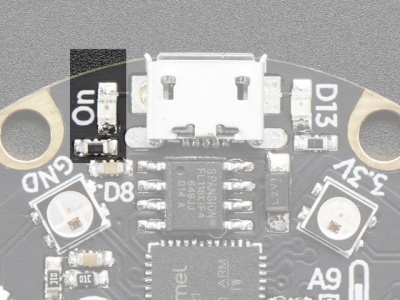
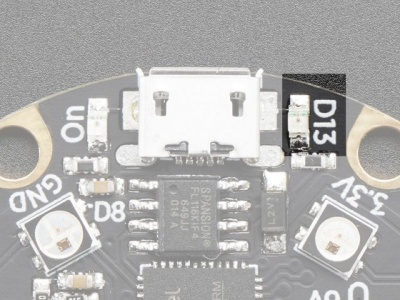
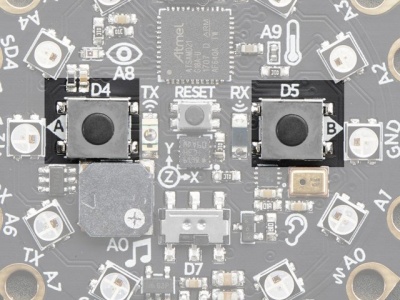
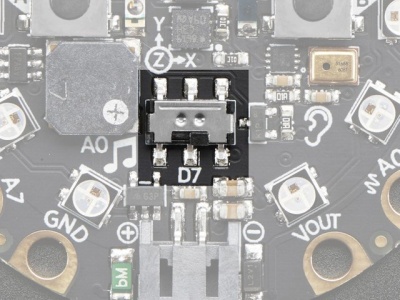
1. Green LED lets you know that the CPX is powered on.------ 2. Red LED on Digital pin#13
3. This small button is for Resetting the board. ------------------ 4. Button A and B on Digital pin #4 and #5
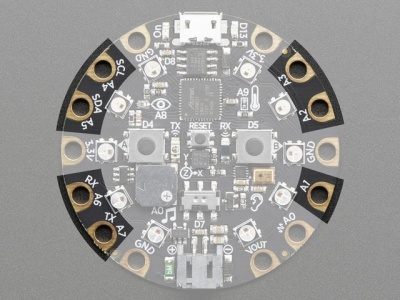
5. slide switch on Digital pin #7 - - - - - - - - - - - - - - - - - - - - - - 6. 7 Capacitive Touch pads from A1-A7
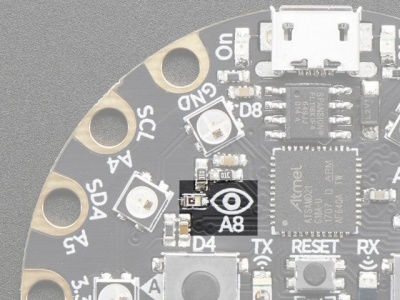
7. Light Sensor on pin A8 - - - - - - - - - - - - - - - - - - - - - - - - - - - 8. Temperature Sensor on A9
9. motion sensor (LIS3DH xyz) - - - - - - - - - - - - - - - - - - - - - - - - - 10. Microphone Audio Sensor
11. speaker and audio output pin on A0
12. Infrared Receive/Transmit
Pinouts:
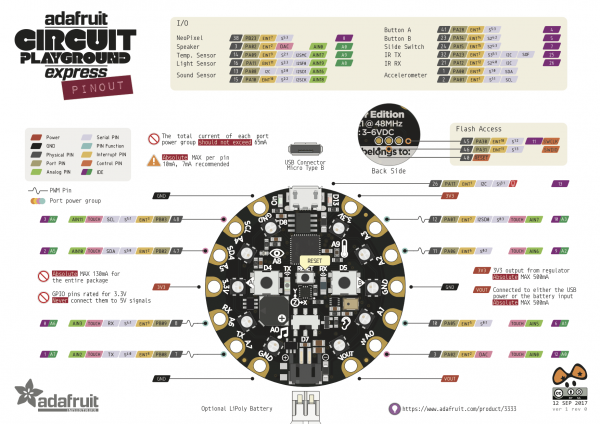
A0 / D12 - true analog output so it's great for playing audio clips.
A1 / D6 - digital I/O, or analog Input, PWM output,capacitive touch sensor
A2 / D9 - digital I/O, or analog Input, PWM output,capacitive touch sensor
A3 / D10 - digital I/O, or analog Input.PWM output,capacitive touch sensor
A4 / D3 - digital I/O, or analog Input, capacitive touch sensor
A5 / D2 - digital I/O, or analog Input, capacitive touch sensor
A6 / D0 - digital I/O, or analog Input, PWM output,capacitive touch sensor
A7 / D1 - digital I/O, or analog Input, PWM output,capacitive touch sensor<be>
Let's start coding
3. Hello, World!
In the code area, where it says, # Write your code here :-), write the following code:
print( 8 )
Then click the Save button to save the code and run it on the CircuitPlayground.
You should see this message appear in the Serial Dialogue Panel:
code.py output: 8
Change the message to something else. If you want to print characters instead of numbers, you must use quotation marks.
print( "hello" )
Let's program the device to print two things, with a time delay in between the two print statements:
import time
print( "hello" )
time.sleep( 0.5 )
print( "World" )
Now let's make a loop, so the message will be running forever:
#short cuts: Tab key , Shift-Tab, command(control)-k

# Write your code here :-)

import time

while True:
   print("hello")
   time.sleep(0.5)
   print("world!")
   time.sleep(0.5)
Indentation and commenting options
Python programs are Space holder Character Sensitive.
To indent the three lines, I selected them all and then pressed the Tab key.
To unindent, select some lines and press Shift-Tab. For commenting: select lines and press command(control)-k
6. CircuitPython Made Easy
Libraries:
Libraries are codes other people have written for you. The libraries we will be using are included as part of the CircuitPython code, but you still must import them into your program. Other libraries, for many uses, must be downloaded and placed in a folder named lib on the CIRCUITPY drive.
CircuitPython Libraries already included in CPX, But if you are using CPB, (CPX = Circuit Playground Express, CPB = Circuit Playground Bluefruit)
you need to install CircuitPython Libraries by download the file and put them in the folder named lib on the CIRCUITPY drive.
we will use circuit playground libraries, a simple way to include the Circuit Playground functionality in our code.
more reference and examples:
https://learn.adafruit.com/circuitpython-made-easy-on-circuit-playground-express
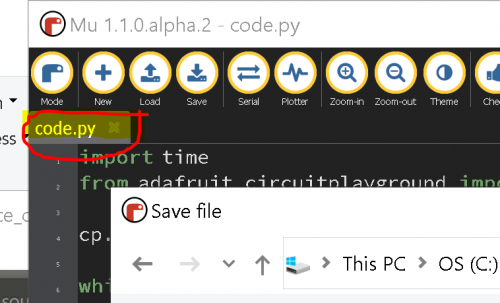
SAVE AS:
if you want to save the code.py file in different names as well as in different locations:
double click on the file name in Mu editor.
Examples with CPX On-Board sensors:
1. Red LED:
https://learn.adafruit.com/circuitpython-made-easy-on-circuit-playground-express/red-led
2. Slide Switch:
https://learn.adafruit.com/circuitpython-made-easy-on-circuit-playground-express/slide-switch
3. Neopixel
3.1 Smiley face
from adafruit_circuitplayground import cp
cp.pixels.brightness=0.3

while True:
    # the smiley's eyes
    cp.pixels[1]=(255,0,0)
    cp.pixels[3]=(255,0,0)
    #the smiley's mouth
    cp.pixels[5]=(255,0,0)
    cp.pixels[6]=(255,0,0)
    cp.pixels[7]=(255,0,0)
    cp.pixels[8]=(255,0,0)
    cp.pixels[9]=(255,0,0)
import time
from adafruit_circuitplayground import cp
cp.pixels.brightness=0.3

while True:
    cp.pixels.brightness=0.3

# the smiley's eyes
    cp.pixels[1]=(255,0,0)
    cp.pixels[3]=(255,0,0)
#the smiley's mouth
    cp.pixels[5]=(255,0,0)
    cp.pixels[6]=(255,0,0)
    cp.pixels[7]=(255,0,0)
    cp.pixels[8]=(255,0,0)
    cp.pixels[9]=(255,0,0)
    time.sleep(3)
    cp.pixels.brightness=0

#the smiley's eyes
    cp.pixels[1]=(255,255,0)
    cp.pixels[3]=(255,255,0)
#the smiley's mouth
    cp.pixels[5]=(255,255,0)
    cp.pixels[6]=(255,255,0)
    cp.pixels[7]=(255,255,0)
    cp.pixels[8]=(255,255,0)
    cp.pixels[9]=(255,255,0)
    time.sleep(3)
Neopixels for loops
import time
from adafruit_circuitplayground import cp
while True:
    for x in range(0,12):
        for j in range(0,10,1):
            print(j)
            cp.pixels[j]=(255,0,0)
            cp.pixels.brightness=0.3
            time.sleep(0.1)
        time.sleep(0.5)
        for j in range(9,-1,-1):
            print(j)
            cp.pixels.brightness=0.3
            cp.pixels[j]=(0,0,255)
            time.sleep(0.1)
        time.sleep(0.5)
4. light sensor:
https://learn.adafruit.com/circuitpython-made-easy-on-circuit-playground-express/light
import time
import time
from adafruit_circuitplayground import cp

while True:
    print("Light:", cp.light)
    print(cp.light*5)
#cp.play_tone(frequency, seconds)
    cp.play_tone(cp.light*5, 0.1)
    time.sleep(0.1)
5. play tone:
https://learn.adafruit.com/circuitpython-made-easy-on-circuit-playground-express/play-tone
Tap to play tone and neopixel
from adafruit_circuitplayground import cp

import time
# Change to 1 for detecting a single-tap!
cp.detect_taps = 2
cp.pixels.brightness=0.3

while True:
    if cp.tapped:
        print("Tapped!")
        cp.red_led = True
        time.sleep(0.1)
        cp.play_tone(262, 1)
        for i in range(0,10,1):
            cp.pixels[i]=(255,0,0)
        time.sleep(0.5)

    else:
        cp.red_led = False
        for i in range(0,10,1):
            cp.pixels[i]=(0,0,255)
capacitive touch piano:
import time
from adafruit_circuitplayground import cp

cp.pixels.brightness = 0.3

while True:
    if cp.touch_A1:
        print("Touched A1!")
        cp.pixels.fill((255, 0, 0))
        cp.play_tone(262, 0.2)
    if cp.touch_A2:
        print("Touched A2!")
        cp.pixels.fill((210, 45, 0))
        cp.play_tone(294, 0.2)
    if cp.touch_A3:
        print("Touched A3!")
        cp.pixels.fill((155, 100, 0))
        cp.play_tone(330, 0.2)
    if cp.touch_A4:
        print("Touched A4!")
        cp.pixels.fill((0, 255, 0))
        cp.play_tone(349, 0.2)
    if cp.touch_A5:
        print("Touched A5!")
        cp.pixels.fill((0, 135, 125))
        cp.play_tone(392, 0.2)
    if cp.touch_A6:
        print("Touched A6!")
        cp.pixels.fill((0, 0, 255))
        cp.play_tone(440, 0.2)
    if cp.touch_TX:
        print("Touched TX!")
        cp.pixels.fill((100, 0, 155))
        cp.play_tone(494, 0.2)
#    time.sleep(0.1)
combine the code from examples "Play tone" and "light sensor". and use light sensor input to generate tones.
Conditionals:
Evaluate a condition and react. If True, do this. If False, do this other thing.

"while" creates a repeated action. while this condition is true, continue to do this thing over and over.

 when the condition is false, go on to the rest of the program.

"if" creates a single action. if this condition is true, do this thing. if false, don't do it.

"else" creates a single action, when the if the condition is false.
for loop
A for loop is used for iterating over a sequence. (in our previous example, we iterated through all the Neopixels on CPX using for loop)
There is a CircuitPython reference PDF:

File:CircuitPython Reference Sheet.pdf

please read it after this lesson.
8. Play audio file
https://learn.adafruit.com/circuitpython-made-easy-on-circuit-playground-express/play-file
#https://learn.adafruit.com/circuitpython-made-easy-on-circuit-playground-express/play-file

from adafruit_circuitplayground import cp

cp.pixels.brightness = 0.3
while True:
    if cp.button_a:
        cp.play_file("dip.wav")
        for x in range(5,10,1):
            cp.pixels[x]=(0,0,0)

        for y in range(0,5,1):
            cp.pixels[y]=(255,0,0)

    if cp.button_b:
        cp.play_file("rise.wav")
        for j in range(5,10,1):
            cp.pixels[j]=(0,255,50)

        for i in range(0,5,1):
            cp.pixels[i]=(0,0,0)
9. Acceleration
https://learn.adafruit.com/circuitpython-made-easy-on-circuit-playground-express/acceleration
# SPDX-FileCopyrightText: 2021 ladyada for Adafruit Industries
# SPDX-License-Identifier: MIT

"""
This example uses the accelerometer on the Circuit Playground. It prints the values. Try moving
the board to see the values change. If you're using Mu, open the plotter to see the values plotted.
"""
import time
from adafruit_circuitplayground import cp

while True:
    x, y, z = cp.acceleration
    print((x, y, z))

    time.sleep(0.1)
Now, try to use the "if" condition to turn on Neopixels and change colors according to the x,y z values.
7. CPX external inputs and outputs Wiring
for some external components that are not on board sensors.
we need to install some library to make it work.
that means we need to create a folder called "lib" on CIRCUITPY.
and copy some files there. you can download the lib folder here:
if you want to download and explore the full Bundle you can find they here:
https://circuitpython.org/libraries
Simple digital and analog inputs and output
1. Digital:
https://learn.adafruit.com/circuitpython-essentials/circuitpython-digital-in-out
2. Digital in and out With external electronic components:
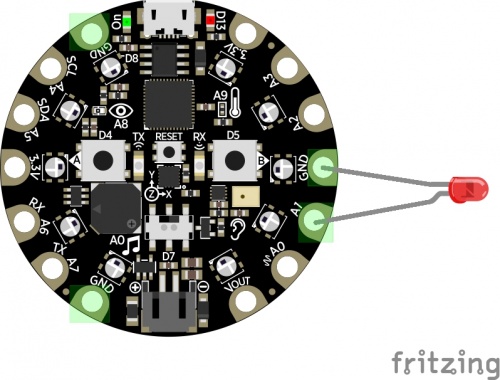
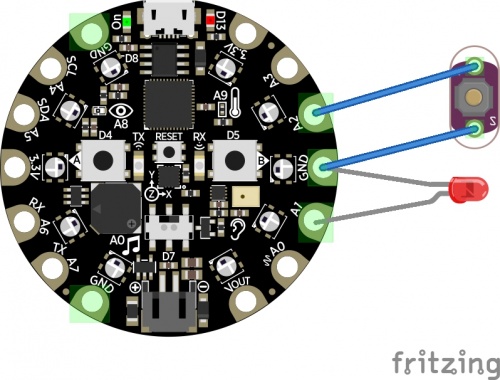
After we followed the example, now let's try to connect an external Led.
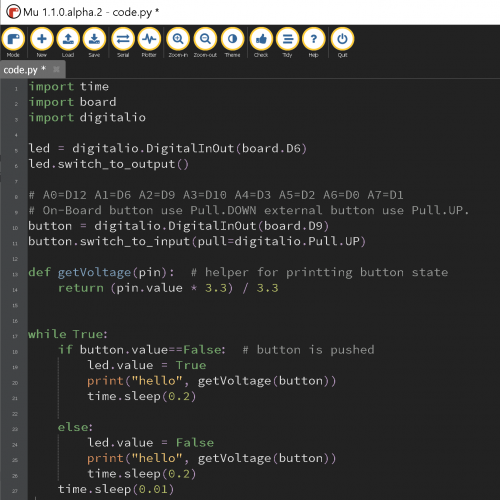
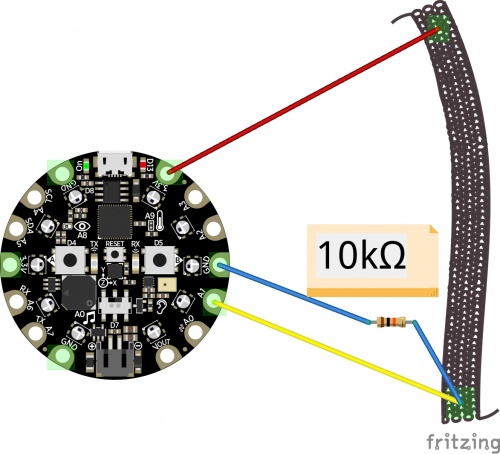
let's connect the led to A1(D6). There is a list of pinout from Adafruit's website:
https://learn.adafruit.com/adafruit-circuit-playground-express/pinouts
instead of the onboard button, we can also use an external button
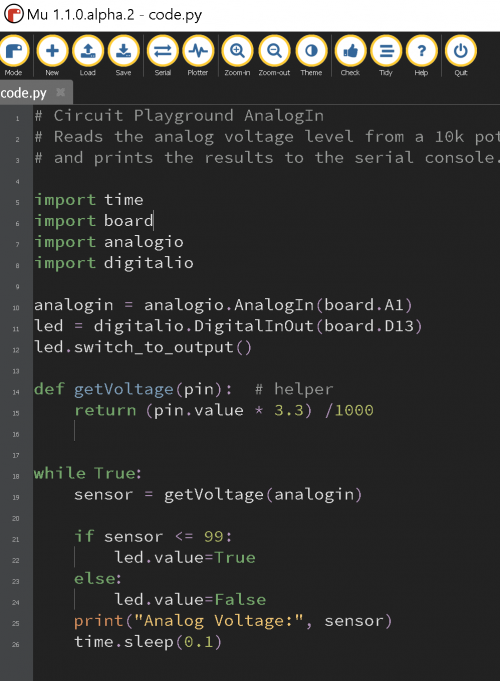
3. Analog input:
https://learn.adafruit.com/circuitpython-essentials/circuitpython-analog-in
4. Analog input and output with external electronic components:
import time
import board
import analogio
from adafruit_circuitplayground import cp
analogin = analogio.AnalogIn(board.A2)
def getVoltage(pin):
    return (pin.value * 3.3) / 300
while True:
    sensor = getVoltage(analogin)
    cp.play_tone(sensor,0.05)
    print("analog voltage:", sensor)
    time.sleep(0.01)
Other external wiring
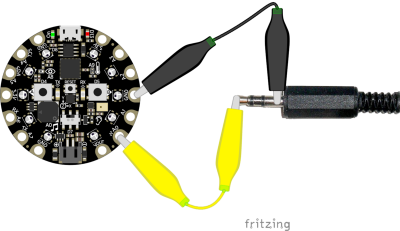
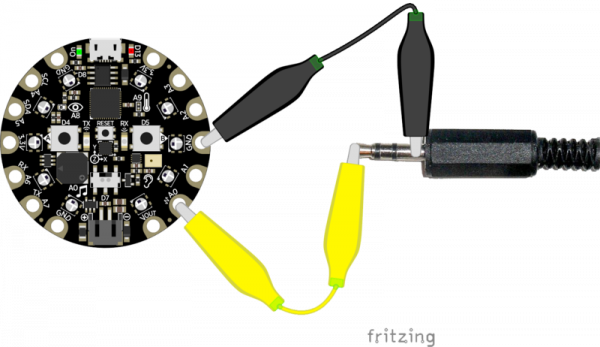
Connect to external speakers:
Connect to servo motors:
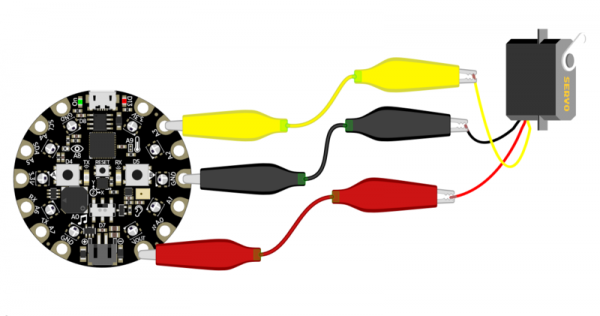
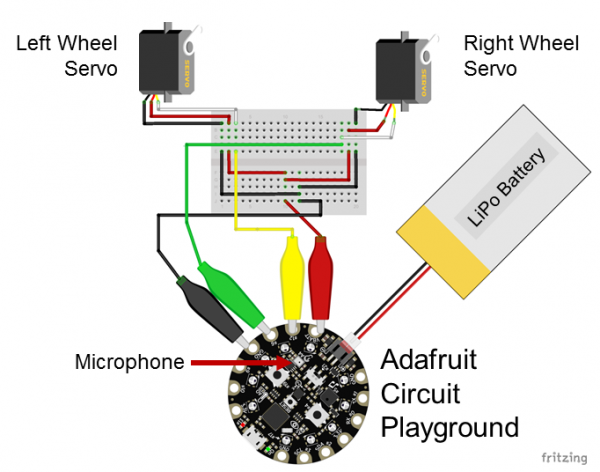
https://learn.adafruit.com/circuitpython-essentials/circuitpython-servo
download lib here:File:Lib.zip
single motor:
multiple motors:
you can find the library and code for the servo motors here:
https://learn.adafruit.com/adafruit-circuit-playground-express/circuitpython-servo
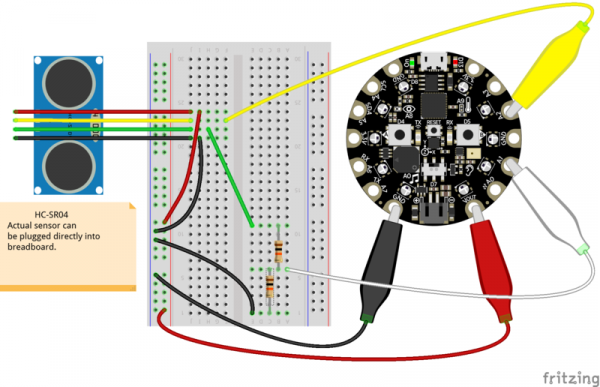
ultra-sonic sensor:
https://learn.adafruit.com/jack-o-theremin/circuit-python-code
Fun projects made with CPX and CircuitPython Made Easy Lib
[Combo Dial Safe with Circuit Playground Express]
[FruitBox Sequencer: Musically Delicious Step Pattern Generator]
-Paged updated by NaN 2024
