Difference between revisions of "Arduino & Stepper motors"
| Line 8: | Line 8: | ||
The design of the stepper motor provides a constant holding torque without the need for the motor to be powered and, provided that the motor is used within its limits, positioning errors don't occur, since stepper motors have physically predefined stations. | The design of the stepper motor provides a constant holding torque without the need for the motor to be powered and, provided that the motor is used within its limits, positioning errors don't occur, since stepper motors have physically predefined stations. | ||
<br><br> | <br><br> | ||
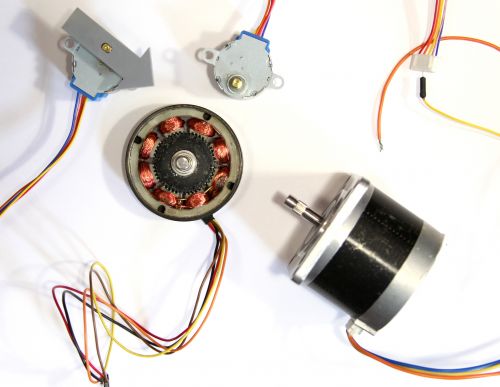
| − | [[File:Steppers.jpg | | + | [[File:Steppers.jpg | 500 px]] |
<br><br> | <br><br> | ||
<span style="background-color:yellow">Steppers work by moving in a bunch of little increments, or steps. If you step them fast enough, it looks like continuous motion. Each time one of the coils is energized, it pulls one of the teeth on the shaft toward it to complete one step. For example, a 200-step motor moves in a full 360° circle at 1.8° per step.</span> | <span style="background-color:yellow">Steppers work by moving in a bunch of little increments, or steps. If you step them fast enough, it looks like continuous motion. Each time one of the coils is energized, it pulls one of the teeth on the shaft toward it to complete one step. For example, a 200-step motor moves in a full 360° circle at 1.8° per step.</span> | ||
| Line 15: | Line 15: | ||
Now you might want to connect the stepper motor to a microcontroller like Arduino. <br> | Now you might want to connect the stepper motor to a microcontroller like Arduino. <br> | ||
You will need: | You will need: | ||
| − | * Arduino Uno | + | * Arduino Uno <br> |
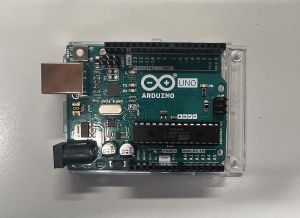
| + | [[File:arduino_uno.jpg | 300px]]<br> | ||
* Adafruit Motor Shield <br> | * Adafruit Motor Shield <br> | ||
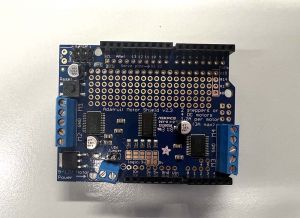
| + | [[File:motor_shield.jpg | 300px]]<br> | ||
There are also other drivers you can use to connect the motors to your microcontrollers, like for instance [[https://www.pololu.com/category/120/stepper-motor-drivers |this ones]] or an H-Bridge. We will use the Motor shield as it provides a set-up to work with more than one motor and leaving your digital pins free to use for other sensors or actuators. | There are also other drivers you can use to connect the motors to your microcontrollers, like for instance [[https://www.pololu.com/category/120/stepper-motor-drivers |this ones]] or an H-Bridge. We will use the Motor shield as it provides a set-up to work with more than one motor and leaving your digital pins free to use for other sensors or actuators. | ||
| − | * Jumper | + | * Jumper wires |
* External power supply <br> | * External power supply <br> | ||
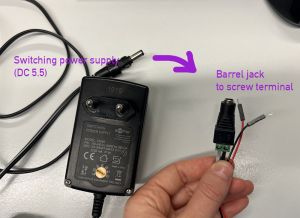
| + | [[File:Sower_sup_ext.jpg | 300px]]<br> | ||
Your Arduino can only provide 5 volt while the motor usually requires between 9 and 12 volt so we are adding an external power supply. | Your Arduino can only provide 5 volt while the motor usually requires between 9 and 12 volt so we are adding an external power supply. | ||
You can supply energy in other ways as well, like for instance with a battery. In our case we are using a switching power supply connected to a barrel jack to screw terminal with two jumper wires. | You can supply energy in other ways as well, like for instance with a battery. In our case we are using a switching power supply connected to a barrel jack to screw terminal with two jumper wires. | ||
| − | + | ||
At the Interaction station we have several stepper motor. Most | At the Interaction station we have several stepper motor. Most | ||
Revision as of 15:39, 2 December 2022
Stepper motor: how and why
A stepper motor is essentially a servo motor that uses a different method of motorization. Where a servo motor uses a continuous rotation DC motor and integrated controller circuit, stepper motors use multiple toothed electromagnets arranged around a central gear to define position.
Stepper motors require an external control circuit or micro controller (for instance a Raspberry Pi or Arduino) to individually energize each electromagnet and make the motor shaft turn. When electromagnet ‘A’ is powered it attracts the gear’s teeth and aligns them, slightly offset from the next electromagnet ‘B’. When ‘A’ is switch off, and ‘B’ switched on, the gear rotates slightly to align with ‘B’, and so on around the circle, with each electromagnet around the gear energizing and de-energizing in turn to create rotation. Each rotation from one electromagnet to the next is called a "step", and thus the motor can be turned by precise predefined step angles through a full 360 Degree rotation.
Stepper motors are available in two varieties; unipolar or bipolar. Bipolar motors are the strongest type of stepper motor and usually have four or eight leads. They have two sets of electromagnetic coils internally, and stepping is achieved by changing the direction of current within those coils. Unipolar motors, identifiable by having 5,6 or even 8 wires, also have two coils, but each one has a center tap. Unipolar motors can step without having to reverse the direction of current in the coils, making the electronics simpler. However, because the center tap is used to energize only half of each coil at a time they typically have less torque than bipolar.
These motors have four to eight wires you need to use to control the pulses to make the shaft step continuously, so they’re more complicated to control than the previously described motors. They are squatter looking than the rest of the DC motor family, and have less torque than you might expect for their size and weight. However, they’re also the fastest way to integrate both speed and position control into a project.
The design of the stepper motor provides a constant holding torque without the need for the motor to be powered and, provided that the motor is used within its limits, positioning errors don't occur, since stepper motors have physically predefined stations.

Steppers work by moving in a bunch of little increments, or steps. If you step them fast enough, it looks like continuous motion. Each time one of the coils is energized, it pulls one of the teeth on the shaft toward it to complete one step. For example, a 200-step motor moves in a full 360° circle at 1.8° per step.
Arduino wiring
Now you might want to connect the stepper motor to a microcontroller like Arduino.
You will need:
- Arduino Uno
- Adafruit Motor Shield

There are also other drivers you can use to connect the motors to your microcontrollers, like for instance [|this ones] or an H-Bridge. We will use the Motor shield as it provides a set-up to work with more than one motor and leaving your digital pins free to use for other sensors or actuators.
- Jumper wires
- External power supply

Your Arduino can only provide 5 volt while the motor usually requires between 9 and 12 volt so we are adding an external power supply.
You can supply energy in other ways as well, like for instance with a battery. In our case we are using a switching power supply connected to a barrel jack to screw terminal with two jumper wires.
At the Interaction station we have several stepper motor. Most
