Difference between revisions of "WdKA RIoT Arduino Shield"
m |
m (Annasa moved page Lora/shield to WdKA RIoT Arduino Shield) |
||
| (13 intermediate revisions by 2 users not shown) | |||
| Line 2: | Line 2: | ||
[[File:Wdka riot shield 10042017.jpg|300px|WdKA RIoT Arduino Shield]] | [[File:Wdka riot shield 10042017.jpg|300px|WdKA RIoT Arduino Shield]] | ||
| − | The WDKA Riot Shield is a simple Arduino shield with a Microchip RN2483 LoRa transceiver module. The shield has inputs | + | The WDKA Riot Shield is a simple Arduino shield with a Microchip RN2483 LoRa transceiver module. The shield has the following inputs: |
| + | * 2 analog resistance based sensors like RTDs (PTC/NTC) or LDRs. The resistive sensors form a voltage divider together with a 10kΩ ground. | ||
| + | * 1 electret microphone input using the [http://www.mouser.com/ds/2/256/MAX4465-MAX4469-62764.pdf MAX4466] as amplifier module. | ||
| + | * 1 LittleBit input. The LittleBit chain needs to be separately powered through a LittleBit power module at the beginning of the chain. | ||
| + | |||
| + | |||
| + | <gallery> | ||
| + | Image:LORA Shield Programming RN.jpg|LORA Shield with LDR and NTC | ||
| + | Image:LORA Shield LittleBit.jpg|LORA Shield with LittleBit connected | ||
| + | </gallery> | ||
| + | |||
| + | = Programming the RN2483 = | ||
| + | To get started with the shield the RN2483 LoraWan module needs to be programmed with the correct frequency channels, Device ID, Application Security key and the Network Security key. All these can be found in the [http://www.italks.eu iTalks] interface. The application used for the current shields is called '''IASAPP''' and has application id BE-7A-00-30. In the devices section of the application in iTalks you can see an overview of the devices with Device EUI and Address. Clicking on the device will show the necessary keys. Make sure to program the '''NetwSKey''' and the '''AppSKey'''! | ||
| + | |||
| + | Programming can be done with the python script in the firmware/utils directory: https://github.com/mywdka/WdKA_IoT/blob/master/LoraWAN_Shield/firmware/utils/init_riot_shield.py | ||
| − | |||
python2 init_riot_shield.py /dev/ttyUSB0 DevAddr NwkSKey AppsKey | python2 init_riot_shield.py /dev/ttyUSB0 DevAddr NwkSKey AppsKey | ||
| + | |||
| + | To do so remove the two red jumpers and connect a USB tot serial adapter (TTL not RS232!) to the TX and RX pin on the module side:<br> | ||
| + | [[File:LORA Shield Programming RN.jpg|300px|WdKA RIoT Arduino Shield with Serial Adapter attached]] | ||
Example:<br> | Example:<br> | ||
| − | <syntaxhighlight lang=" | + | <syntaxhighlight lang="bash" collapse="true" title="Example programming the RN2483" enclose="div"> |
[simon@aldeberan WdKA_RiOT]$ python2 init_riot_shield.py /dev/ttyUSB0 0125E1DF D8D87836076B304D757D13F5C9FD50BB C0908620ECD3C54498FAEFF34E467F5F | [simon@aldeberan WdKA_RiOT]$ python2 init_riot_shield.py /dev/ttyUSB0 0125E1DF D8D87836076B304D757D13F5C9FD50BB C0908620ECD3C54498FAEFF34E467F5F | ||
writing: sys reset | writing: sys reset | ||
| Line 27: | Line 43: | ||
got: ok ( 6F:6B) | got: ok ( 6F:6B) | ||
| − | |||
| − | |||
| − | |||
| − | |||
| − | |||
| − | |||
| − | |||
| − | |||
| − | |||
| − | |||
| − | |||
| − | |||
| − | |||
| − | |||
| − | |||
| − | |||
| − | |||
| − | |||
| − | |||
| − | |||
| − | |||
| − | |||
| − | |||
| − | |||
| − | |||
| − | |||
| − | |||
| − | |||
| − | |||
| − | |||
| − | |||
| − | + | [...] other channels removed for brevity [/...] | |
| − | |||
| − | |||
| − | |||
| − | |||
| − | |||
| − | |||
| − | |||
| − | |||
| − | |||
| − | |||
| − | |||
| − | |||
| − | |||
| − | |||
| − | |||
| − | |||
| − | |||
| − | |||
| − | |||
| − | |||
| − | |||
| − | |||
| − | |||
| − | |||
| − | |||
| − | |||
| − | |||
| − | |||
| − | |||
| − | |||
| − | |||
| − | |||
| − | |||
| − | |||
| − | |||
| − | |||
| − | |||
| − | |||
| − | |||
| − | |||
| − | |||
| − | |||
| − | |||
| − | |||
| − | |||
| − | |||
| − | |||
| − | |||
| − | |||
| − | |||
| − | |||
| − | |||
| − | |||
| − | |||
| − | |||
| − | |||
| − | |||
| − | |||
| − | |||
| − | |||
| − | |||
| − | |||
| − | |||
| − | |||
| − | |||
| − | |||
| − | |||
| − | |||
| − | |||
| − | |||
| − | |||
| − | |||
| − | |||
| − | |||
| − | |||
| − | |||
| − | |||
writing: mac set rx2 0 869525000 | writing: mac set rx2 0 869525000 | ||
| Line 164: | Line 72: | ||
[simon@aldeberan WdKA_RiOT]$ | [simon@aldeberan WdKA_RiOT]$ | ||
</syntaxhighlight> | </syntaxhighlight> | ||
| + | |||
| + | |||
| + | 0004A30B001B64F5 18-4-2017 12:33:05 868.500 SF7 BW125 4/5 -106 5.8 33 188 2509003499990533 | ||
| + | |||
| + | Payload: | ||
| + | <font color="red">TTTT</font> | ||
| + | <font color="green">LLLL</font> | ||
| + | <font color="blue">MMMM</font> | ||
| + | <font color="orange">BBBB</font> | ||
| + | * 2 bytes NTC (<font color="red">T</font>) | ||
| + | * 2 bytes LDR (<font color="green">L</font>) | ||
| + | * 2 bytes MIC (<font color="blue">M</font>) | ||
| + | * 2 bytes LittleBits (<font color="orange">B</font>) | ||
| + | If a sensor is not enabled the corresponding field reads 9999. | ||
== Resources == | == Resources == | ||
| Line 173: | Line 95: | ||
<div class="references-small"> <references /> </div> | <div class="references-small"> <references /> </div> | ||
| − | [[Category: | + | [[Category:Internet of Things]] |
[[Category:Lora]] | [[Category:Lora]] | ||
| − | |||
Latest revision as of 13:29, 13 January 2023
WdKA RIoT Arduino Shield
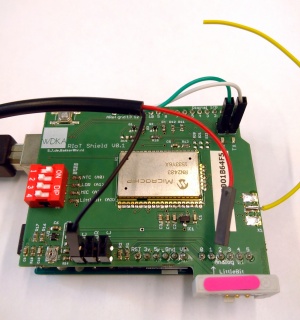
The WDKA Riot Shield is a simple Arduino shield with a Microchip RN2483 LoRa transceiver module. The shield has the following inputs:
- 2 analog resistance based sensors like RTDs (PTC/NTC) or LDRs. The resistive sensors form a voltage divider together with a 10kΩ ground.
- 1 electret microphone input using the MAX4466 as amplifier module.
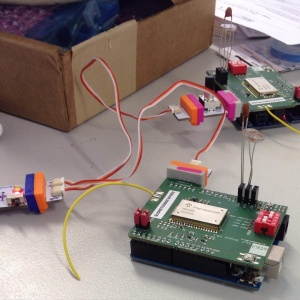
- 1 LittleBit input. The LittleBit chain needs to be separately powered through a LittleBit power module at the beginning of the chain.
Programming the RN2483
To get started with the shield the RN2483 LoraWan module needs to be programmed with the correct frequency channels, Device ID, Application Security key and the Network Security key. All these can be found in the iTalks interface. The application used for the current shields is called IASAPP and has application id BE-7A-00-30. In the devices section of the application in iTalks you can see an overview of the devices with Device EUI and Address. Clicking on the device will show the necessary keys. Make sure to program the NetwSKey and the AppSKey!
Programming can be done with the python script in the firmware/utils directory: https://github.com/mywdka/WdKA_IoT/blob/master/LoraWAN_Shield/firmware/utils/init_riot_shield.py
python2 init_riot_shield.py /dev/ttyUSB0 DevAddr NwkSKey AppsKey
To do so remove the two red jumpers and connect a USB tot serial adapter (TTL not RS232!) to the TX and RX pin on the module side:

Example:
[simon@aldeberan WdKA_RiOT]$ python2 init_riot_shield.py /dev/ttyUSB0 0125E1DF D8D87836076B304D757D13F5C9FD50BB C0908620ECD3C54498FAEFF34E467F5F
writing: sys reset

got: RN2483 1.0.1 Dec 15 2015 09:38:09 ( 52:4E:32:34:38:33:20:31:2E:30:2E:31:20:44:65:63:20:31:35:20:32:30:31:35:20:30:39:3A:33:38:3A:30:39)
writing: mac get deveui

got: 0004A30B001B64F5 ( 30:30:30:34:41:33:30:42:30:30:31:42:36:34:46:35)
DEVEUI: 0004A30B001B64F5
setting channel: {'dcycle': 302, 'status': 'on', 'drrange': (0, 5), 'ch': 0, 'f': 0}
writing: mac set ch dcycle 0 302

got: ok ( 6F:6B)
writing: mac set ch drrange 0 0 5

got: ok ( 6F:6B)
writing: mac set ch status 0 on

got: ok ( 6F:6B)

[...] other channels removed for brevity [/...]

writing: mac set rx2 0 869525000

got: ok ( 6F:6B)
writing: mac set rxdelay1 1000

got: ok ( 6F:6B)
writing: mac set retx 3

got: ok ( 6F:6B)
writing: mac set dr 6

got: ok ( 6F:6B)
writing: mac set devaddr 0125E1DF

got: ok ( 6F:6B)
writing: mac set nwkskey D8D87836076B304D757D13F5C9FD50BB

got: ok ( 6F:6B)
writing: mac set appskey C0908620ECD3C54498FAEFF34E467F5F

got: ok ( 6F:6B)
writing: mac save

got: ok ( 6F:6B)
[simon@aldeberan WdKA_RiOT]$
0004A30B001B64F5 18-4-2017 12:33:05 868.500 SF7 BW125 4/5 -106 5.8 33 188 2509003499990533
Payload: TTTT LLLL MMMM BBBB
- 2 bytes NTC (T)
- 2 bytes LDR (L)
- 2 bytes MIC (M)
- 2 bytes LittleBits (B)
If a sensor is not enabled the corresponding field reads 9999.
Resources
- RN2483 LoRa Technology Module Command Reference User’s Guide
- RN2483 Low-Power Long Range LoRa Technology Transceiver Module Datasheet
- RN2483 Low-Power Long Range LoRa Technology Transceiver Module Datasheet Errata


